Showing posts with label Finishes for 2021. Show all posts

Sunday, December 26, 2021

Year-End Wrap Up

It's always fun to look back to see what I made each year. I knew there weren't many quilts this year, but there were more projects and other bits, and I still like to have them all in one place, so here goes: Quilts, Other Projects, and Blocks. (Links are attached if you want to read more.)

Quilts 

1. Valued Bear Paws

This was a quilt that was started last year during the Quilter's Color Quest led by Rachel Hauser. At the time I made it, I said that I hoped to make more Bear Paw Quilts this year based on other blocks made in that workshop. Oops. Didn't happen. I donated this quilt to Margaret's Hope Chest for the Mother and Baby Program (for mothers experiencing postpartum depression or other perinatal distress).

2. I've Got the Blues

This quilt was originally intended to be a donation quilt, but my husband claimed it. The pattern is Chain Linx by Karen at Sugar Free Quilts.

3. Positivity Quilt

This quilt replaced the Blues quilt above for donation to Mercyful Quilts, a quilt collection by Bernie at Needle and Foot for end-of-life patients. Preeti at Sew Preeti Quilts challenged us to overwhelm Bernie with quilts and supplied patterns, layouts, tutorials and inspiration.

4. M's Birthday Quilt

This is a present for my brother-in-law to celebrate his 57th birthday (this week). He opened the quilt a few days early and is already enjoying it while visiting my sister-in-law. They sent photos. Yippee! (His smile is cropped out for privacy.)

Other Projects

1. Two pillows for my living room chairs

Both are from shopping my fabric drawers--a squirrel of a project.

2. Cosmetic bags, sunglass cases, and tissue covers

These were donated to Carole from my Carolina Home for the Safelight Domestic Violence Shelter.

3. Three placematsno

These are from leftovers from my Positivity Quilt. I'll be donating them to my LQS for the spring collection for distribution through Meals on Wheels. 

4. Purse for my granddaughter

It's based loosely on a pattern by Aleah at no time to sew.

5. Featherweight Cover

This was another squirrel project made from a piece of vintage fabric I found at a local antique market. Now when my machine sits out in the living room, the mess is a little more organized and prettier.

6. Scrappy Grands Projects


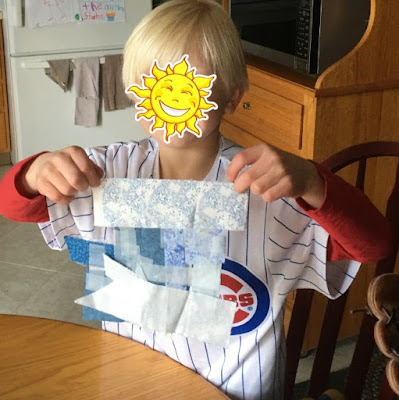
No, I didn't make these, but it sure was fun being with the grandkiddies after a long time apart. I taught my granddaughter how to make an accidental landscape wall hanging. My grandson got in the quilting spirit by making his own quilt block--with tape! During another sewing session, my granddaugher made a hand-sewn tissue cover and I made my grandson a teeny tiny blanket for a beanie baby, but somehow there are no photos.

Blocks

Much of my year was spent making blocks a little at a time for PQs (Potential Quilts).

1. 52 blocks (one each week) in the Rainbow Scrap Challenge colors and the Year of Scrappy Triangles patterns.

2. 48 blocks of the Confetti quilt by Rachel Hauser.

3. 121 hand-pieced 4-patch blocks from my scraps and vintage (by way of having them for so many years) fabrics. 

So...that's 4 quilts, 13 projects (plus the grandkiddie projects), and 221 blocks.

This coming year, I hope to add to the triangles and finish that quilt, finish the Confetti quilt, make more Bear Paw quilts and more placemats, and start fresh quilts with all the new fabrics I collected over the year.

Also, I hear there is another Quilt-Along with Preeti and Bernie for Mercyful Quilts. And who knows what else the year might bring?  

I'm linking up with Cheryl at Meadow Mist Designs for the Best of 2021 Linky Party. I know this is more than 5 favorites (but it is 3 sections), and I like to keep all my finishes in one place rather than have multiple year-end posts. I'm looking forward to seeing what you have to share.

I hope that all of you will unwrap a new year that's full of happiness, health and time for lots of quilting.

(Just a reminder: I'm not affiliated with any company, so when I mention products, services, or stores I'm just documenting what I used or liked.) 


Friday, December 3, 2021

Birthday Quilt

It seems like most of what I've done this year is blocks and small projects. There haven't been many quilt finishes. I'm not sure why that is, but I am excited today to share a quilt. Such a satisfying project. And I'm pleased to say that I finished it a whole month ahead of the gifting for my husband's younger brother's birthday. (He's not on social media, so I can safely share this now without ruining the surprise.)

M lives in a house with 4 other guys with special needs. Each of them has his own room. And this past summer, I got a glimpse of M's room when we picked him up for an outdoor family reunion after many months apart. I knew that I wanted to make him a quilt this year, but that brief visit was the inspiration I needed to make decisions about design and color. 

I've made this quilt design before. It's based on a colorful batik quilt I saw on Etsy several years ago. The site is no longer active, and I have no idea who designed it. If someone knows, please let me know so I can give credit. Anyway, the first quilt was this one I made for our  brother-in-law L in 2012. That one was smaller in both scale and size, but I knew that a larger size would work well, too.

M's room is a light yellow-green. The furnishings are wood tones. He has a charcoal-colored easy chair and a rug with grays and blues in it. I forgot to take a photo when I was there and had to rely on memory for the blues. I'm thinking (hoping) that they were somewhere between a medium and greenish blue. 

I wanted a scrappy look with prints that read as solids. (There are no solids in the quilt at all.) Most of them are from my stash supplemented with some new fat quarters. I started by cutting about 2/3 of the plain squares and then a variety of strips and squares. I had some vanilla/gray grunge fabric that I knew would stand out well in the flying geese and nine-patch squares. I made the flying geese first using paper foundations. It's my favorite way to make geese as it's great for getting good points. I put the nine-patch squares together webbing style like some quilters sew together quilt blocks. I laid out plain, geese and nine-patch squares first and then planned the colors and locations of the other blocks in place on my design floor aka living room carpet. (I was too lazy to go upstairs to my design curtain.) 


As I laid out the quilt, I added more plain squares in the colors I needed. Here are close-ups of the types of blocks in the design.

Plain

Flying geese

Nine-patch

Four-patch

Block variation 1

Block variation 2

Block variation 3
I placed the variations randomly after laying out the first three types of blocks, turning some in different directions. 

The backing is lighter than I envisioned, but I couldn't find one with blues and greens that I liked. So I went with a fallback fabric that I've used for years. I'm happy that it's still available at my nearby big box store. It is buttery soft, and while it might look like solid ivory from afar, it actually has a khaki vine print.

Please excuse the wrinkles. This was folded away over the weekend.

Can you see the vines?

I quilted with a khaki thread I hadn't used before, and my sewing machine loved it. I used my beloved meanders, so relaxing and one of my favorite all-over designs. 

My initials and date show up more than usual, but I always sign in the lower right corner. The geese were too small and the next block over just happened to be charcoal. I had to make sure I wrote neatly!


Here are the stats: 

Pattern: Unknown. Blocks finish at 6 inches.
Fabrics: Variety from stash and store.
Batting: Fairfield 80/20. (My machine loves this.)
Thread: Superior Masterpiece in Granite for piecing; Coats Egyptian Cotton machine quilting thread (30 weight) in Dogwood. I've never used it before, but my machine LOVED it, and I was thrilled that it comes on a cardboard cone (1200 yards). I wish my favorite quilting thread wasn't on a plastic cone. I really hate plastic waste. So it's nice to know this is available and that it works for me. I used a strong hand quilting thread in off white for hand sewing on the binding. It's no longer available, and now it's almost gone. Waah.
Binding: I think it's a Keepsake Calico in a mottled green.  
Size: 60 3/4 inches square before quilting; about 58 3/4 by 58 1/2 inches after quilting; about 55 5/8 inches square after washing on cold and machine drying on low. I expect it will relax a bit with use.
Machines: Singer Featherweight for piecing; Singer Treadle 115 for free motion quilting and  machine work on the binding.

Just a few more photos--


Hey, it matches my chair!

Yummy texture after washing

I love how quickly this quilt came together and that the plain blocks moved it along but not as alternate blocks but as part of the overall design. Must do this again. Gifty quilting is fun.  Any gifty quilts in the works for you this month?


(Just a reminder: I'm not affiliated with any company, so when I mention products, services, or stores I'm just documenting what I used or liked.) 

Saturday, August 28, 2021

Featherweight Cover

Look at this pretty little squirrel!

A few years ago I made a sewing machine dust cover for my treadle machine. Since then, I've switched it back and forth between my treadle and my Singer Featherweight which worked fine until this year when many of my projects are long-term ones, and both machines are sitting out. One is always collecting dust. A few weeks ago I came across a piece of vintage fabric at an antique mall. Well, I thought it was fabric, but it was a squirrel.

I suddenly needed a new sewing machine cover. Right away. And that is how my August started. Never mind that another quilt in progress was lying in pieces all over the house. 

I had just made a bag for my granddaughter, and it occurred to me that I could make the cover in the same paper bag style as the main part of that bag. (In fact, my other cover is also paper bag style, but made a little differently. I had forgotten until I just read the old blog post about that one.) If you want to check out that bag pattern by aleah at no time to sew, click here. My cover has fusible fleece on the back of every fabric piece, so it is very stiff. Also, I made the cover and lining each from a single piece of fabric instead of two pieces with a seam in the middle.

What do you suppose this print is supposed to be?? (Yes, that vase was an impulse buy, too.)

My fabric was 36 inches wide (old fabric was like that) and 44 inches long. I had to wash it because it reeked of old house (acrid, but thankfully, not smoky). It shrank a bit, but came out smelling fine.

I was so involved chasing that squirrel that I forgot to photograph the steps, but I made some drawings and took photos of my paper mock-up that might help you if you'd like to make a similar cover.

Yes, you may be distracted by that sunset art piece my granddaughter made.out of polymer clay.

First, I measured my Featherweight with the bed extension folded up so it would be compact.

Here are my measurements:

Here are the dimensions of the fabric pieces:

Main piece of outer fabric and lining (cut one of each):

L + W + 1 inch (for clearance) + 1 inch (for 1/2 inch seam allowances)

12 + 7 + 1 + 1 = 21 inches

 by

2 (H) + W + 1 inch (seam allowances)

2 (9) + 7 +1 = 26 inches              

Pockets (cut 2)

L + W + 1 inch (for clearance) + 1 inch (seam allowances

12 + 7 + 1 + 1 = 21 inches

by

desired height of pockets + 1 inch (seam allowances)

5 + 1 = 6 inches

Fusible Fleece  Cut 1 piece for each of the fabrics above, 1 inch smaller in each direction, 

so 2 pieces 20 by 25 inches, for outer fabric and lining

2 pieces 20 by 5 inches for pockets.

If your sewing machine is a different size from mine, the formula should still work if you plug in the numbers for the measurements of your machine.

Before I sewed, I made a paper mock-up to check my dimensions.

Perfectly snug.

I ended up having to piece the lining a bit because of the shrinkage of my fabric, and this is all I had left. I'll have to think of something nifty to make with it. 

I think if you bought about 1 1/4 yards of modern fabric, you'd be okay, but if in doubt, you could make a paper pattern to help you figure it out. This cover works best with a fabric with no directional print. Otherwise one side of your cover will look upside down. 

So here we go. I cut out the fabric pieces and pressed the fusible fleece on the backs according to product directions, centering it so there was 1/2 inch of fabric showing on all sides.

I sewed the pocket pieces right sides together along a long side. I understitched along the seam for stability. Not sure it's necessary, but it's neat. If you need to learn how to understitch, you can see here. I did my understitching about 1/8 inch from the seam. Then I folded the pocket section wrong sides together along the seam and topstitched about 1/4 inch from the edge. 

I laid the pocket section along the bottom edge (one of the narrow edges) of the right side of the outer fabric piece, aligning the raw edges. I sewed lines of stitching from the top of the pocket to the bottom edge 4 inches in from each side, and then stitched two more lines  between those for additional pockets. As an afterthought, I extended those stitch lines to the other narrow end of the fabric as sort of quilting lines. 

I folded the whole thing narrow edge to narrow edge right sides together, and stitched down each side from fold to lower edge. I trimmed the top edge of the seam allowance at an angle to reduce bulk. I repeated this step with the lining fabric. 

The next part is a bit tricky to explain. I turned the outer fabric right side out and poked my finger into the fold right where the seam comes together, then shaped it into a triangle like the ones you see on paper grocery bags. 
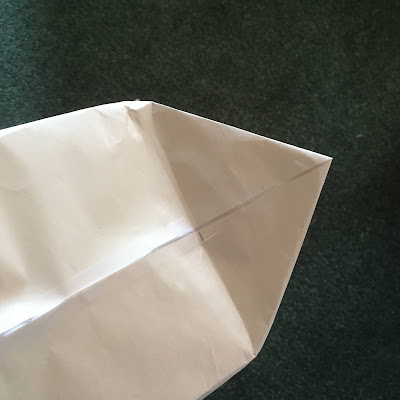
This is how that looks on my paper mock-up.

I like to fold these right sides showing. Then I stitched along the quilt line that I made when I sewed the pockets. That line at the base of the triangle is about 7 inches long. I did the same thing with the lining.

Almost done. This all takes much longer to write than to do. I put the two bag parts inside each other right sides together and stitched around the raw edge, leaving about 4 to 5 inches unsewn. Then I turned the bag right side out (think giving birth) and topstitched around the edge about 1/4 inch, which also closes up that open part. 

The last thing I did was fold the triangles down on both the lining and the outer fabric and sewed some big buttons through all thicknesses to keep the triangle flaps in place. (My buttons are handmade by an ceramics artist named Sandra Lance that I met on a trip to Vermont a few years ago.)

Now I have two dust covers so I can leave both of my machines out as much as I want. The older cover is a bit floppy because I used quilt batting. Maybe I'll make an extra thicker liner for it. If you want to see that old cover, click here

It sounds like a lot of work, but the prep (mostly figuring out the size and pressing the fleece) took the longest. Sewing took maybe 20 minutes. If I had read my old post before starting this project, I would have had two of my measurements instead of having to figure them out. Doh. 

I love how the cover is stiff enough to hold my sewing tools. To keep my little sewing scissors from poking holes, I slipped an empty thread cone into the pocket, and they sit just fine. 


If you have lots of sewing notions, you could add pockets to the other side. But there seem to be enough pockets for me. I put smaller items (seam ripper, ruler and hera marker) in a little scavenged plastic sleeve so they wouldn't get lost in the pocket. 


One more photo.


I hope you enjoyed my little tutorial. I am not a designer or pattern writer. Obviously! So I have to say this is what worked for me. (That's why I wrote in first person instead of imperative). So take it with a grain of salt if you want. (That's imperative.) If you do want to try it, though, I strongly suggest making a paper mock up (without seam allowance) to make sure you're on the right track, I'm sure there are other bag patterns out there that are similar or more succinctly described, but at least this post will help me remember what I did if I ever need another cover (and remember to read this post before I start working).

I'm linking up on the last Saturday of the month with Sandra at mmm quilts for DrEAMi (Drop Everything and Make it), 'cause that's just what I did.

Now, back to regular sewing...

(Just a reminder: I'm not affiliated with any company, so when I mention products, services, or stores I'm just documenting what I used or liked.)  


Sunday, August 22, 2021

Positivity QAL Link-up 3: Finish on Location

Lots of photos today. After a year and a half of photos only on the garage or in the yard, I went crazy getting some while out and about. What fun (but also always a bit self-conscious)! My Positivity Quilt for Preeti's challenge to benefit Bernie's collection of Mercyful Quilts has been finished for awhile, but this is the final link-up party to celebrate.  

First, let's get the obligatory garage photos out of the way for documentation.


Closer


The back used up a lot of the leftover fabric.


Initials and date. (Marker disappears when washed.)

Okay, let's take her on the road. We decided to visit some of our favorite spots on campus after a carillon concert at our local university. 

A bench near the music building:

A lovely old tree branch:

This spot was striking in the evening sun. I took a closeup, but I prefer this one with the arch of the entryway.
My husband had classes in this building in grad school.

On to the garden by the fountain.

Let's look at the back again.

Don't forget we came here to see the fountain.

We weren't done yet. To get back to our car we needed to walk past the art museum. I have to admit I don't care for this building in this old area of the campus. It's a modern piece of folded metal. I like old brick. But it is an art museum. If you'd like to see the whole museum, click on this link. It is a neat place for a quilt shoot.


How about that Dr. Seussian grass? It matches the green in the quilt.

We stopped at Andromeda, dancing in the median. This is not her best side, but I would have had to stand in traffic. (I know there's none there, but the traffic light was about to change.) If you'd like to see a better angle, here's a link to a photo
So we went to her friend Cassiopeia, my favorite quilt model.
The tee-shirt store behind her was likely a casualty of the pandemic. I feel sorry for the owners and workers, but I think Cassiopeia's surroundings are much improved without the advertisements plastered on the windows behind her. And now you can see the reflection of the campus building across the street. I wonder what she's contemplating this evening.

Here are the stats:
Pattern: A variation of a Plus quilt suggested by Preeti (Sew Preeti Quilts) for the Positivity Quilt Along.
Fabrics: Blues and yellows are mostly scraps from many years of quilt-making; Also some new yardage, especially for the background and backing. (Sorry, I didn't keep track of what they were, but those pluses in the background were serendipitous.)
Batting: Fairfield 80/20. (My machine loves this.)
Thread: Superior Masterpiece in Granite for piecing; Superior King Tut in Temple for quilting, and I think Superior Treasure in Little Prince (variegated blues) for hand stitching the binding.
Binding: Scrap pieced from leftover navy fabrics. 2 1/2 inches cut, double layer, machine sewn to front and hand stitched on back. 
Size: 80 1/2 by 60 1/2 inches before quilting; about 59 by 78 inches after quilting. I forgot to measure the quilt after washing. Oops. But I'm sure it's a few inches smaller each way. 
Machines: Singer Featherweight for piecing; Singer Treadle 115 for walking foot quilting and  machine work on the binding.
Previous posts about this quilt: Here and here.

Here's the quilt all washed and ready for her trip to California. She didn't want to travel alone, so she took a friend with her. 


I hope this quilt will bring comfort to a hospital patient and loved ones. Thanks to Preeti for inviting us to build this collection of quilts for Mercy Hospital and providing all the design ideas, and to Bernie for always keeping us updated on the needs of this special program. I'm looking forward to seeing all the positively wonderful quilts that everyone has made this summer. By the time you read this, the Quilt Along will be over, but the need for quilts goes on, so if you feel moved to do so, you could still make a quilt and send it along to Bernie. The quilt along was spread out for a long time to give quilters time to work throughout the summer, but the quilt sews up really fast, and there are lots of ideas for making/setting the blocks at Preeti's site Sew Preeti Quilts. Or you can make a quilt of your own design or choosing.

Oh, and I did use my bonus HSTs from the snowballed corners in the quilt to make some placemats. You can read more about them in the middle section of my last post here.

I hope your summer has been positively wonderful. Do continue to take care of yourself and others. You know what I mean.

I'm linking up with Bernie at Needle and Foot for our final party. Come join the celebration!

(Just a reminder: I'm not affiliated with any company, so when I mention products, services, or stores I'm just documenting what I used or liked.)