Showing posts with label ornaments. Show all posts

Wednesday, December 31, 2025

Year End Bits and Pieces

Oh, my!! Please ignore all these blue words and search links. Blogger has come up with something new: inserting search links. Apparently, my pinkie finger keeps hitting the pencil thingie while I'm typing and all these links are appearing. It seems that I can't cancel them unless I notice them immediately. How ridiculous! Okay. Carry on. Here's the real beginning of my blog post... 

Whaat? I haven't posted anything here since the beginning of August. What's more is that I haven't done much sewing either. We did have many spots of joy this past fall--two vacations (one on Lake Huron and one on Lake Michigan), train trips to watch our grandkids' volleyball, and choir and band concerts, bike rides and hikes, a birthday shopping trip with one of our grands and then holiday fun. Those activities were just spread out enough that I didn't feel like starting new quilt projects in between.  And, to be honest, there were times when I just didn't have the motivation to create. I did more reading than usual--some to educate myself, but often for escape to try to distract from numerous discouraging and maddening events in the news. And--confession here--a little too much doomscrolling.

But I did make a few things and I want to make sure to record them here before the year ends. 

First up, three more placemats from the scrap bins. I made these at the end of August and beginning of September and brought them on vacation to stitch the binding on. No photos on location, but here are some I just took on the guest bed. They will be donated to Meals on Wheels in the spring. 


Closer looks:


This one has some favorite old floral prints along with green prints collected over many years. The back is strips of the same fabrics.


Such a quick way to use up scraps and make a two-sided placemat.

I had a bunch of pieces of blue, both modern and very old. This time I made a striped front. (I was really in a hurry because I wanted a take-along binding project and this was just a few days before vacation.)


The back was one of the final scraps of a quilt I made for a niece and her husband more than 24 years ago. Another way to speed up this little project.


The third quilt--maybe I made this one first before my need for hurry set in--was from leftover bits of a quilt I made for donation a few years ago.

And another quick backing.

Lighting is a bit dark here. I squiggle quilted all three placemats (because hurry, hurry). For this one, I used variegated rainbow thread. During the evenings on vacation I stitched the bindings down by hand. Each placemat is approximately 14 by 18 inches.

During November, I always make Christmas ornaments for my Grands based on their Halloween costumes. I have been doing this since my oldest was not quite 1 year old (She's 14 now), so it's definitely a tradition. I've made them in various ways, (tiny quilts, modeling clay, cross stitch) but my favorite is with felt, as I did this year. This year's batch is a penguin, Benny the Bull mascot, and Jack Skellington and the Pumpkin King from Nightmare Before Christmas. I used online coloring pages to help me make my patterns. Not quilting, but a fun sewing project. Unfortunately, the bottom two ornaments haven't been delivered yet because their owners had the flu and missed our get-together. Hopefully we'll see them soon. (I am confident that they don't read my blog so I'm not spoiling the surprise.)

 
A few weeks before Christmas, I heard that a nearby quilt/gift store was collecting handmade stockings to fill with PJs for foster children. They published a simple pattern online. With a quick browse of my fabric bins, I found a few pieces that would work to make three stockings, some with some extra piecing to make them fit, but it was easy sewing done in an afternoon. 
Here they are from one side

And here, showing the different other side of one of them.

They aren't quilted, but are from quilting fabric, so that also counts as a project, right?

Finally, I made a last minute project--a head rest cover and two arm rest covers to protect my husband's new dark green recliner delivered just before Christmas. We found the perfect twill fabric at a new-to-me sewing store. I quilted three rectangles onto batting pieces and then lined them with fabric from my stash. and shaped two of the rectangles with buttons to go around the arm rests. 

I was thrilled to find the fabric I was hoping for. The store is delightful--a small collection of quilting, garment and decorator fabric. A good upscale replacement for some of the things I used to buy at a certain big box store. The store apparently specializes in sewing lessons, which thrills me, as it is the greatest hobby that everyone needs to learn, amIright? And Gramma hobbies are going to save our sanity.

Speaking of which, my granddaughter asked her parents for a sewing machine for Christmas this year. Yay!! She took it with when visiting here and together we learned how to use it. She wanted to applique some flowers on a hoodie, so we did that too, all in an afternoon and a morning. I had to learn a lot right along with her. I had only minimal experience with fusible web and had never used a zigzag stitch. She caught on quickly to everything. We looked up manuals online and watched a lot of videos to learn about threading the machine and using it. She finished the whole project while she was here. L is an entirely different kind of maker than I am. I'm a planner, she's a free spirit. I followed her lead, and it was so much fun to watch her. 

Sewing with L was so much fun, it might just be the motivation I need to get back to quilt making again. Winter is a good time for that.

I was going to include some photos from our vacations (pretty scenery and barn quilts) but this is getting long, and I still need to do one more post of my end of the year wrap-up. So, I'll just leave you with this photo of Darryl the squirrel checking out our fake wreath (they are not impressed). Maybe I'll post the other photos in some future posts.

So with that let's say goodbye to 2025. Here's a little dumpster sketch I drew on my grocery list this morning to help us do that. May 2026 be a better year in every way. Keep hopeful, keep quilting.

.


Saturday, November 26, 2022

Bunk Quilts

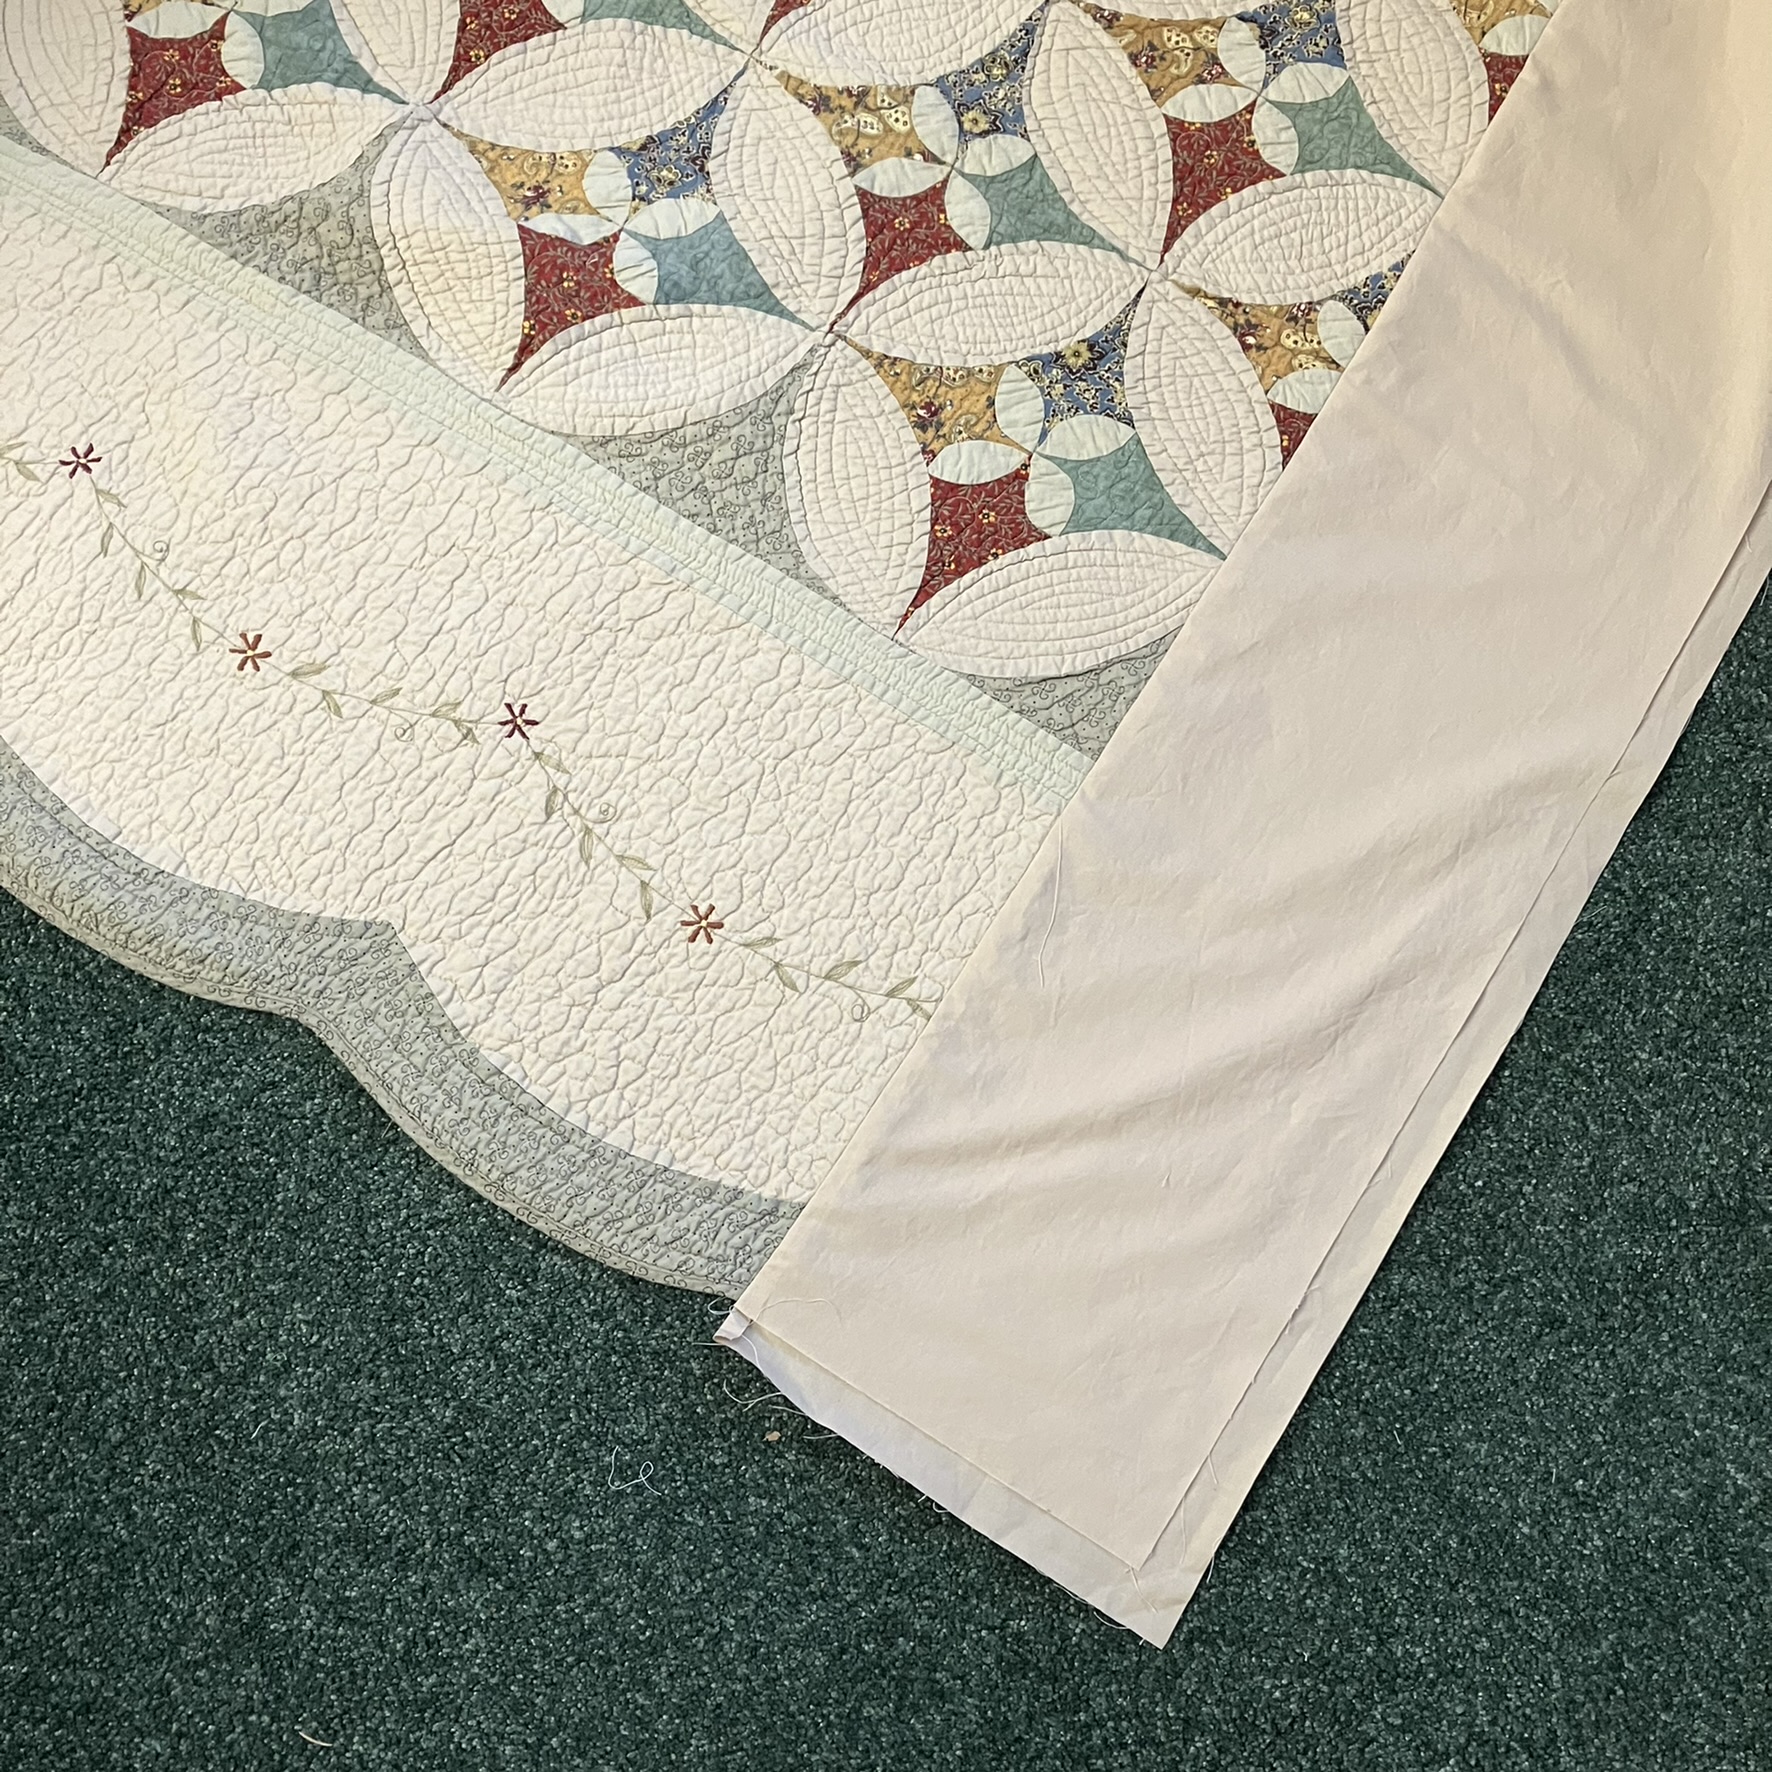
Squirrel!! Yes, I know I have two quilts to finish up if you read my last post, but something else distracted me this month. Here's the back story: We recently ordered a bunk bed set to keep our grandkids a bit more comfortable when they come to visit.  After we put the beds together, I started thinking about what to do for bedding. The twin bed that the bunk beds replaced had a rather inexpensive store-bought quilt, an odd square size meant for a queen bed. On the twin bed it had draped down to the floor with the excess stuffed against the wall out of sight.  Even though I'm not fond of store-bought quilts for several reasons, I do like the pattern and quilt design on this one. It's a bit skimpy for a queen bed, though, and wouldn't work in our other guest room. So, what to do? It seemed wasteful to make two new quilts and send this one to the back of a closet (although I could have donated it). Well, why not cut it in half and add a bit to each piece to make them big enough? So I did...

So that's it. That's my squirrel. Unless you'd like to see how I did it. (Well there is another squirrel at the end of the post, but first things first.

So, first, I found one of my Kona fabric swatches that was a pretty good match, and my big box fabric store had it in stock and substantially on sale.Yay! Well, I guess Khaki is a pretty commonly stocked fabric. I bought about 1/2 yard more than length of the quilt, pre-washed it, and sliced it lengthwise down the middle. With a bit of measuring, I figured that I could make a border along one side of each half-quilt about 9 inches wide. From each strip, I cut a border 9 1/2 inches wide (border width plus 1/2 inch seam allowance) and 10 5/8 inches wide (border backing width plus 1 1/8 inches allowance for fold-over binding plus 1/2 inch seam allowance). I made sure that I also added the binding allowance to each end of the border backing fabric. Sorry, no photos of the cutting. I was just making it up as I went to make the most efficient use of fabric, but I think you'll see from the next pictures what this looked like. 

To attach the borders, I first pinned the backing to the raw edge of the back of the quilt, extending it over the ends by 1 1/8 inches. (I pinned from the front here, which wasn't necessary.)


Then I pinned the border front to the right side, sandwiching the quilt edge and aligning the border with the ends of the quilt.

Pardon the shadow of my camera. I was working under strong LED light in my basement.

I sewed a 1/2 inch seam along the quilt edge. Here you can see the two border parts after sewing with the border backing pulled out away from the quilt.


And with the borders right sides together. You can see the extra fabric showing on the backing.


I drew a line on the backing to show the extra fabric. Then I cut batting the same size as the front border and carefully laid it out on the wrong side of the border backing overlapping the seam allowance. I had initially thought of laying it up to the seam allowance, but this seemed to ensure a neater transition from the quilt to the added border. My batting is pieced, as I was using leftover bits from other quilt projects.
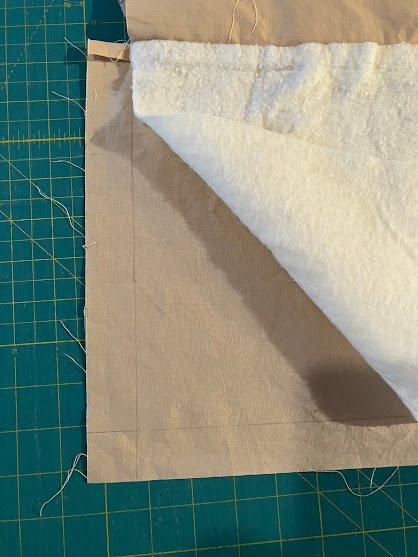
Corner pulled back to show the line on the backing.

I basted the batting in place to keep it from shifting over the edge.


After that it became a typical quilting project. I pin basted, then quilted a straight line a generous quarter inch from the main seam (with walking foot) and then free motion meanders similar to the ones in the border of the original quilt. I forgot to photograph the binding process. I folded the border backing toward the front all the way to the seam line (behind the seam allowance) and then folded it again to form the binding on the front. I could have machine sewed it down, but I love to relax and hand sew a binding, so that was what I did. Mitering the corners was a bit fiddly with those layers, but it worked.  


So here are the finished quilts, as much as I can show on my living room floor. They look different sizes here, but they are exactly the same size.

I know they are a little strange. I admit that for a second at the beginning, I considered trying to match the border to the original quilt, scalloping it and even doing some embroidery. Luckily, because this was a squirrel project, I quickly came to my senses. Because the whole point of this addition is to make sure the quilt is wide enough to be comfortable to the person under it. When the bed is made it's tucked down on the side of the bed against the wall and no one will ever see it. So no need for a fancy finish. I'll be interested to see how the quilts look after washing, when the meanders crinkle up a bit to match the rest of the quilts, but I don't plan to wash them until they've had some use.

Here's a close up of the quilting and transition. You can see that there is real applique and hand-guided quilting on the original quilt, which is why I like it, although someone was probably paid pitiful wages to do this. (Come to think of it, that is always the quilter's lot, isn't it?)


And one last one of the beds ready for the kiddies. By the time you read this they will have been slept in. 


If you think I was done with squirrels after this, you would be wrong. I won't bore you with the details, but this bedding project also included cutting and hemming a huge thermal blanket (it must have been meant for a king size bed--which we have never had-- and it was always drooping off our queen sized one), to make two bunk blankets, and reworking an old contour twin sheet (truly Frankenstyle, adding material to the corners and then recontouring them) for one of the bunks. It had shrunk so that it was somehow too tight for even a bunk mattress. Recycle, Repurpose, Reuse!!!

And...one more little project I have to show you because it's soooo cute! And fun! I was making my usual Christmas ornaments for the kiddies' stockings the other day (inspired by their Halloween costumes), and suddenly had the urge to make just one more. I had seen this fabric origami star by zencrafting and just had to Drop Everything and Make it. It was such fun, and only took a few minutes. It's made with a freezer paper lining which keeps it nice and crisp. Since vintage fabric designs seem to be trending now, all I had to do was look through my drawers of fabric, which have become vintage without even trying. I used 4-inch squares for my ornament parts as 5 inches seemed a bit larger than I wanted. A quick look through my button jar yielded just the right buttons to finish it off. This ornament will top off a holiday gift. Now I might have to make one for myself. Ooh, was that another squirrel calling?
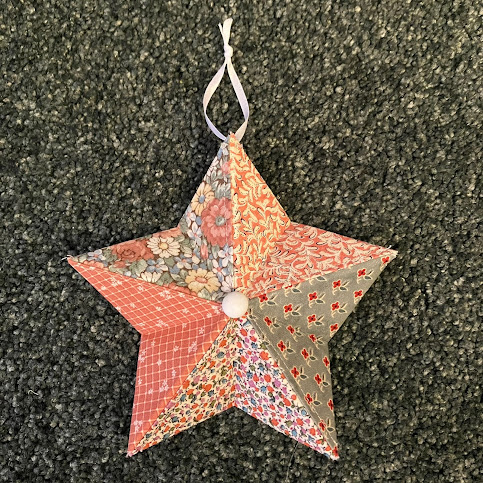
Front (convex side)

Back (concave side)

I'm linking up with Sandra at mmmquilts for DrEAMi (Drop Everything And Make it) because that is all I've been doing this month. I hope you are having fun preparing for whatever holidays you celebrate at this time of year. Next time you read this, I just might have gotten back to the sewing I was planning to do.

(Just a reminder: I'm not affiliated with any company, so when I mention products, services, or stores I'm just documenting what I used or liked.) 


Friday, December 21, 2018

Holiday Sewing

Still no quilting going on here--it's been about 2 months now. Definitely a dry period. I was hoping to finish up two small quilts to donate, but I'm realizing now that I'll enjoy the quilting more if I wait until the new year. The quilting "studio" has been used from time to time this fall as a guest room, and now I don't want to mess it up only to have to clean up again in a few days. We've also been out of town a few times this month for family-related needs and gatherings. I wasn't going to do a blog post, but hey, I have done a little sewing, and even though it's not quilting, there were layers of fabric involved, so I can share them. They are surprises, but for little folk, so if their mothers happen to glance at this, I'm sure they will keep the secrets safe.

First up, a few weeks ago I suddenly realized that our littlest grandson needs a Christmas stocking. So I scrambled through the fabric bins to find fabric that coordinated with the stockings I've made over the years for his cousins and brother. These projects are always made on the spur of the moment with less than stellar sewing techniques--super homemade-y, but fun. I managed to find some bits of the dark green I used for his brother's stocking (I had to piece three scraps to get the size I needed) and found most of the fabrics (or close enough) I had used in the other stockings for the light bulbs. I only had to buy a little twill tape for the "string." Here it is waiting to be filled. I've rubbed out most of his name for privacy.

I also made a little soft book for A. It's from a panel by Shelly Comiskey for Henry Glass. 

This page cracks me up. Unicorns are real, people!

Each year, I make ornaments for each of my grandkiddies based on their Halloween costumes. I don't know why I started doing that, but by now it's a tradition. Sometimes I quilt them, but I also like to make them from felt. This year, L was the Princess in Black, based on a book about a princess (dressed in frothy pink) who turns into a super hero (dressed in black) to thwart monsters who are going after the country's goats. (Really.) The princess's logo is a magnolia blossom, so L is getting her own magnolia ornament this year. Through the magic of technology, I can show you the front and back at the same time.

C was Thomas the Tank Engine for the second year. Since I gave him a Thomas ornament last year, I had to come up with something else this year: the windmill from the Island of Sodor (where Thomas lives). I used a brad to fasten the windmill blades so he can turn them.

Little A didn't really wear a costume, but he did wear his little bear fleece, complete with ears, to make the rounds for Trick-or-Treating. So, of course, he needed a little bear. I found  this one as a coloring page online. Now I can't find it, argh! But there are lots of similar ones.

I was stumped when it came time to make E's ornament. He had chosen the Bumblebee transformer costume this year (never mind that he had no idea who Bumblebee was). I had no idea how to make the character in felt. Finally, I found this pixel coloring page math worksheet, and made it in counted cross stitch. What fun. I hadn't done cross stitch in quite a long time. In this version, Bumblebee transforms into a Camero, I think. In the new movie, I think it's a VW. Kind of abstract, but it does relate to the costume of choice this year. I used 18-thread cross stitch fabric and made the X's over three threads, except the date, which is over one thread. 

I thought that might be the extent of my sewing this season, but the other day, my daughter-in-law asked if I could do a tiny project. E had been asking for a super hero cape. She sent me the links to these two tutorials: Pennies into Pearls and The Bears Four. I mashed the two patterns using the neckline from the first and the width and logo of the second to make a cape worthy of a super hero. And, why make one cape when you can make four? Here's E's cape (modeled by Mr. Bear):

And here they are all together:
 Little A's is really a bib, but definitely not a drool-catchy one. I figure he can wear it as a cape during tummy time. It will give him super power to endure it. I made these all out of two layers of satin, with the shiny side out on the top layer and the matte side facing out on the lining. I'm hoping that will make them a little less slippery against clothing. It also made it a snap to sew without slippage. (I can't guarantee there won't be static, though!) I don't have a zig-zag sewing machine, so the shields and letters were a little fiddly. I used freezer paper for patterns for the shields and some stabilizer behind the letters, which I turned under and appliqued with a straight stitch. Except A's. His letter was so small that I did raw edge applique with the stabilizer (yes, I know fusible web would have worked, but I had the stabilizer on-hand) and put some fray inhibiter on the edges. The logos are cotton fabric instead of the recommended felt because I wanted the capes to be machine washable. (That also reduced my fabric scraps somewhat.) Well, that was a fun project. Not as tiny a project as my DIL envisioned, but now we can have a whole houseful of superheros. As opposed to squirrels, as these capes certainly were for me.

But I wasn't done yet. I decided that A needed some fresh bibs for his stocking, so I kept sewing. The bigger bib is based on one similar to this one (I don't know where I got the original), but I modified the shape to fasten it on the side. The other style is this bandana bib. These are so much fun to make--kinda like eating potato chips. You can't stop at one. Just keep going until you run out of fabric.

They're reversible.
I had to put that baseball print on in honor of my husband's and son's favorite baseball player of all time getting voted into the Baseball Hall of Fame last week. Go Harold Baines!

So there they are, not quilts, but layered sewing projects. I guess I did more sewing than I thought during the last few weeks (mostly the last couple of days). 

I may try to do a planning post (yes, me, planning--or maybe I should say "planning") as well as a year end wrap-up if I can in the next few days. We don't start hardcore celebrating until after Christmas, so there may be time. 

Meanwhile, here's my view from my chair: our Charlie Brown tree. Since we were out of town, we waited to get our tree until the 17th. There were only 5 left of the kind we like at the tree lot we go to. This was the best. And hey, when you get a tree that late, it's 50% off. (Not going to be a tradition, though.) Actually, the tree is okay. Lots of stiff branches and spaces for hanging ornaments. I just really get a kick out of those random poky branches sticking every which way. It looks a little bare under there. I'd better get wrapping.


Oh, and how about some comfort food? My daughter shared this Skinny Crockpot Loaded  Potato Soup link with me from The Chunky Chef. We added the optional carrots and celery as well as some leftover chicken. YUM YUM! (And good eats for a sewing day).
I'm linking up with Sarah at Confessions of a Fabric Addict for Can I Get a Whoop Whoop, with Wendy at Wendy's Quilts and More for Peacock Party, and if there is a DrEAMi party at Sandra's mmm! quilts at the end of the month (I'm not sure of the holiday schedule), I'll link up there, too, because there were definitely some squirrels this month.

I hope you are enjoying your holiday season this year. I'm going to try to be back in a more regular way next year. I have lots of pent-up quilting energy, so there may be more quilts to share. 

Together, let's enjoy the new year the way quilters always do, changing the world for the better, one quilt at a time.

Wednesday, January 4, 2017

Happy New Year!

Hey, I'm back from my blogcation. I had a good time doing mini posts on Instagram this past month. I usually forget to keep up with that part of social media, but now that I'm a bit more in the habit, maybe it will stick. Anyway, it was fun to get some snaps of my holiday prep and activities. The past few weeks have been a whirlwind, but what fun! And now I can share some fabric-related activities that I couldn't share before because my little projects are all in the hands of their new owners. 

For the past five Christmases, I've been in the habit of making my granddaughter a felt applique Christmas ornament that represents her Halloween costume. This year, I decided to do the same for my grandsons. It was a challenge because the Grands had fairly complex costumes, but by tracing my patterns with freezer paper and ironing the paper to the felt, I was able to cut out precise pieces with my embroidery scissors. I was thrilled with how they turned out and with the reactions I got from my Grands when they found them in their stockings.

For Halloween, my granddaughter was Owlette from PJ Masks (a children's cartoon about kids who turn into superheros and do good deeds at night when they are in their pajamas). My older grandson was a golfer. He's not quite two years old, but he loves to hit golf balls and has perfect form. And my younger grandson was a monkey with a stuffed banana sewn to his costume. For the ornaments, I found clip art online to help me with the basic designs, and I chose felt colors and embroidery thread to match the kids' costumes. 

Here they are:

I stuffed each one with a bit of leftover batting (always looking for ways to use up those odd pieces). 

I also give ornaments to my kids every year. And this year I made a couple of extra ones for my physical therapist and my hair stylist since I had appointments just before Christmas. I can do handwork pretty well now, but using a sewing machine has been more challenging lately--partly because of aches and pains from rehab activities, but also because I've needed to keep the mess to a minimum while getting ready for guests. But I still wanted to use fabric, so I decided to make no-sew ornaments.

I found a folded star ornament that is EVERYWHERE on the internet. It seems that most people attribute the directions for the ornament to Sophie Legarth in this tutorial. Because the tutorial is not in English, I looked at a lot of other sites, too. I probably used this one by Betz White the most. But no matter what tutorial I looked at, I had a lot of trouble with the last step. There's nothing wrong with the tutorial. I just have a really hard time following pictures. I need lots of words to go with them to describe the process. I finally figured out my own way to stuff the ends of the fabric into the star, and I can't even tell you how I did it. All I know is that for each ornament, I had to figure it out all over again when I got to the last step. So these little projects took way longer than they needed to, and I pretty much had to limit myself to making one a day to keep frustration to a minimum. Really, they were fun, though. And my ornaments are quite puffy and tight, so they should stay together pretty well. 


The ornament on the upper right is the one I made for myself for practice. The two red, white and blue ones went to my son-in-law/daughter and to my physical therapist to celebrate the Cubs' win of the World Series (They are fans. Well, my daughter is a White Sox fan, but she was happy for my son-in-law.) The other two went to my son/daughter-in-law and to my hair stylist with no particular reason for the colors except that I liked how they looked together. 

These ornaments were not messy to make. Except for the mess of choosing the fabrics. You should have seen the bed in my quilting room. A fabric explosion! I had a really easy time picking out three fabrics that I liked together, but the fourth was always a challenge. By the time I was done choosing dithering, there was a HUGE pile of scraps on the bed. Because I needed to get it all cleaned up for company, I may have indiscriminately stuffed the mess into my scrap drawers. Oops! No, not the drawers in my closet. Those are still nice and neat ever since I did the major closet reno. These drawers are in a dresser. If I were the kind of person to make New Year's resolutions, one would definitely need to be to get all those drawers back in order again. We'll see. I kept my hand sewing area by my chair neat by using my "garbage vase." 


Yes, I know some of those scraps look salvageable. Maybe I'll go through them before I dump it out. It was so cheery looking, I left it out over the holidays.

Oh, one more thing--someone mentioned that it might be fun to have the recipe of some cookies I posted on Instagram. I usually make my go-to cookies over the holidays: Heath Bar cookies and cream cheese cut-out cookies. This year I also made some simple butter cookies with vegan "butter" for one of my grandsons, who can't have dairy right now. The Heath Bar recipe is my favorite. It was my mother's, and I don't know where she got it, but the cookies always disappear quickly. Yup, they're that good! Delicate and crispy.


I used to make them with a margarine brand that's famous for baking in my area, but the formula seems to have changed, and the cookies don't turn out as well with it anymore. So I went with real butter and upped the flour a bit from the original recipe.

Here's the revised recipe for anyone who'd like to try it:

Heath Bar Cookies  
Cream 2 sticks (1/2 pound) salted butter with 3/4 cup white sugar. Add 1/2 teaspoon baking soda and beat. Mix in 1/2 teaspoon white vinegar, and 1/2 teaspoon vanilla. Add 1 3/4 cups flour, somewhat packed. Chop 3 Heath Bars really fine (or use half a bag of milk chocolate Heath bar toffee bits, crushed a bit smaller) and mix in well with the above dough. Cool in the refrigerator for about 1 hour. With floured hands, roll dough into small balls (about the size of large marbles). Flatten out each ball very thin on a cookie sheet with a floured fork in a criss-cross pattern. Bake at 300 degree oven for 20 minutes or until light brown. This recipe makes about 60 cookies (if you don't eat the raw cookie dough while you're working). 

So, now, a new year. I fervently hope it will be a good one for our whole fragile world. If you live in my country (or even if you don't) I think you know what I mean. I'll keep doing my best to make it a better place through quilting. I'm not one to make resolutions (although I do enjoy reading everyone else's). I probably should clean up those messy drawers, though. And I do know that I have the same goal I've had for the last 4 (yes, 4!) months. To regain the full use of my left arm so I can sew and quilt as much as I want to again. I think that's enough. (And I will try to get in the habit of regular posts again.) As always, I'll continue to enjoy everyone's wonderful blogs, photos and quilts. 

Looking back over this post, maybe I should have called it Hodge Podge. Oh well. That's just how things are right now.I have three projects in process. Two are fall quilts and one is a summer quilt, so I think for the new year, I'll start something new to boost my enthusiasm and mix in something less seasonal. Stay tuned, and check out my Instagram feed (button is on the right sidebar) for a peek at the fabric. 

I hope the new year is a wonderful one for you, quilt-wise and every other way. 

I'm linking up this week with Freemotion by the River, Confessions of a Fabric Addict and Crazy Mom Quilts.  

Wednesday, January 6, 2016

How I Spent My Blogcation

Whew. I just finished putting the last of the Christmas decorations away (except for a couple of things I'll keep out through January). And my blogcation is over. 

So now it's time for my essay--you know kind of like the one kids have to write in school at the end of their summer break. How did I spend my blogcation? Let's see. (If you want to, grab a cuppa something. This is long!)

We waited a long time for our family Christmas celebration this year. My dad's birthday is on December 31, and when we found that we could get 19 out of 21 members of his family together (including all 6 of his great grandkiddies) at my brother's home to celebrate his 92 years, we decided to delay our Christmas celebration so that our kids could participate without having to travel twice. All of this meant that we were alone on Christmas. And the weather was unseasonably warm--in the low to mid 40s F. And sunny. With no wind. So we did something we've never done before on Christmas. Bike ride! Our favorite trail was blocked by some flooding so we took to the country roads. I just have to show a few pictures because who knows if this will ever happen again. What a beautiful day! (By comparison, today is in the 20s with snow on the ground.)


Christmas tree farm--all was calm


Wheat in winter


We had a great time with extended family at Dad's birthday party--and then with our own family (9 people and a granddoggy) back at home for our Christmas on New Year's Eve. Our kids had to share bedrooms with their littlest ones (sorry, kids), but it was fun having a full house. And our granddaughter had to wait hours to open presents because first C needed to be changed and then E needed to be fed and then E needed to be changed and then C needed to be fed and then C needed to be changed...well, you get the picture. But L was very patient, and I think it was worth the wait. 

So how else did I spend my blogcation? In addition to the holidays, we had four birthdays to get ready for (My daughter, granddaughter, a brother-in-law, and my dad)--actually, six if you count that I always get a present for my dad in memory of my mother's December birthday and that we have one more birthday to get ready for this week (C is turning 1 year old! I know. I can't believe that's happening already.) So there was a lot of shopping for presents. Some travel for birthday parties. Some cookie baking. Some cake making. (I can't take credit for that--that's my husband's talent.) Decorating (of course). Some mending of two princess dresses at the request of my granddaughter. (She was very specific about what needed to be done--I felt like the royal seamstress!) 

And just a little secret sewing. 

First of all, I needed to make some more Christmas stockings. L was born 4 years ago on Dec 2. I stayed with her family to help out for about 2 weeks and then went home to get ready for Christmas. So her stocking that year was hurriedly made with scraps I had on hand. I was going to do something different for E's stocking this year (he was born at the end of October), and then I suddenly remembered that C needed a stocking, too, because he was born in early January. I rummaged in the scrap bins and realized that I had most of what I needed to make two more stockings like L's. I bought one little piece of fabric for the cuffs, and a strip of twill tape for the cords to hang the light "bulbs." I couldn't get the ecru color I wanted for the twill, so I bought white and tea dyed it with a leftover tea bag. 

Here they all are. I like that I used the same hurried style--hardly any measuring, bits and pieces of leftover fabrics, scrap batting, an old cut-up sheet for the back--and that they all go together. They hold a lot, too. (The names are hand embroidered--covered up with a bit of batting for this picture.)


Every year I make ornaments to put in the kids' stockings. Now that they are both married I give one ornament to each couple (and make one for our tree) and then one for each grandkiddie. For some reason, when L was a year old, I started making her ornament to reference whatever costume I had made for her for Halloween (So far she has a penguin, an owl, and Dash from the Incredibles). This year, she wanted to be Skye from the cartoon Paw Patrol for Halloween. It was a pretty complicated outfit, and because we were waiting for E's birth at the time, it seemed like too much work. Also, the outfit was available for much less money in the stores. So her costume was purchased. But I was able to make an ornament that looks like Skye's badge. I built up the design using felt applique. A fun project for evenings watching bad Christmas movies on TV. In the cartoon, Skye flies an airplane to make her rescues, so her badge has propellers on it. I based the design on various pictures of her badge that I found online.


For the boys' first Christmas ornaments, I decided to make presents since they were our presents this year. I did improv piecing--no pattern, although I started with a drawing on graph paper so that I'd know where I was going with the design. It probably would have been easier in some ways to do a paper pieced design, but I just started sewing bits of cloth together to make a bow until it looked right to me, and then I used a ruler minimally as I added the pieces for the gift boxes and ribbons. It took FOR. EV. ER. I spent a couple of days on each ornament, but it was worth it and so much fun to see the design emerge. They turned out exactly as I pictured they would. I added a little frame for a faux binding and then sandwiched the tops with batting and backing and did a bit of quilting around the presents. I used a permanent marker for the boys' names (blurred out in the pictures) and the date. They are about 4 inches square (and really are square, even though C's looks wonky in the picture).


For the adults' ornaments this year, I made stars based on this Pentagon Folded Star pattern from Love Quilting. I made my pattern about 3/4 inch smaller on each side, and I stuffed a small piece of batting inside to puff it out a bit before quilting. 


Here's the finished version of our ornament:


I followed all of the steps from the pattern, but here's the little extra step I took to stuff the batting in. After I folded each point of the pentagon in and pressed it, I unfolded one point and cut a little slit on the fold line in the yellow fabric. I cut a little piece of batting the size of the folded pentagon.


I took the clips off the folds, unfolded the star, and placed straight pins along the fold lines. Then I used a knitting needle to push the batting though the slit and smooth it down inside up against the pins. It worked best to roll up the batting and then fold it over the end of the knitting needle.


I took the straight pins out and then refolded the star and quilted it with my walking foot.

Here are the ones I made for the kids. The star quilting ended up a little wonky by the time I got to the center, but I like it that way. 


Instead of using a ribbon, I just sewed some embroidery thread through a point for a hanger. 

Now, I know this post is getting really long--but I have a couple more things to share before I go. (When you haven't blogged for awhile, you have lots of things to share!) First, right after I went on Blogcation, I found out that I had won a package of goodies from Soma at Whims and Fancies. Remember her Trunk Full of Quilts online show? Yup, a prize from the giveway on that one. It included thread, a voucher for an online class, patterns from several people, fabric and a gift certificate. (Thanks, Soma, and everyone else who contributed!) What a bundle of quilting joy! I will share some of the prizes as I use them, but here's one: 


Yes, you're seeing that right. I used a gift certificate from Fat Quarter Shop to buy (drum roll, please) a big piece of Moda Bella Solids white fabric!!! Wow! Isn't that exciting?? Who uses a certificate to buy plain white fabric?! I'll be cutting up most of it to make a quilt top with some rainbow colors to make this pattern from Cheryl at Meadow Mist Designs (another goodie in the prize package--thanks Cheryl!) You will see this project in action very soon.

The other really fun thing that happened was this adorable gift that came in the mail from Bernie at Needle and Foot--a little zippered pouch and two tubes of rich, heavenly smelling hand cream. 


If you follow Bernie's blog, you will know that she's a prolific quilter and tells fantastic stories about her quilting journey. She also made a ton of these pouches, and each one is amazing. I'm really tickled that mine is an orphan block. Her work is superb. If you haven't read her blog before, drop everything and go read. You'll be glad you did. 

So that's it for catching up. I think. If I think of anything later I'll let you know. I did work on some treadle and hand quilting over the holidays here and there, but mostly I just enjoyed the season and looking at what other bloggers were working on. What I found, though, was that a vacation from blogging also meant a vacation from commenting. Just know I was looking, and I enjoyed everything I saw. And thanks to you if you commented on my blog. I appreciate it. I didn't keep up with responses as well as I'd like, but I just really needed to be away from the computer for awhile. Now I'm ready to jump back in. 

I'm linking this post with Sew Fresh Quilts for Let's Bee Social and with Crazy Mom Quilts for Finish It Up Friday (because, hey, there are actually some finishes here). The buttons are on the right side of the page. And watch this space Thursday for some Throwback fun.  

Happy New Year, everyone!