Showing posts with label sewing accessories. Show all posts

Friday, November 22, 2019

Bed Runner

Ooh, ooh, ooh, a finish! I just haven't had many of those this year. At least it seems like it. I started this quilt way back in July. It's been sitting around for the past few weeks with the binding ready to sew down. I had been saving it for a take-along task, but realized this week that I could just finish it because soon I'll have a couple more take-along projects. (Yes, two other projects close to a finish. I've been a quilting machine during our early winter weather.) So, after a couple of evenings of TV watching and staying cozy while binding, here it is: our bed runner, aka Gently Down the Stream Again, from a pattern by Christina Cameli. I say Again, because it's the third quilt I've made from this pattern. (Can you tell I love it?!)
I have to say that I am more pleased with my fabric selection for this quilt than I have been for any other quilt I have ever made. Everything came together so well. I went to the biggest independent fabric store in my area and challenged myself to do a pull from just that store (in addition to four pieces I had at home.) I stood back about 10 feet from the shelves and pulled whatever I thought might work in my scheme of coral, turquoise/aqua, gold and green. 

This is pretty much the entire pull. I had an aqua print and a light coral at home. I couldn't find a turquoise I liked, but I knew I had two at home. After I got home, I deleted the aqua fat quarter you see on the lower left. I had another darker turquoise in the mix, too, but I rejected it as too dark for the quilt. The thing that thrilled me most was that each of the more complex prints had other colors from the pull in them. My favorite is that aqua paisley. This really just "happened" as these are from a lot of different fabric lines. As you can see my favorite fabrics are tone-on-tone prints, but there was just enough movement in the prints to satisfy me. For the zigzag feature in the design, I chose Kona Bone because it matched our bedspread.

This quilt is built with strip sets, and laying them out to get varied combinations took a lot of space. I ran out of room on my banquet table and had to use my couch, too. Somewhere along the way, I figured out how many combinations of three you can make from 14 fabrics. Let's just say it's A LOT. (I can't find my notes, or I'd tell you)
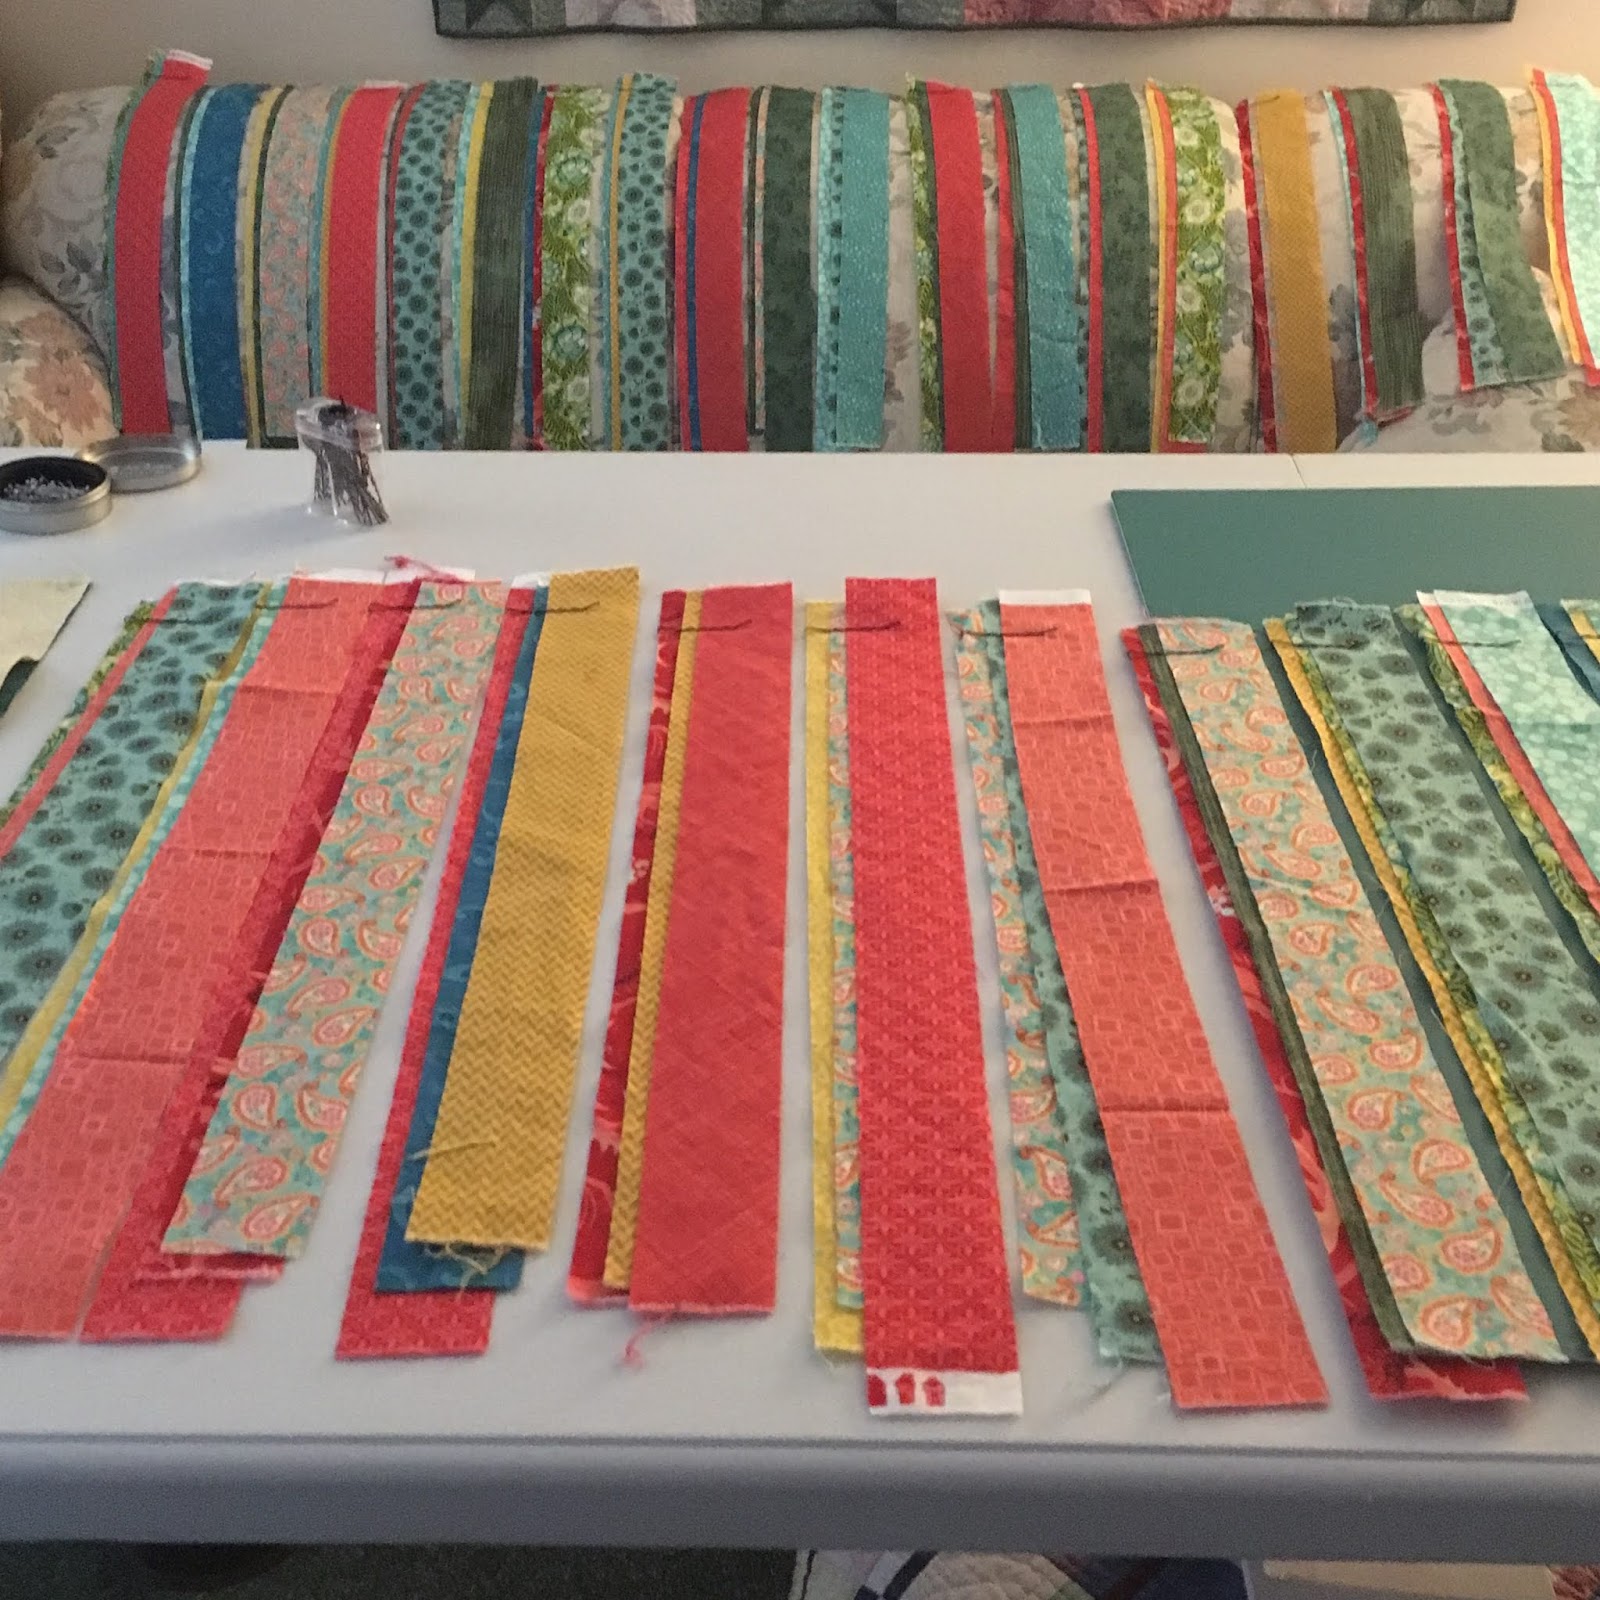
To keep them all together, I used bobby pins. I had recently needed a couple of bobby pins for my hair. Of course, I had to buy a bunch because that was how they came, but they came in handy for this kind of project. I pulled out a few to keep in my vanity drawer, but the rest became a sewing notion. They are in this nifty little magnetic case. I love how you can make sewing notions out of all kinds of things.

I quilted the quilt sort of as recommended in the pattern, with squiggles in the zigzag area and mostly meanders with a few kinda, sorta flowers in the colorful parts. My rule was no picking out anything unless there was a major tension issue or pleats in the fabric. So there are some wonky stitches, but I don't care because we are wonky people and this is our quilt. Free motion quilting went fast because I could go from one end to the other without stopping except to change a bobbin. (So much to love about this pattern!) I used leftover fabric in strips for the binding, first laying pieces out around the quilt edge to make sure that a particular binding fabric didn't touch the same fabric in the body of the quilt.

Here are some close-ups of the front.


And my initials and date:

I chose to use Kona Bone on the back. Not sure exactly why--maybe a thought that a color would eventually crock onto the bedspread? Probably a ridiculous idea. Oh well. I didn't seem to have that worry when it came to the binding. Anyway, now that it's done, I love the back because it shows the quilting so well. 

Here's the back on the garage:

And some close ups:


So there you have it. But wait, how about some pictures on the bed?


I love how it looks with our green walls--and it's just the pop of color we need. I have some fabric left (there are a lot of cut-off edges as well as some extra triangles), so maybe a throw pillow is in the future--but don't hold your breath waiting.

Here are the stats:
Pattern: Gently Down the Stream by Christina Cameli. The pattern was in a magazine, but I think you can purchase it from her. I made my version longer and narrower.
Fabrics:  A variety (sorry, I'm not good at keeping track of them) plus Kona Bone.
Batting: Hobbs Heirloom 80/20 
Thread: Superior-- Masterpiece in Granite for piecing; King Tut in White Linen for quilting; Treasure in Old Lace for hand stitching binding.
Binding: 2 1/2 inches cut, double layer, machine sewn to front and hand stitched on back
Size: I forgot to measure (or maybe write down) the size before quilting; 83 1/4 inches by 27 5/8 inches after quilting. I don't plan to wash it until it needs it.
Machines: Singer Featherweight for piecing; Singer Treadle 115 for free motion quilting.

I learned one big thing with this quilt. If it's going to take a long time between start and finish, keep all notes in one good place so you can find them later when you want to write about it. Of course, that doesn't guarantee that I'll know what the notes say, as they are usually a kind of stream of consciousness/problem solving indecipherable scratch. 

We put the quilt on the bed last night. It felt good to have that extra bit of weight at the end of the bed. There is a mysterious elf at our house that often pulls our blankets off the bed--almost always on my side. Hmm. Well, that runner seemed to stay on the bed most of the night, but did slide off sometime in the wee hours. I'm blaming the elf. At least the bed looks pretty during the day.

It seems that no modern blog post would be complete without one of those swirl glamour shots, so here it is!

I'm linking up this week with Sarah of Confessions of a Fabric Addict for Can I Get a Whoop Whoop and  Wendy of Wendy's Quilts and More for Peacock Party.

Have a good week. And if you are in the US, have fun preparing for Thanksgiving.

(I'm not affiliated with any company, so when I mention products, services, or stores I'm just documenting what I used or liked.) 


Wednesday, July 6, 2016

Well, Hello Again!

Oh, my, how did almost a month slip away? From the looks of this blog, I've given up quilting and writing about it all together. I really didn't mean to take a time away, but if you are a reader of this little blog, you'll know that I've been working on a project that I've decided not to share until the recipients have it in their hands. I thought it would be a quick project, but it turns out that although there are few blocks in the quilt, they have LOTS of little pieces that could be chained pieced but (for design reasons) not mass cut. So the only way to get the top pieced in a (somewhat) timely way was to cut myself off from most social media. I'm happy to say the top is pieced now. And the back is pieced. In fact, as of this afternoon, the quilt is also about 1/4 of the way quilted. So I think it's time to get back in a routine again. And I've missed blogs (and some pretty neat blog hops) for sure. 

So, lets see. What can I show you? Oh yes. Because my quilt blocks were big and had lots of pieces, I needed a way to transfer them from my design wall to my sewing machine (downstairs). I came up with an impromptu mini design wall. In my basement I found an old poster frame with a hardboard (masonite?) back. I laid some old strips of batting over the board and clipped the plastic frame parts around hold the batting in place. It's not pretty, but it worked great. Sometime I'll either sew those batting strips together or find a bigger single batting scrap to use instead. 
What else? Oh, the closet. I think I have a finish I can show you. I know, I know. A closet--or a whole sewing space--is a work in progress. But I'm happy with how the closet is working for me now, so I'm calling it a finish. To refresh your memory, here's what it looked like Before:
Besides the mess, notice the blue contact paper covered bookcase and the sponge painted chest.

And here are some Afters:
I'm so happy with how this looks, I leave the doors open all the time. I think it gives me incentive to keep things neat. The yellow fabric bins are working out really well for keeping smaller bits of fabric. I have them divided by color, although two bins are reserved for my solids collection and solids scraps. I love how clean the bookcase looks with its fresh coat of paint. My binoculars are close at hand for reducing the view of quilt projects when they're up on the design wall. There are an organizer for scissors and other frequently used items, a bowl of fabrics for the current project, and small yellow plastic bins of markers, lights and other tools. I do have other fabric, but it's kept in a six-drawer dresser in the main part of the room. 
The left side of the closet has a wall with rulers hung on it and my ironing board. The top shelf has a tote of totes--not really sewing stuff, but some things just needed to stay from pre-cleaning. The laundry basket has yarn-related stuff in it. The bookcase has what's left of my magazine and book collection after a huge cleanout.
Here's the right side of the closet. Look how cute that old chest looks with the paint. No more sponge paint. The drawers hold ribbons, knitting needles, my button collection, and other crafty things/sewing notions.The bin on top of the chest holds my batting. Next to it is my sewing lamp. Hangers hold some Works-In-Progress, and in the dead spot in the corner are a few little-used items such as rolled patterns from large art quilts.  And on the top shelf is a bin with my old dolls and one with special baby clothes. I don't mind having these in there because I did part with several bins of other toys and baby items.

I also cleaned up a bookcase in the main part of the room. It used to look like this: 
Here's the After:
I removed most of the old birdhouses.The bottom two shelves still hold random books, but I've reserved the top three shelves for mostly sentimental things. The black-framed pictures are free-form designs I made in the Paint program on my computer. I think they bring a nice zing of color to the back of the shelves. They used to hang in my office at work after the town Fire Marshall ruled that fabric items (like my awesome quilt) couldn't be hung in school buildings. On the top shelf is an autograph book from the 1930's that belonged to my aunt. The middle shelf holds my old name badge (with a little house) from back when I was active in the town quilt guild. My mom's picture is on the third shelf. She taught me to sew my own clothing on her sewing machine (now mine) when I was in junior high. I'm sure these shelves will change frequently depending on my whims. In fact, I just added something I found last week: 
A puzzle box. It was sitting on a shelf at an antique mall. Here's what it looks like open:
Some of the old sewing machine attachments are missing, and the velvet lining has a little tear, but I don't mind. I'm not planning to use the attachments anyway. I just like the old box and how it folds up. Oh, except that stiletto. I'm thrilled to finally have one of those. I've already used it to pull my bobbin thread up when I'm quilting. There was another box at the antique mall that was maybe a little more complete, but it cost nearly 10 times as much as this one, so I'm happy with my little purchase. And now it has a special spot on my shelf.

Now I have other projects in the works (in my mind). I have some rainbow colored fabric that's calling to me for a donation quilt. There's a timeline attached, so I have to consider carefully if I can get this done over what remains of the summer and still keep some balance in my life. 
The top row is fabric I won long ago in a giveaway. It seems like it was just waiting for this. The bottom row is a mix of leftovers from other quilts (including some from another giveaway). I feel like I really need to make this quilt, even if it means shifting some priorities. I'll mull it over for the next day or so while I quilt. 

When I wasn't sewing this past month, I was playing with grands and bike riding. We've had really variable temperatures this summer (like 90 degrees F one day followed by low 60's another). We've taken advantage of the cool days to ride parts of a new-to-us bike trail as well as other trails close to home. We also spent a day with my Dad going on a boat ride on a river on the west side of the state and out into Lake Michigan. I'll finish this post with pictures from those mini-vacations (day-cations?). Lots of pictures--if you're interested. But if you don't want to stick around, that's okay, too. 
Bike trail from St Johns to Ovid, Michigan. Straight, straight trail, but so pretty. 


Fowler to Pewamo to Muir, Michigan. Bridge over an old railroad trestle. A cloudier day, but pretty in its own way, and so comfortable.


Isn't this just the cutest bike trail rest stop? It's a mini replica of the rail station that used to be here, put up by this tiny town just for people using the trail. There are artifacts of the old railroad in shadowbox-like windows on the sides of the building. 
And there's even a mini lending library, top shelf for children, bottom shelf for adults. Best bike rest stop I've ever seen.
Saugatuck, Michigan on the Kalamazoo River.
Enjoying the river on a paddle boat.
The weather was calm enough to take the boat into Lake Michigan. Such a lovely day.
Independance Day bike ride to a local park. We are in a drought, so there was a ban on fireworks. That made it a rather quiet, but beautiful, day.
I'm linking up today with Freemotion by the River and Sew Fresh Quilts for their weekly linky parties. Click on the links or on the buttons on the right. See you soon. I hope.

Tuesday, May 17, 2016

Swatches

I'm sort of between projects this week. I just finished two quilts, but I'm not quite ready to share them. I did venture out beyond the confines of my own yard to take pictures of them, and I'll have a post up on the weekend. My next big project will be some secret sewing that I can't share for quite awhile. I do have a wall quilt that I'll work on in the meantime, and I hope to also have some other little projects that I'll be able to blog about for the next month or so. 

At loose ends today, I tackled a little project that I've wanted to do for some time. Homemade swatches. I have a Kona color card, which I love, but I wish that I could move the fabrics around. I know there are nifty ways to cut up the card and mount the little swatches, but I just wanted to do something quick. I also wanted bigger swatches. So today I went through my Kona bin (there are also a few other solids in there) and cut squares of about 4 1/2 inches. Then I pinked the edges and labeled each square with the brand, color name, and color number (if it was Kona) using a permanent marker on light fabrics and a white colored pencil on the darkest ones.


I probably should have pressed my fabrics, but I was in the making zone and couldn't be bothered. I tried using a paper puncher to make holes in each square, but it jammed, so I traced the circles and then just cut the holes with sharp embroidery scissors. So far they are pretty crisp. If they start fraying, I'll put some Fray Check on them.


I cut front and back covers from scrap template plastic (only one shown here) and two card stock flyleaves (only one here) for my little swatch book. 

Then I loaded up my swatches onto a jump ring I found in a junk box. (Kind of wish I had pressed those fabrics.)


Here's how the book looks with the swatches fanned out:

And here it is closed:

I suppose I could decorate the front, but this works for me. The flyleaves give it a clean look, but they are also useful to place behind light fabrics when they're fanned out to ensure that the colors are true. 

This will be an easy swatch book to slip in my purse when I'm shopping or for general planning at home. I only have about 30 solid swatches right now so the 1-inch jump ring worked out fine. If I add a lot to the book in the future, I'll need a bigger one. But hey, this one was free and now my junk box is a tiny bit less stuffed. 

I'm linking up today with Freemotion by the River for Linky Tuesday and tomorrow with Sew Fresh Quilts for Let's Bee Social. (Click links here or the buttons on the right.) I'll be back on the weekend to share my finishes. (If you want a sneak peek, click on my Instagram link on the right.)

Have a great week with your quilt related projects--big or small. 

Wednesday, November 11, 2015

Gaining FMQ Confidence

After three restless weeks, I'm finally settling down and back to the treadle again. I now have three of the large blocks on the Big Quilt quilted, with some spillover quilting on surrounding blocks. This quilt is definitely going to be a little history of my growth in FMQ, especially on the blocks with the floral design. 


My favorite floral patch so far is the orange one in this picture. I can still see some wonkiness here and there, but it is the first block that I felt free enough to quilt without drawing much of the pattern before quilting. I'm getting lost in tight spots less now and am improvising a little more. I've started adding some curlicues here and there instead of just leaves when I get into a smallish space. Now I do have to say that I've been a bit more awkward on some of the patches after taking a break from FMQ, but that's okay. When the quilt is finished, it will be fun to compare my earlier and later attempts at quilting the flowers. 

In other news, I have a couple of snippets to add to the Throwback Thursday post I did last week. The day after I wrote the post, my son sent me a link to a realtor's website that he had come across, and it turns out that the little bungalow that we lived in while I was making that quilt is for sale! There were lots of pictures as well as a video of it, so I was able to see what changes there have been since we lived there. Most of them are cosmetic, and the place still has much of it's charm, especially in the kitchen. The wallpaper in the attic room is gone now (not surprising), and it looks like it just got a fresh coat of bright white paint (the electrical outlet covers were in a pile on the floor). It was fun to see the old house again, and it's such a coincidence that we were able to see it right after I wrote about it. 

The other little tidbit is that some of us fellow bloggers were discussing the fading of the old bedspread and wondering about the instability of older fabric dyes. As I was making the bed the other day (yes, the old quilt is still on it--I move slowly to make changes), I noticed that the fabric that I bought for the binding after I finished the quilting has not faded at all even though the other fabrics are in bad shape where the sunlight got to them. I wonder if that is because it was relatively newer fabric with a more stable dye. Can anyone shed any light (ha) on why there is such a difference in fading?

Otherwise, here's what else I've been up to this week. I have an old spool cabinet that I keep my thread, embroidery floss, and needles in, but now that I'm doing more FMQ, I've been investing in cones of thread that are too big for the spool cabinet drawers. So I decided to check out some antique stores for an old medicine cabinet for additional storage, and I found this little gem...


Selfie! (Old school style)
I'm not sure how old it is--probably not super old. It holds my thread cones nicely. That little tea towel was given to me at my wedding shower in 1978. I use it as a dust cover for my treadle when I'm not sewing. I'm thinking eventually I might hang a little scrap of fabric instead and pin some minis to it. 

Here's my other spool cabinet: 


Someone painted the label areas black and stuck little cherub decals on--I'm guessing this happened a long time ago given their poor condition. I was going to remove them, but I've grown attached to them--and they are part of its history. It was way too expensive, but this was what really grabbed my attention:


It still has the tin lithograph advertisement on the back from when it was in a shop! I have not seen one of these in any spool cabinets I've come across when antiquing. So cool! Just had to share this. It fits so well with my treadle. (Side note: Do you see those little paint chips on the wall behind the cabinet? Some colors I'm considering for painting my bedroom. Got to do that before I replace the old quilt on the bed.)

Well, enough rambling. I'm linking up this week with Sew Fresh Quilts and My Quilt Infatuation for their linky parties. Buttons are on the right. 

Have fun quilting, and remember, practice builds confidence when it comes to FMQ.