Look at this pretty little squirrel!
A few years ago I made a sewing machine dust cover for my treadle machine. Since then, I've switched it back and forth between my treadle and my Singer Featherweight which worked fine until this year when many of my projects are long-term ones, and both machines are sitting out. One is always collecting dust. A few weeks ago I came across a piece of vintage fabric at an antique mall. Well, I thought it was fabric, but it was a squirrel.I suddenly needed a new sewing machine cover. Right away. And that is how my August started. Never mind that another quilt in progress was lying in pieces all over the house.
I had just made a bag for my granddaughter, and it occurred to me that I could make the cover in the same paper bag style as the main part of that bag. (In fact, my other cover is also paper bag style, but made a little differently. I had forgotten until I just read the old blog post about that one.) If you want to check out that bag pattern by aleah at no time to sew, click here. My cover has fusible fleece on the back of every fabric piece, so it is very stiff. Also, I made the cover and lining each from a single piece of fabric instead of two pieces with a seam in the middle.
 |
| What do you suppose this print is supposed to be?? (Yes, that vase was an impulse buy, too.) |
My fabric was 36 inches wide (old fabric was like that) and 44 inches long. I had to wash it because it reeked of old house (acrid, but thankfully, not smoky). It shrank a bit, but came out smelling fine.
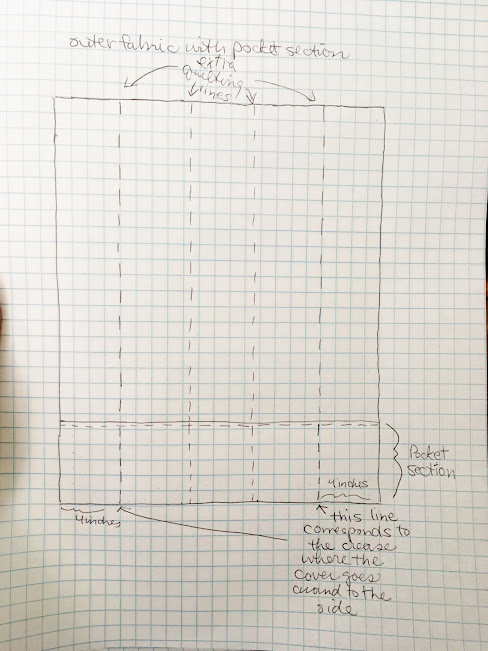
I was so involved chasing that squirrel that I forgot to photograph the steps, but I made some drawings and took photos of my paper mock-up that might help you if you'd like to make a similar cover.
 |
| Yes, you may be distracted by that sunset art piece my granddaughter made.out of polymer clay. |
Here are my measurements:
Here are the dimensions of the fabric pieces:
Main piece of outer fabric and lining (cut one of each):
L + W + 1 inch (for clearance) + 1 inch (for 1/2 inch seam allowances)
12 + 7 + 1 + 1 = 21 inches
by
2 (H) + W + 1 inch (seam allowances)
2 (9) + 7 +1 = 26 inches
Pockets (cut 2)
L + W + 1 inch (for clearance) + 1 inch (seam allowances
12 + 7 + 1 + 1 = 21 inches
by
desired height of pockets + 1 inch (seam allowances)
5 + 1 = 6 inches
Fusible Fleece Cut 1 piece for each of the fabrics above, 1 inch smaller in each direction,
so 2 pieces 20 by 25 inches, for outer fabric and lining
2 pieces 20 by 5 inches for pockets.
If your sewing machine is a different size from mine, the formula should still work if you plug in the numbers for the measurements of your machine.
Before I sewed, I made a paper mock-up to check my dimensions.
 |
| Perfectly snug. |
I ended up having to piece the lining a bit because of the shrinkage of my fabric, and this is all I had left. I'll have to think of something nifty to make with it.
I think if you bought about 1 1/4 yards of modern fabric, you'd be okay, but if in doubt, you could make a paper pattern to help you figure it out. This cover works best with a fabric with no directional print. Otherwise one side of your cover will look upside down.So here we go. I cut out the fabric pieces and pressed the fusible fleece on the backs according to product directions, centering it so there was 1/2 inch of fabric showing on all sides.
I sewed the pocket pieces right sides together along a long side. I understitched along the seam for stability. Not sure it's necessary, but it's neat. If you need to learn how to understitch, you can see here. I did my understitching about 1/8 inch from the seam. Then I folded the pocket section wrong sides together along the seam and topstitched about 1/4 inch from the edge.
I laid the pocket section along the bottom edge (one of the narrow edges) of the right side of the outer fabric piece, aligning the raw edges. I sewed lines of stitching from the top of the pocket to the bottom edge 4 inches in from each side, and then stitched two more lines between those for additional pockets. As an afterthought, I extended those stitch lines to the other narrow end of the fabric as sort of quilting lines.I folded the whole thing narrow edge to narrow edge right sides together, and stitched down each side from fold to lower edge. I trimmed the top edge of the seam allowance at an angle to reduce bulk. I repeated this step with the lining fabric.
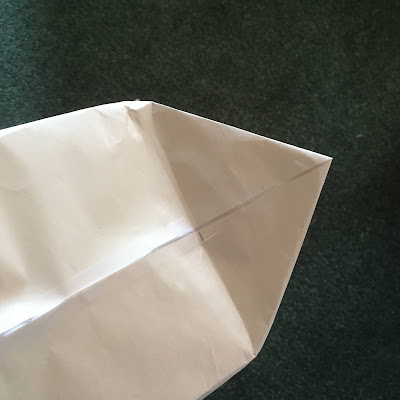
The next part is a bit tricky to explain. I turned the outer fabric right side out and poked my finger into the fold right where the seam comes together, then shaped it into a triangle like the ones you see on paper grocery bags.
 |
| This is how that looks on my paper mock-up. |
I like to fold these right sides showing. Then I stitched along the quilt line that I made when I sewed the pockets. That line at the base of the triangle is about 7 inches long. I did the same thing with the lining.
Almost done. This all takes much longer to write than to do. I put the two bag parts inside each other right sides together and stitched around the raw edge, leaving about 4 to 5 inches unsewn. Then I turned the bag right side out (think giving birth) and topstitched around the edge about 1/4 inch, which also closes up that open part.
The last thing I did was fold the triangles down on both the lining and the outer fabric and sewed some big buttons through all thicknesses to keep the triangle flaps in place. (My buttons are handmade by an ceramics artist named Sandra Lance that I met on a trip to Vermont a few years ago.)
Now I have two dust covers so I can leave both of my machines out as much as I want. The older cover is a bit floppy because I used quilt batting. Maybe I'll make an extra thicker liner for it. If you want to see that old cover, click here.
It sounds like a lot of work, but the prep (mostly figuring out the size and pressing the fleece) took the longest. Sewing took maybe 20 minutes. If I had read my old post before starting this project, I would have had two of my measurements instead of having to figure them out. Doh.
I love how the cover is stiff enough to hold my sewing tools. To keep my little sewing scissors from poking holes, I slipped an empty thread cone into the pocket, and they sit just fine.
If you have lots of sewing notions, you could add pockets to the other side. But there seem to be enough pockets for me. I put smaller items (seam ripper, ruler and hera marker) in a little scavenged plastic sleeve so they wouldn't get lost in the pocket.
One more photo.
I hope you enjoyed my little tutorial. I am not a designer or pattern writer. Obviously! So I have to say this is what worked for me. (That's why I wrote in first person instead of imperative). So take it with a grain of salt if you want. (That's imperative.) If you do want to try it, though, I strongly suggest making a paper mock up (without seam allowance) to make sure you're on the right track, I'm sure there are other bag patterns out there that are similar or more succinctly described, but at least this post will help me remember what I did if I ever need another cover (and remember to read this post before I start working).
I'm linking up on the last Saturday of the month with Sandra at mmm quilts for DrEAMi (Drop Everything and Make it), 'cause that's just what I did.
Now, back to regular sewing...
(Just a reminder: I'm not affiliated with any company, so when I mention products, services, or stores I'm just documenting what I used or liked.)


4 comments:
I love your "paper bag" design! What a great idea! And cute fabric, too. Thanks for the tutorial!
Well, I have to say this sure looks nicer than the piece of old fabric I just wrap over my machine (when I remember to do this). Very nice Janine!!
What a gorgeous machine cover. Well done & although I have one for my Bernina, I don't use it much. Thanks for sharing, take care & hugs.
That fabric is just so cool and perfect for the Featherweight cover. I see apples, olives, maybe ruffled tulips and daisies. I like the bag-style cover but especially the pockets. I did that on my longarm cover I made. Great idea to use a thread cone in there; my tools disappear. I have a FMQ graffiti practice piece I bound and just drape over mine that I keep thinking I should make ends for and turn it into a proper cover. Another wonderful DrEAMi!
Post a Comment