Showing posts with label quilt extension project. Show all posts

Saturday, November 26, 2022

Bunk Quilts

Squirrel!! Yes, I know I have two quilts to finish up if you read my last post, but something else distracted me this month. Here's the back story: We recently ordered a bunk bed set to keep our grandkids a bit more comfortable when they come to visit.  After we put the beds together, I started thinking about what to do for bedding. The twin bed that the bunk beds replaced had a rather inexpensive store-bought quilt, an odd square size meant for a queen bed. On the twin bed it had draped down to the floor with the excess stuffed against the wall out of sight.  Even though I'm not fond of store-bought quilts for several reasons, I do like the pattern and quilt design on this one. It's a bit skimpy for a queen bed, though, and wouldn't work in our other guest room. So, what to do? It seemed wasteful to make two new quilts and send this one to the back of a closet (although I could have donated it). Well, why not cut it in half and add a bit to each piece to make them big enough? So I did...

So that's it. That's my squirrel. Unless you'd like to see how I did it. (Well there is another squirrel at the end of the post, but first things first.

So, first, I found one of my Kona fabric swatches that was a pretty good match, and my big box fabric store had it in stock and substantially on sale.Yay! Well, I guess Khaki is a pretty commonly stocked fabric. I bought about 1/2 yard more than length of the quilt, pre-washed it, and sliced it lengthwise down the middle. With a bit of measuring, I figured that I could make a border along one side of each half-quilt about 9 inches wide. From each strip, I cut a border 9 1/2 inches wide (border width plus 1/2 inch seam allowance) and 10 5/8 inches wide (border backing width plus 1 1/8 inches allowance for fold-over binding plus 1/2 inch seam allowance). I made sure that I also added the binding allowance to each end of the border backing fabric. Sorry, no photos of the cutting. I was just making it up as I went to make the most efficient use of fabric, but I think you'll see from the next pictures what this looked like. 

To attach the borders, I first pinned the backing to the raw edge of the back of the quilt, extending it over the ends by 1 1/8 inches. (I pinned from the front here, which wasn't necessary.)


Then I pinned the border front to the right side, sandwiching the quilt edge and aligning the border with the ends of the quilt.

Pardon the shadow of my camera. I was working under strong LED light in my basement.

I sewed a 1/2 inch seam along the quilt edge. Here you can see the two border parts after sewing with the border backing pulled out away from the quilt.

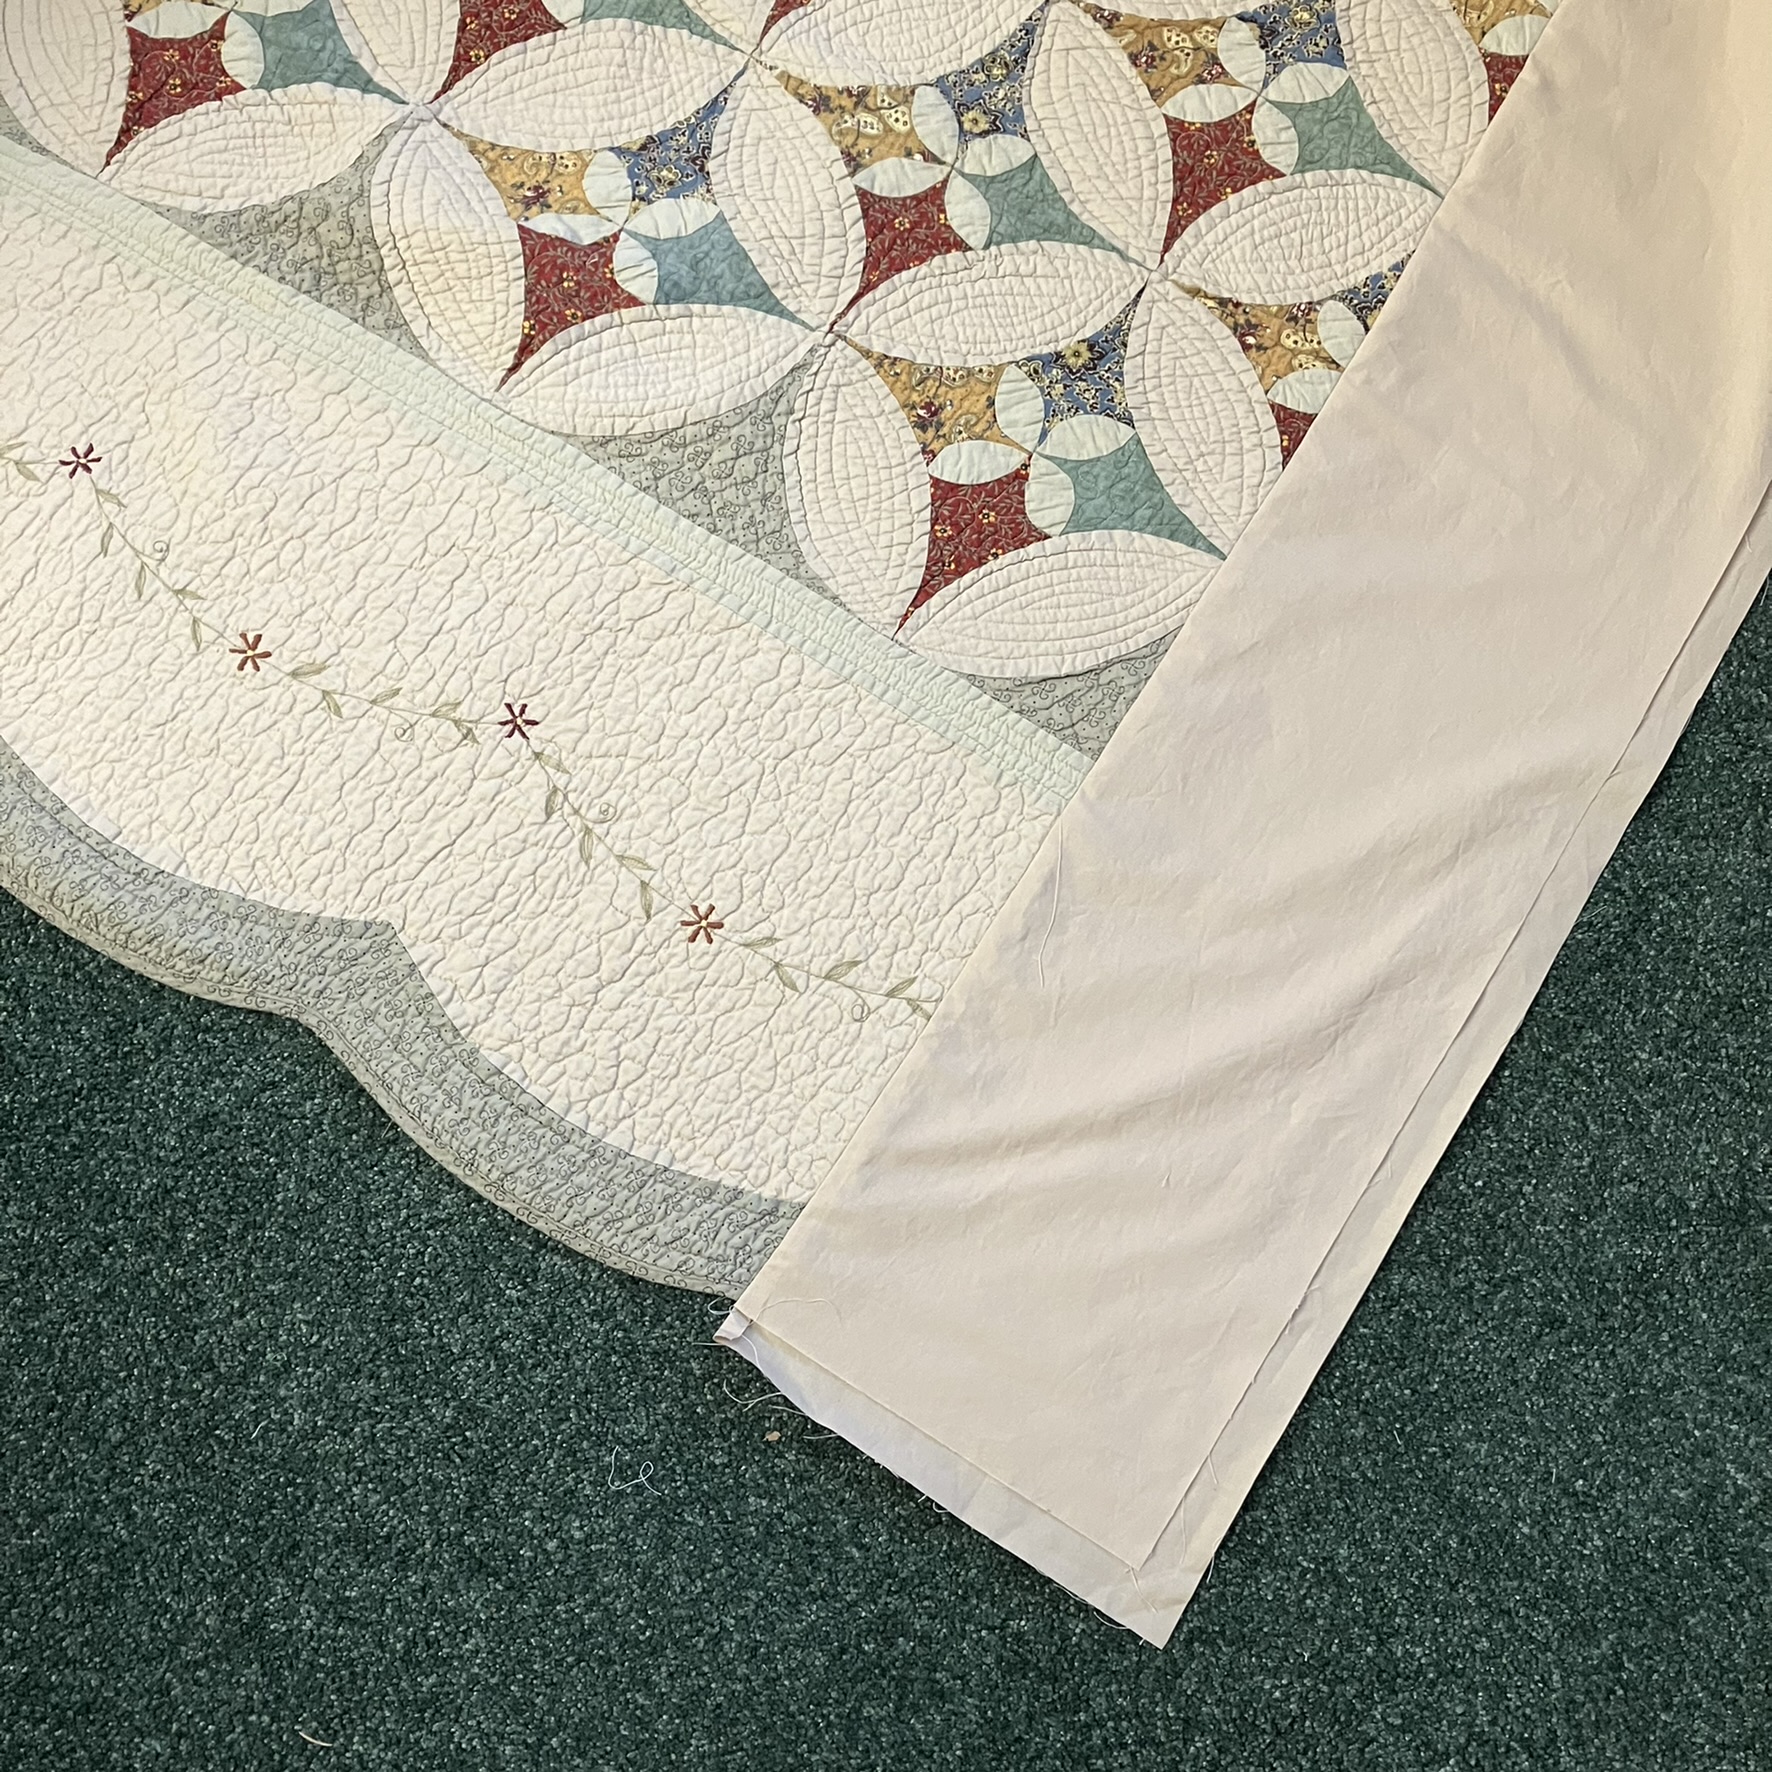

And with the borders right sides together. You can see the extra fabric showing on the backing.


I drew a line on the backing to show the extra fabric. Then I cut batting the same size as the front border and carefully laid it out on the wrong side of the border backing overlapping the seam allowance. I had initially thought of laying it up to the seam allowance, but this seemed to ensure a neater transition from the quilt to the added border. My batting is pieced, as I was using leftover bits from other quilt projects.
Corner pulled back to show the line on the backing.

I basted the batting in place to keep it from shifting over the edge.


After that it became a typical quilting project. I pin basted, then quilted a straight line a generous quarter inch from the main seam (with walking foot) and then free motion meanders similar to the ones in the border of the original quilt. I forgot to photograph the binding process. I folded the border backing toward the front all the way to the seam line (behind the seam allowance) and then folded it again to form the binding on the front. I could have machine sewed it down, but I love to relax and hand sew a binding, so that was what I did. Mitering the corners was a bit fiddly with those layers, but it worked.  


So here are the finished quilts, as much as I can show on my living room floor. They look different sizes here, but they are exactly the same size.

I know they are a little strange. I admit that for a second at the beginning, I considered trying to match the border to the original quilt, scalloping it and even doing some embroidery. Luckily, because this was a squirrel project, I quickly came to my senses. Because the whole point of this addition is to make sure the quilt is wide enough to be comfortable to the person under it. When the bed is made it's tucked down on the side of the bed against the wall and no one will ever see it. So no need for a fancy finish. I'll be interested to see how the quilts look after washing, when the meanders crinkle up a bit to match the rest of the quilts, but I don't plan to wash them until they've had some use.

Here's a close up of the quilting and transition. You can see that there is real applique and hand-guided quilting on the original quilt, which is why I like it, although someone was probably paid pitiful wages to do this. (Come to think of it, that is always the quilter's lot, isn't it?)


And one last one of the beds ready for the kiddies. By the time you read this they will have been slept in. 


If you think I was done with squirrels after this, you would be wrong. I won't bore you with the details, but this bedding project also included cutting and hemming a huge thermal blanket (it must have been meant for a king size bed--which we have never had-- and it was always drooping off our queen sized one), to make two bunk blankets, and reworking an old contour twin sheet (truly Frankenstyle, adding material to the corners and then recontouring them) for one of the bunks. It had shrunk so that it was somehow too tight for even a bunk mattress. Recycle, Repurpose, Reuse!!!

And...one more little project I have to show you because it's soooo cute! And fun! I was making my usual Christmas ornaments for the kiddies' stockings the other day (inspired by their Halloween costumes), and suddenly had the urge to make just one more. I had seen this fabric origami star by zencrafting and just had to Drop Everything and Make it. It was such fun, and only took a few minutes. It's made with a freezer paper lining which keeps it nice and crisp. Since vintage fabric designs seem to be trending now, all I had to do was look through my drawers of fabric, which have become vintage without even trying. I used 4-inch squares for my ornament parts as 5 inches seemed a bit larger than I wanted. A quick look through my button jar yielded just the right buttons to finish it off. This ornament will top off a holiday gift. Now I might have to make one for myself. Ooh, was that another squirrel calling?

Front (convex side)

Back (concave side)

I'm linking up with Sandra at mmmquilts for DrEAMi (Drop Everything And Make it) because that is all I've been doing this month. I hope you are having fun preparing for whatever holidays you celebrate at this time of year. Next time you read this, I just might have gotten back to the sewing I was planning to do.

(Just a reminder: I'm not affiliated with any company, so when I mention products, services, or stores I'm just documenting what I used or liked.) 


Friday, July 17, 2015

S.U.C.C.E.S.S.

I am giddy! The project you've been reading far too many posts about is successfully DONE!! If you want the background, just click on "quilt extension project" at the bottom of this post and you'll see my previous posts. 

I'll show you the finish first and then go back to some details. Here's how the quilt looks on my bed. It's a king size (104.5 by 131.5 inches) and my bed is queen size, so it's a good thing you can't see it puddling on the other side (although a tiny bit of my bedskirt is peaking out on that left corner). I'm not taking a picture outside (mosquito plague).


I spent a good part of the day Wednesday attaching the binding. I used my walking foot on my treadle machine, and the binding went on perfectly. I attached it to the front first, pressed it toward the edge, then folded it back to the back just up to the seam line and pressed again. I used Wonderclips to hold it in place and topstitched just under 1/8 inch from the seam line on the front, which easily caught the same amount of binding on the back. The original seam line looked like I had sewn "in the ditch" next to the binding on the back. I haven't done a binding exactly this way before, but it was so easy that I think it will be my go-to way when I want a machine sewn binding. I much preferred it to sewing the binding on from the back and then topstitching on the front. 
Binding on the front (fabric below it is some of the backing fabric)
Binding on the back (you can see the fake "in the ditch" line on the backing)
Maybe I'll try to make a little picture tutorial for next week to show how I did it. I was too focused on getting this project done to take any pictures while I worked. 

Yesterday I very carefully laid out the bedspread on the floor and basted the border to it. I did not use any pins. After my problems with the polyester fabric in the border, I didn't want any more holes than necessary in the polyester bedpread. I am thrilled to say that the border fit just right. I marked a chalk line to help get the bedspread in just the right place. I used a very fine needle and some thin rayon thread for basting. Then I put the thinnest needle I could find in my machine and threaded the machine with thin blue thread to match the bedspread. I again used my walking foot to sew over the topstitching that was already on the binding of the bedspread to attach it to the border. Finally, I sewed a second line of stitching to the outer edge of the binding to strengthen the connection. Now the binding of the bedspread looks more like a ribbon. I'm just so happy with how it all turned out. Obviously, the bedspread is a higher quality polyester than that fabric that gave me so much trouble when I was making the border. It all feels really sturdy now, and I think it will hold up well in use. 


Before I attached the binding, I cut the corners of the borders on an angle to reduce bulk and get rid of the "bad" fabric that had been there. 


One more little detail. I used Hobbs 80/20 batting on this quilt. I gently soaked and dried it and prewashed the fabrics before using them so that they won't shrink up too much when the quilt gets washed.

This project was definitely one of the most challenging quilt related projects I've made. I have added a border to enlarge a quilt before to make it fit a bigger bed, but that project was entirely cotton (and based on my own quilt instead of a commercial one). Working with a polyester spread was really scary for me, and I doubt that I would take on such a task again. If I had had more experience with polyester, I probably would have known how to use a fusible interfacing (and been comfortable with it) to strengthen the polyester (and other gauzy fabrics) that I was first trying to use. But quality cotton is so sturdy and so much more satisfying to work with. So I'll stick to that in the future. 

I don't regret this project, though. It was a labor of love, and I did learn a lot about designing on the fly, fixing problems, and finding creative solutions. I also learned that I love using the walking foot with my treadle. The stitch is gorgeous and the machine absolutely purrs while I'm working. (That's why I named her Kitty.) I also learned how to let the walking foot move the fabric instead of trying to push the fabric through. I didn't even have to use my quilting gloves, which is nice in the summer. I also learned how to puddle a large quilt to maneuver it on a domestic machine, which will certainly be helpful on my next quilting project. (Remember the Big Quilt? Yup. Time to get back to that one.)

After all this, I'm taking off from quilting for the weekend. I'm going to catch up on blog reading instead. Next week, I'm going to fool around with some ideas for quilting the Big Quilt. I still need to order thread for that project, too. And clean part of the basement so I can use the floor to baste the Big Quilt. Oh, and I'll try to put together some pictures of my binding technique. 

I'm linking up with Crazy Mom Quilts, My Quilt Infatuation, Confessions of a Fabric Addict (Can I Get a Whoop Whoop), and Quilt Matters (TGIFF) to share my excitement about being done!! Buttons are on the right.

Have a wonderful weekend everyone!! 

Wednesday, July 15, 2015

Getting there...

Another  quick update--and I sincerely hope to have a finish by Friday. I fixed all of the problem areas on the quilt extension in the last two days. It might have looked like I was working last week (I did put up a post), but I was really taking a little vacation from quilting. My husband and I were doing a week of grandkiddie daycare at our daughter and son-in-law. It was busy, busy, busy but so much fun. L learned to pedal her tricycle, so we spent a lot of time outside and riding to the park. C is only a catnapper, so there was no down time, but he is such a happy little guy and fun to play with. He thinks everything his sister does is hilarious (and she loves to entertain him with her songs and dances). He's rolling all over and almost sitting by himself. I had a little knitting project with me that I thought I would do in the evenings, but the time flew by and before I knew it, it was time for bed. I could go on and on about our time, but this is a quilt blog, right?

So on Monday and Tuesday this week I worked like crazy on the quilt border, and this morning I made the binding. It's all ready to attach. 


Then, the last thing will be sewing the border to the bedspread. I'm a little scared about that part because I'll be sewing to polyester again. I think I'll use a really sharp, thin needle. 

I'll end this with a few shots from the garden. We are having a mosquito plague right now, so I don't have many pictures that weren't blurry. I was so busy swatting in just the couple of minutes I was out there that I couldn't hold still long enough to focus.


Not a great shot of the Astilbe, but I wanted to include it. They peaked while we were gone. 


I'm linking up today with Freemotion by the River, Freshly Pieced and Sew Fresh Quilts for their linky parties. Buttons are on the right. 

Hope to see you Friday with a finish. If you live in a mosquito prone area, I hope the rest of your week is bug free!

Wednesday, July 8, 2015

Quick Update

Last post was a bit of a downer, but here's just a quick update to say that I think all is well. I found some good cotton fabric to replace the shiny fabric that was giving me trouble, and I'm really pleased with the color. Here's how it compares with the shiny fabric.


I've taken out the seams of one section of the shiny fabric, leaving a space with just the batting and backing.


I sewed one side of a new strip of fabric by machine, but because of the quilting in other areas, I wasn't able to sew the other edge by machine, so I hand sewed it as well as the top edge. 


It's going to take some time to finish the remaining nine sections, but it isn't difficult. I have some other things to do this week, but I'm hoping to finish this sometime next week.

I'm linking up with Freshly Pieced for WIP Wednesday and Sew Fresh Quilts for Let's Bee Social. The buttons are on the right.

I hope you're having a quilty good week.

Wednesday, July 1, 2015

Seam Ripper Blues

I was making so much progress with quilting the border for the quilt extension I've been working on for the last couple of weeks. I had the walking foot attached to my treadle machine and was pedaling along and falling in LOVE with quilting with a walking foot. The weather was cool, and there was a pleasant breeze coming in my window. I could hear the birds singing. It was treadle heaven.

And then. The one fabric that a little voice in my head had been whispering against since I started the project suddenly started to split along a seam, and once it started, there was no stopping it. I was so rattled, I didn't even think to take a picture. I looked it over and saw that the split was caused by raveling along the seam. I carefully removed the piece of fabric, and cut another one, pinking the edge and leaving a larger seam allowance, then stitched everything back together again (a more complicated process than you might want to know). The little voice was talking a little louder now, but I ignored it and told myself that everything would be okay because the quilting would reinforce the seams and hold all the edges inside reducing the probability of more raveling. I had invested too much time into the quilt border to stop and take it all apart. I kept quilting, and everything went smoothly. It was all lying nice and flat without any puckers on the front or back. 

Here's a bit of what it looked like:

Well, you know where this is going. As I was burying some threads, I stuck a pin near a seam, and the fabric started to split along it. And you know that little voice was no longer little, but screaming I TOLD YOU SO. And, of course I had to listen. This quilt needs to be fixed because it needs to be usable and durable and cleanable. After all, it's going to be on a bed. 

So I spent most of this afternoon and evening singing the blues and working with my seam ripper, which has suddenly become my favorite sewing--ahem, unsewing--tool. I'm almost done removing 40 lines of quilting. Next, I'll take out the 20 seams where the shiny fabric joins the surrounding pieces. And then I'll have to try to find something to replace it. It's too bad, because that shiny fabric added the right amount of glitz to the design, and I know it was important to my niece, as it complements the copper accents in her bedroom. But it is just not meant to be. 

I used to quilt and repair old quilt tops as a professional hand quilter, so I have a lot of experience with splitting fabric. But those were very old fabrics, and even though I was skeptical about using a polyester fabric in this quilt, I really didn't think it would be so fragile. And I thought cutting it with pinking shears would eliminate raveling. But then, there was that little voice, so I should have known better. Anyway, I've learned a valuable lesson: a quilt is only as strong as its weakest fabric. I guess I knew that already, but there's nothing like an object lesson. 

Taking this quilt apart will take some time, but the backing fabric is a beautifully strong organic cotton, and I'm sure that it will help keep everything in line when I replace those 10 fabric strips. I know the extra effort will be worth it in the end. 

No garden pictures today. It's raining now.  (Perfect seam ripping weather.)

I'm linking up with Freemotion by the River, Freshly Pieced, Sew Fresh Quilts and My Quilt Infatuation for their weekly linky parties. Buttons are on the right. 

I hope your quilty week is going well. And to our friends to the north, Happy Canada Day!


Wednesday, June 24, 2015

Border progress

This week I've been working on the quilt extension I'm making on my niece's bedspread. I have to say it's going very well considering I'm working with random lengths of fabric that were sent to me with no specific plan for what to do. After replacing two fabrics that were either too slippery or too gauzy to play well with the other fabrics, I spent a little time figuring out placement for a design. I decided to go with a simple vertical stripe border. Since I was working with a commercially made bedspread that was not completely symmetrical in shape or quilting design, simplest seemed best. I used what I call "intuitive geometry" to figure out the width of the fabric strips to make it fit and to plan the miters at the corners: limited measuring (mostly by eye) and some strategic pinning. So far everything fits. It's a looong way around a king size quilt, so I can only show a bit of it here:


Close-up of a corner
With a sham standing in for the bedspread
The quilt colors are a little washed out here. Also the bedspread is not as shiny as in the photo. It's more of a matte luster, if that makes any sense. 

I had just enough of the flower and vine fabrics to piece a back in 40-inch lengths. It was a nice way to use up the rest of the fabric, and those fabrics are a dream to work with. To put the border together, I sewed batting to the backing about 3/4 inch from the edge and then seamed the front and back together along the edge that will attach to the bedspread. In the pictures, those edges are pinned because I plan to topstitch them to add a little stability before I start quilting. There is no batting in that seam so it should be easy to attach to the spread. I've been using my walking foot because it seems to keep things feeding well despite the bulk of the border, which is about 320 inches (!) around. 

Next up is pin basting and figuring out quilting, which I think will be very simple--maybe straight lines with my walking foot (great practice)--because I don't want it to complete with the quilting on the bedspread. I had very briefly considered mimicking the bedspread quilting, but abandoned that idea as soon as I realized it wasn't quite centered. It would make everything else look crooked. 

I also have to figure out whether I want to bind the quilt or just turn the edge under. I have plenty of the shimmery gold fabric left, but it's a slippery polyester and prone to raveling, so I might get myself in trouble there. Another possibility is using a blue. (I have a tiny piece in my stash that looks good, but I don't know if I can find any more like it.) I'm just going to quilt 15 inches down the border and that will give me enough fabric to either fold it over or add a binding. 

I've taken a break from the Big Quilt project this week to work on this. Actually this project will give me an idea of how I might like using a walking foot to quilt that one. 

Now, as seems to be my typical summer post, here are a few other pictures of my week. We took a little day trip to Saugatuck, Michigan last Saturday. It's known for it's artsy vibe, and here is the most artsy public restroom I've ever seen:
Do you recognize the work and artist? The picture goes all around the building.
And here are a few garden shots:
Photo credit to my husband

Each year I collect a few rusting metal ornaments at our local art fair.


This week I'm linking up with Freemotion by the River, Freshly Pieced, Sew Fresh Quilts and My Quilt Infatuation (if she's back from vacation--last week I forgot she was off) for their fun linky parties. Buttons are on the right. 

I hope the rest of your week is quilting bliss.

Thursday, June 18, 2015

Shopping!

Not a whole lot to show here today. We had two and a half grand kiddies (and their parents) for a long weekend of fun. The three-year-old entertained us with her free-form songs at the piano. (Any subject can be turned into a song!) The five-month-old rolled around and did lots of baby crunches (He'll be sitting before you know it.) And the littlest just looked adorable inside of mommy-to-be. But now the house is quiet again. I had cleaned up my mess before they came (my "studio" is the whole house, so I had to), but now it's all slowly coming out again. Mostly I've been cutting strips for the bedspread extension project for my niece, and I'm starting to play around with how to place them. Here's a quick look:


I'll be playing around with these some more before stitching them together. The two solid looking colors on the left are ones I found to replace a gauzy fabric and a very slippery one that just didn't seem like they'd sew up well. These have a tiny bit of design in them that doesn't show well unless you enlarge the picture, but I think they'll work okay. 

So today was the day of the huge sidewalk sale at a local fabric store, and I went with high hopes of finding a backing for the Big Quilt. They had lots of beautiful fabric, but I couldn't find anything that I liked for the quilt. (I did buy the fabric on the left, above.)  I found a nice print that wasn't on sale, but that would have cost a fortune for a back. Now, recall that I said the other day that I wished I could steal that bud-and-vine print in the above picture. Ha! I didn't have to steal it after all. I stopped at my local big box fabric store, and there it was!! (I had previously looked online and it wasn't showing up.) They only had about half of what I needed, but the same store on the other side of town had the same amount so I bought both stores out. The fabric wasn't on sale, but I had a 60% off coupon for regularly priced fabric, so whoopee, I saved a bundle. I also scouted out batting. I needed 124" wide batting and found a bin for Warm and Natural (the only brand of that size I can get locally), but it was empty. Bummer. But then a sales associate came by and said a truck had just made a delivery. She checked, and sure enough, the batting was there. I had another coupon for that, so even though I spent a lot of time driving around, the day was a Big Success. I do wish I could have showed you stacks and stacks of sidewalk sale finds--there was a lot to love, but I spent plenty without any impulse buying. There will be another sale someday. 


I'll be sewing the bedspread extension and piecing that backing for the Big Quilt during the next few days. Then I'm going to practice some machine quilting to try out some possibilities for the Big Quilt and also figure out just how I'm going to get that beast basted. I may need to clean the basement to free up some floor space. Thanks for all your suggestions in my last post. I'm inclined to do something with straight lines, but my daughter-in-law said she really likes meandering, so we'll see what comes of it. 

The pictures here aren't all that exciting, so here are a few from my garden this week (trying to work on my photography skills):
Maltese Cross
Stella D'oro daylily

Penstemon
I'm linking up today with Freemotion by the River, Sew Fresh Quilts and My Quilt Infatuation for the weekly linky parties. The buttons are on the right. Have a good weekend, everyone! See you next week. 

Friday, June 12, 2015

Big Quilt Flimsy Finish

All done. Well, not ALL done, but I do have to celebrate the finish of the Big Quilt flimsy. It's really hard to photograph at this point. And then, after I took the first picture, the photo card door was open on my camera, and I lost a few other pictures by the fence. I didn't realize it until I downloaded them. At least I got another on the grass. I think when I get it quilted, I'll borrow my neighbor and her high deck and get a proper picture, but you can get an idea of how the quilt top looks here. It's in kind of a fragile state, and I didn't want to move it around anymore. 

That's my husband, He really didn't want to be in the picture, but even with only a light breeze, the quilt was a sail, and he needed to keep it from blowing away. I told him I'd crop him out. Right. Couldn't do it without cropping the quilt. But I think what shows of him is fine.

And now to quilt. But how? I think I'd like to do straight lines (maybe 1/2 inch apart) down the pale gray patches on the edges to emphasize the angles going out from the middle, but beyond that, I'm really not sure. Maybe more of the same on some of the patches, with other designs here and there? I'm thinking of using a gray thread throughout. Here are some things I have to consider:

--I'm quilting it on a domestic machine--my trusty treadle. 
--My experience with machine quilting designs is fairly limited. Mostly, I've done meandering, but I've also done some squiggles, a little bit of flowers and some scribbling. 
--I have a walking foot, but I haven't used it yet for quilting (only binding).
--This quilt is mostly on the bias. I don't know if that will be a factor in determining a quilting design. I plan to pin baste it like crazy.

So...given the above considerations, if you have any ideas on quilting, I'd love to have you share them. In the meantime, I've made a crude little practice top so I can try out some things. I just sewed some of the leftover strips together. No planning, measuring, pinning, or pressing (!). I just wanted to get it done while I was cleaning up my mess.


Next week there is a huge sidewalk sale at a quilt shop nearby. I'm hoping to find something less angular for the back--maybe floral or paisley or something. I've got my fingers crossed that I'll find enough yardage--although a few different fabrics would be okay, too, I guess. 

I know the basting and quilting will take some time, so between sessions, I have something else to work on. Remember these fabrics? I showed them ages ago. (I would love to steal that second one for the back of the Big Quilt)


I'm going to be making an extension on three sides of a commercial bedspread for my niece to make it a more comfortable size for her king size bed. She sent me the bedspread this week:


I think I'll make vertical stripes. There's one copper colored fabric (not pictured) that's sheer and gauzy (not double gauze, though). If anyone has any tips for backing that material to stabilize it, I'd appreciate it if you'd share. (Would it work to just double it? The shiny copper fabric is polyester curtain material, which will also be unusual for me to sew. It was important to my niece to use it because it goes with metallic accents in her room. I think when it comes to quilting, I'm going to use a combination of machine quilting on the cottons and big stitch hand quilting on the polyester and gauzy fabric. Stay tuned.

I'm linking up today with Crazy Mom Quilts for Finish It Up Friday, Confessions of a Fabric Addict for Whoop Whoop Friday, and TGIFF because, well, you know...it's finished!! (except for the quilting). Buttons for these wonderful linky parties are on the side. 

Don't forget to share your ideas about the quilting and working with the gauzy fabric. Thank you so much!! Now I'm waiting for my grandkiddies to arrive for a long weekend. I hope you have a great weekend, too.