Showing posts with label bed quilt. Show all posts

Saturday, November 26, 2022

Bunk Quilts

Squirrel!! Yes, I know I have two quilts to finish up if you read my last post, but something else distracted me this month. Here's the back story: We recently ordered a bunk bed set to keep our grandkids a bit more comfortable when they come to visit.  After we put the beds together, I started thinking about what to do for bedding. The twin bed that the bunk beds replaced had a rather inexpensive store-bought quilt, an odd square size meant for a queen bed. On the twin bed it had draped down to the floor with the excess stuffed against the wall out of sight.  Even though I'm not fond of store-bought quilts for several reasons, I do like the pattern and quilt design on this one. It's a bit skimpy for a queen bed, though, and wouldn't work in our other guest room. So, what to do? It seemed wasteful to make two new quilts and send this one to the back of a closet (although I could have donated it). Well, why not cut it in half and add a bit to each piece to make them big enough? So I did...

So that's it. That's my squirrel. Unless you'd like to see how I did it. (Well there is another squirrel at the end of the post, but first things first.

So, first, I found one of my Kona fabric swatches that was a pretty good match, and my big box fabric store had it in stock and substantially on sale.Yay! Well, I guess Khaki is a pretty commonly stocked fabric. I bought about 1/2 yard more than length of the quilt, pre-washed it, and sliced it lengthwise down the middle. With a bit of measuring, I figured that I could make a border along one side of each half-quilt about 9 inches wide. From each strip, I cut a border 9 1/2 inches wide (border width plus 1/2 inch seam allowance) and 10 5/8 inches wide (border backing width plus 1 1/8 inches allowance for fold-over binding plus 1/2 inch seam allowance). I made sure that I also added the binding allowance to each end of the border backing fabric. Sorry, no photos of the cutting. I was just making it up as I went to make the most efficient use of fabric, but I think you'll see from the next pictures what this looked like. 

To attach the borders, I first pinned the backing to the raw edge of the back of the quilt, extending it over the ends by 1 1/8 inches. (I pinned from the front here, which wasn't necessary.)


Then I pinned the border front to the right side, sandwiching the quilt edge and aligning the border with the ends of the quilt.

Pardon the shadow of my camera. I was working under strong LED light in my basement.

I sewed a 1/2 inch seam along the quilt edge. Here you can see the two border parts after sewing with the border backing pulled out away from the quilt.

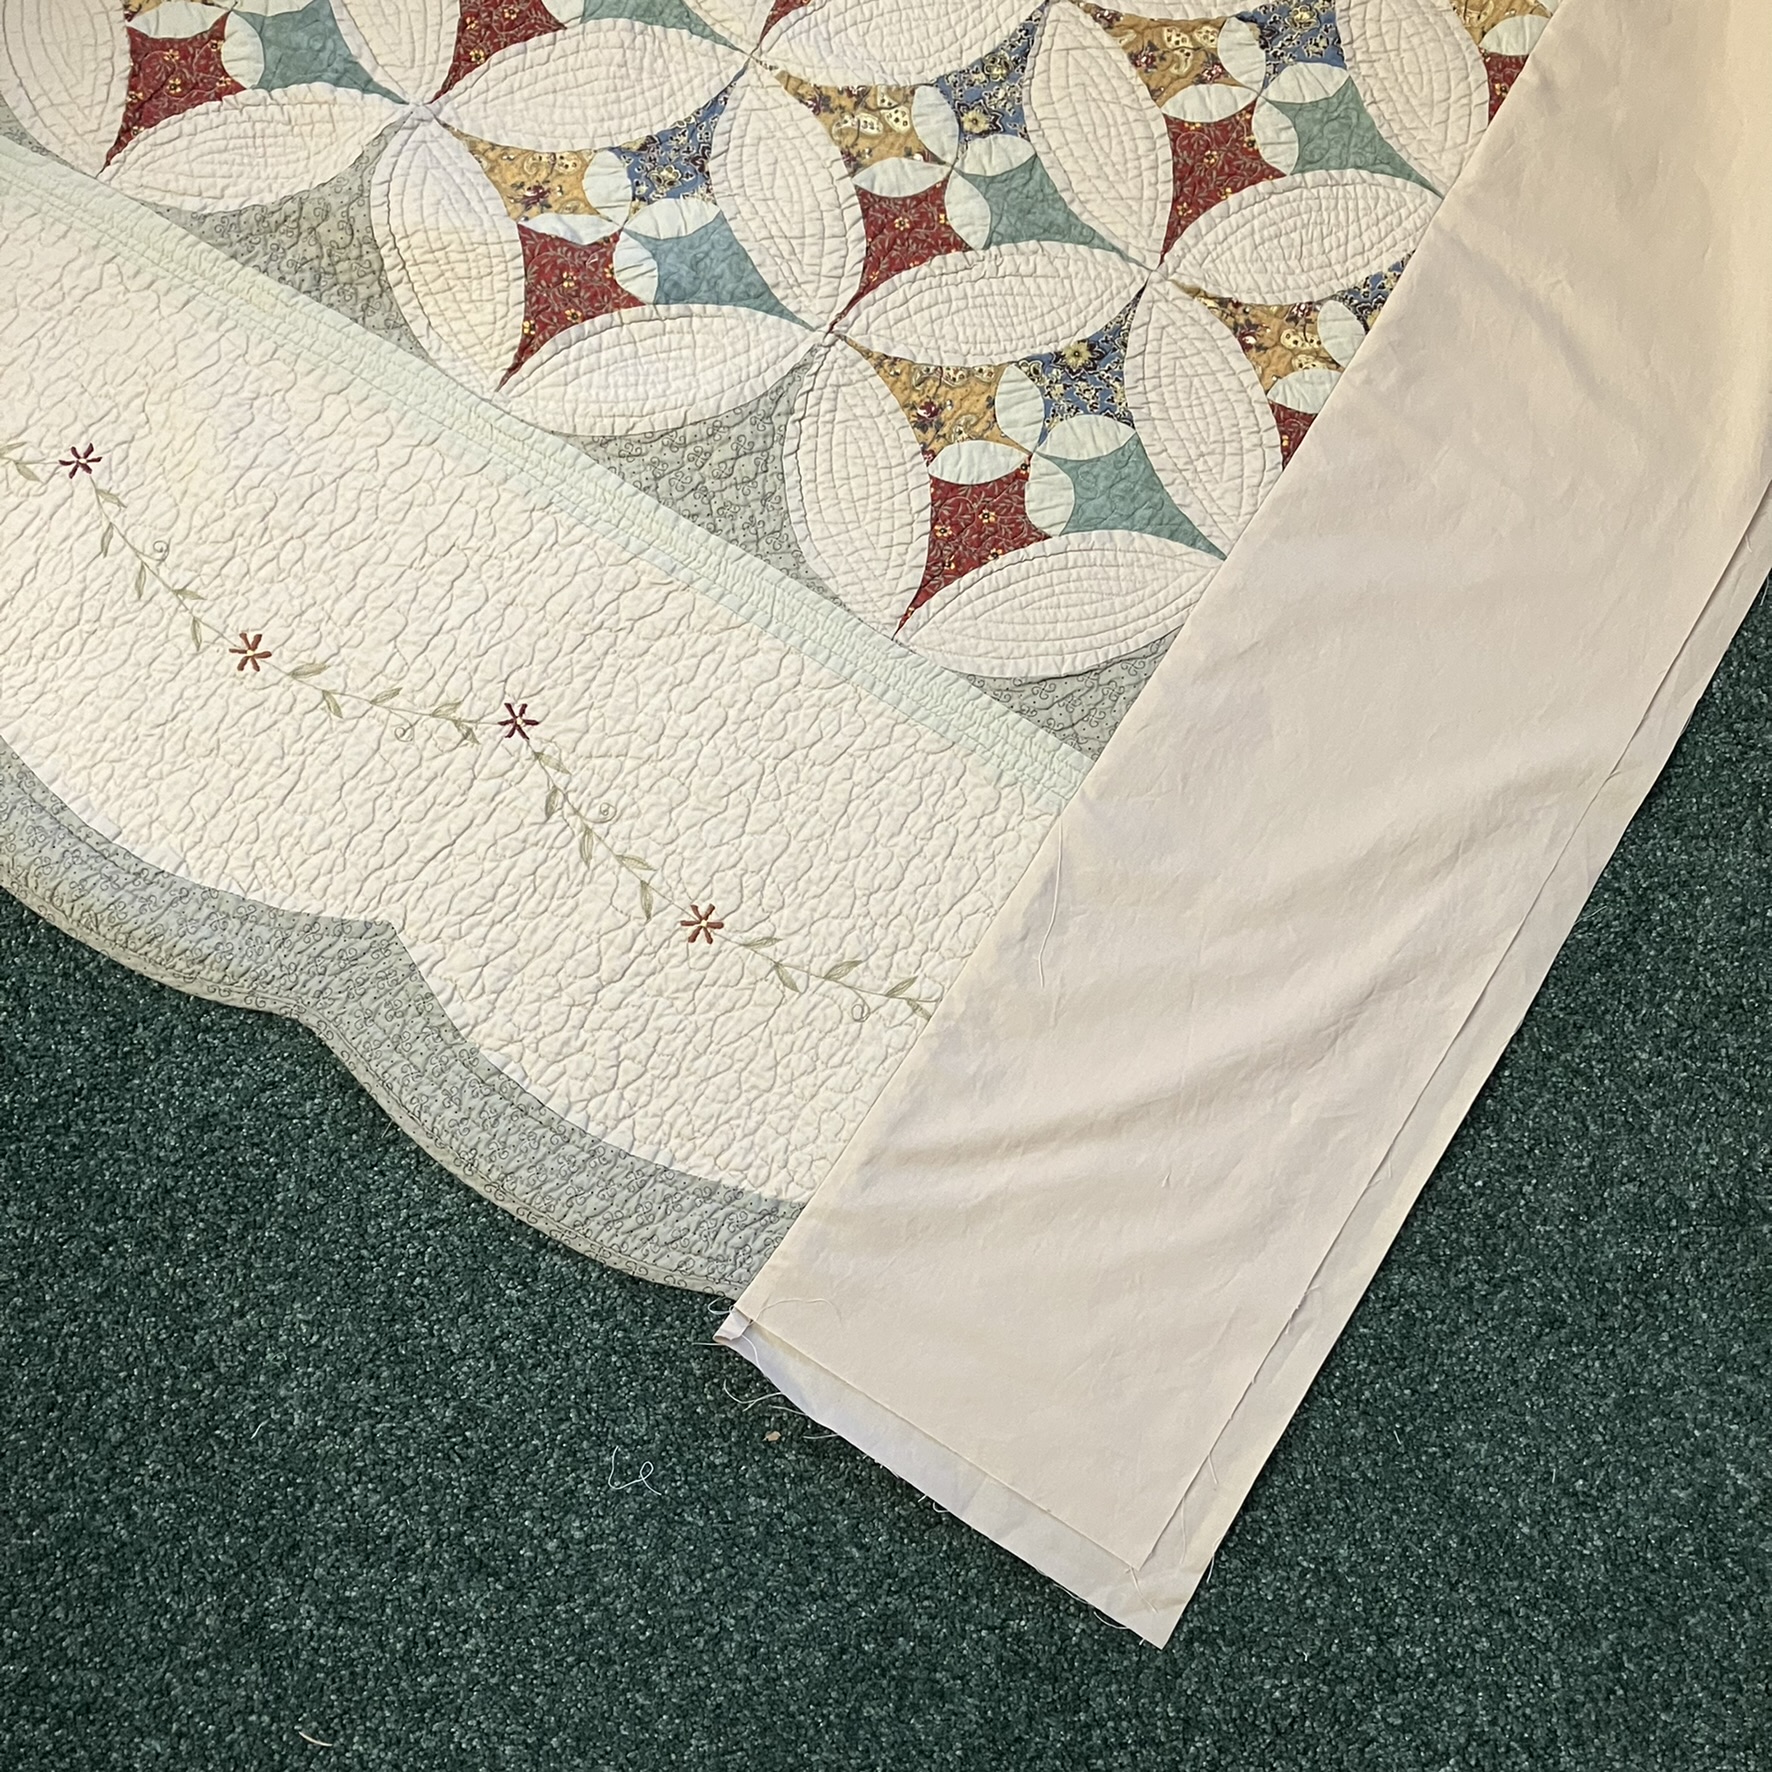

And with the borders right sides together. You can see the extra fabric showing on the backing.


I drew a line on the backing to show the extra fabric. Then I cut batting the same size as the front border and carefully laid it out on the wrong side of the border backing overlapping the seam allowance. I had initially thought of laying it up to the seam allowance, but this seemed to ensure a neater transition from the quilt to the added border. My batting is pieced, as I was using leftover bits from other quilt projects.
Corner pulled back to show the line on the backing.

I basted the batting in place to keep it from shifting over the edge.


After that it became a typical quilting project. I pin basted, then quilted a straight line a generous quarter inch from the main seam (with walking foot) and then free motion meanders similar to the ones in the border of the original quilt. I forgot to photograph the binding process. I folded the border backing toward the front all the way to the seam line (behind the seam allowance) and then folded it again to form the binding on the front. I could have machine sewed it down, but I love to relax and hand sew a binding, so that was what I did. Mitering the corners was a bit fiddly with those layers, but it worked.  


So here are the finished quilts, as much as I can show on my living room floor. They look different sizes here, but they are exactly the same size.

I know they are a little strange. I admit that for a second at the beginning, I considered trying to match the border to the original quilt, scalloping it and even doing some embroidery. Luckily, because this was a squirrel project, I quickly came to my senses. Because the whole point of this addition is to make sure the quilt is wide enough to be comfortable to the person under it. When the bed is made it's tucked down on the side of the bed against the wall and no one will ever see it. So no need for a fancy finish. I'll be interested to see how the quilts look after washing, when the meanders crinkle up a bit to match the rest of the quilts, but I don't plan to wash them until they've had some use.

Here's a close up of the quilting and transition. You can see that there is real applique and hand-guided quilting on the original quilt, which is why I like it, although someone was probably paid pitiful wages to do this. (Come to think of it, that is always the quilter's lot, isn't it?)


And one last one of the beds ready for the kiddies. By the time you read this they will have been slept in. 


If you think I was done with squirrels after this, you would be wrong. I won't bore you with the details, but this bedding project also included cutting and hemming a huge thermal blanket (it must have been meant for a king size bed--which we have never had-- and it was always drooping off our queen sized one), to make two bunk blankets, and reworking an old contour twin sheet (truly Frankenstyle, adding material to the corners and then recontouring them) for one of the bunks. It had shrunk so that it was somehow too tight for even a bunk mattress. Recycle, Repurpose, Reuse!!!

And...one more little project I have to show you because it's soooo cute! And fun! I was making my usual Christmas ornaments for the kiddies' stockings the other day (inspired by their Halloween costumes), and suddenly had the urge to make just one more. I had seen this fabric origami star by zencrafting and just had to Drop Everything and Make it. It was such fun, and only took a few minutes. It's made with a freezer paper lining which keeps it nice and crisp. Since vintage fabric designs seem to be trending now, all I had to do was look through my drawers of fabric, which have become vintage without even trying. I used 4-inch squares for my ornament parts as 5 inches seemed a bit larger than I wanted. A quick look through my button jar yielded just the right buttons to finish it off. This ornament will top off a holiday gift. Now I might have to make one for myself. Ooh, was that another squirrel calling?

Front (convex side)

Back (concave side)

I'm linking up with Sandra at mmmquilts for DrEAMi (Drop Everything And Make it) because that is all I've been doing this month. I hope you are having fun preparing for whatever holidays you celebrate at this time of year. Next time you read this, I just might have gotten back to the sewing I was planning to do.

(Just a reminder: I'm not affiliated with any company, so when I mention products, services, or stores I'm just documenting what I used or liked.) 


Thursday, November 7, 2019

My Last Quilty TBT

Here we are at what I'm pretty sure is my last Throwback Thursday quilt post. So let's get right to it. I made this one for my daughter and son-in-law in, I think, 2006, about a year after they got married--sort of a first anniversary gift, I guess. For some reason I had no photos of it and didn't think of it until just recently when I was searching for photos for my previous TBT post. So I asked my daughter to take some current photos, and while she was doing that, she came across an old one she had taken. Here is the quilt on their bed in 2009. I think my daughter might have been sentimentally taking photos as they were getting ready to become homeowners.
The quilt is based on colors that were popular at the time in an upscale home decor store, so I've always thought of it as the PB quilt (initials of the store). Although I have no photos of my own, I did find some documents on my computer of some of my plans for the design and color arrangement. It seems that I downloaded some graph paper and painstakingly colored in the squares using my paint program on my computer. Yipes! I'm not even sure how I did that. Here are some of my ideas:


I'm pretty sure the one on the left in that last picture is the final design. 

Here are some photos of the quilt in their current bedroom:
She had to dig it out of storage, so it's a bit scrunched up. It now only lives on the bed under their current quilts in the winter when it gets really cold. 
Here's a close up so you can see some of those tone-on-tone fabrics better. And you can also see that I tied it with pearl cotton. I was not yet retired back then and had no time to quilt it. I was only doing hand quilting at the time. They would probably still be waiting for it today if I had quilted it. I don't know the exact size, but it fits a queen sized bed, and the last time I hand quilted a quilt that size, I think it took 17 years. (There's a TBT post about that other quilt somewhere on this blog.) The back of this quilt is off-white--probably a good quality muslin. I'm certain that the batting is polyester given the distance between those ties.

This is, as far as I can tell, my 52nd quilty Throwback Thursday, a series of posts I have devoted to the quilts I made--or quilted--before I started blogging sometime in 2014. During that time I have documented at least 174 quilts--all the ones I could find photos for. There were a few more quilts along the way, but those were either exact duplicates or ones that slipped away from me without any documentation. I started this series in October 2014 when I found a blogger who was featuring TBT posts. Alas, the following week, she disappeared from blogland. For a few months I linked up almost weekly with another blog (Kelly at My Quilt Infatuation, which is still going strong), but that didn't feel quite right because the quilts featured on that blog were new ones. In the fall of 2015, I found Jenn at A Quarter Inch from the Edge, and I linked up with her monthly TBT linky party until life caught up with her in the fall of 2016, and she discontinued the party. I took a TBT break until January 2018, when Sandra at mmm! quilts revived TBT the first Thursday of the month. She now shares the hosting of the party with  AndrĂ©e at Quilting and Learning. So a big thank you to all of these women, and especially Sandra for reviving TBT. 

I have a real sense of accomplishment completing this documentation of old quilts. Looking back, I see that I used to write often about one quilt at a time. As my blogging rate tapered off, I started grouping quilts.There were some posts that wrote themselves--the ones where there was a poignant, or at least interesting, back story. Others relied on details and statistics because that was really all I had. Anyway, if you are new or newish to my blog and are interested in my old work and previous TBTs, just click on the "throwback thursday" label on the right side bar or at the bottom of this post. I think that will take you to most, if not all, of them. 

Again, thanks to the wonderful bloggers who have made these TBT parties possible. I'm linking up today with Sandra at mmm! quilts, where you will find her ALWAYS fascinating TBT blog post (really, she has total recall of the quilts she made before blogging and great photos) and the link party for you to share your own pre-blog quilts if you can. Even if you don't have any to share, be sure to read about the others at the party. 

I'll be back soon with more on my current projects. Until then, keep quilting!


Thursday, September 5, 2019

A Few More Quilts

Two quick quilts today for Throwback Thursday. I don't have much information about the first one. I think it might have been a kit quilt. 

Sometime in the 1980's, my sister-in-law asked if I could quilt it. I'm not sure if she made the top or if a relative of hers did or if they both worked on it. I just remember that I jumped at the chance to do the quilting. At that time I was a hand quilter. In fact, it was my favorite part of making a quilt, and I thought of making a top as a way to get to the quilting. So this was the perfect project for me. I do not remember whether I marked the designs or if the top was pre-marked. I've enlarged a bit of the photo so you can see it better. I know it's fuzzy,  but it does show the sort of spirograph style flowers, circles and outlining. Does anyone remember these kinds of quilts and any details about them?
And now, I don't even remember whether I did the binding or not. If so, it was my first (only?) scallop binding. Wow, for a Throwback Thursday quilt, this sure is short on memory. We'll just blame it on young motherhood and the fact that I didn't need to keep track of my work since it was for a family member, not for hire. I gave my quilting as a gift to my SIL that year, (Christmas? Birthday? I don't know). She put it on her oldest daughter's bed, which is the one in the photo. 

I was "hired" by my mother-in-law to make this second quilt. 

The churn dash pattern is one I made (or quilted) often during my tiny quilting career (which you can read about if you click on the "my tiny career" label on the right sidebar). This quilt was to be an anniversary gift for friends of my in-laws. My MIL wanted Delft colors to celebrate the couple's Dutch heritage. While I was making it, I decided to pep it up just a little bit with one red churn dash block, which led to the name of the quilt: Tulip in the Delft--one of the rare times I named my early quilts.The quilting is outlining in all the background fabrics except the red block so that one would poof out a bit. And then I did my signature leafy vine pattern in the border. Here's the back:

I made this quilt in September 1988. It measures 13 1/4 by 11 1/2 inches. 

Well, since this post is short on content, I'll include just one more quilt--one I made for our family room. It still hangs there. 

I've shown lots of mini quilts on my blog over the years, but aside from a couple of tiny pictorial quilts, I've never made a really tiny quilt for us except for this one. It's from a pattern I bought. The folder says it's from Mary Herschleb Designs in Hudson, Wisconsin. The copyright date is 1995, which makes sense, because that is the year we moved to a new house, and my daughter and I set to work painting birdhouses for decoration. It was a fun little quilt to make--paper foundation pieced, with tiny black buttons used to "quilt" it. I used all scraps. Even the background is a variety of prints. I used black embroidery thread to attach the buttons and tied it in bows on the back. Not sure why I did it that way, but there you have it.

Now that I look at it more closely, I guess I did a bit of actual quilting around the yellow border. The birdhouses have long since been packed away (first step toward donation), but the little quilt still hangs on the side of an antique china cabinet in our family room. The quilt measures 13 1/4 by 11 1/4 inches.

Well, that's almost it for my Throwback Thursday posts of my pre-blog quilts. I guess you can tell I'm scraping the bottom of the barrel for content about these last ones, but it is good to have them all documented. I have just one more quilt (as far as I can tell) to post about, but I don't have a photo of it, which seems really odd to me, because it's a big quilt. Since the quilt is owned by my daughter and son-in-law, it will not be a problem to remedy that. 

I'm linking up today with Sandra at mmm! quilts for Throwback Thursday. Go there to read her always interesting and delightful post about her own pre-blog quilts and post some of your own if you have any.
                                         

Thursday, December 6, 2018

TBT: Commissioned Quilts

I can't believe it's been nearly a month and a half since I did any quilting. (I did manage to baste two quilts, but didn't even get a photo of that.) I kind of knew that might happen this year, but that's a long time for a quilter!! There have been a lot of family things going on,  and now that we are into December--during which I never do much quilting--I doubt much more will be done, at least for the next couple of weeks. I will content myself with looking back at some quilts from the past. (I haven't been totally idle from sewing. I did sew a Christmas stocking for my newest Grand last week and did some fun hand sewing of ornaments for the Grands' stockings.) 

Anyway, as I've been doing the last few months, I'm sharing another post about my tiny quilting career. For more posts about that (if you wish to review them) just click on "my tiny career" in the label list on the right side bar or at the bottom of this post. Most of these posts cover quilts I hand quilted for Becky Schaefer in the 1980s and 90s. She made the tops from antique fabrics and blocks and shipped them to me for the quilting. I thought I had shared all of them, but just as I was finishing my last TBT post, I came across just a few more. So I'll quickly show them and then get on to the quilts I meant to share for this post. I don't have any details recorded for these last quilts--just loose photos. So without further ado, here they are. Let's start with a pretty one for the holidays--a feathered star. I'm guessing that this one was 20-some inches square based on the size of those clothes pins. I never tired of quilting feathered circles. 

Here's the back--a bit wrinkled, but we jammed these into mailers for the least postage possible, so there you have it.

Next, this little group of Lone Star blocks. I think it's about the same size as the quilt above. So much to love here: the soft colors, the shirting in the background, the diagonal striped inner border. Again, feather circles, but also a feather heart in the center. What fun! 
And the back in all it's wrinkled glory. If I were to quilt these kinds of quilts today, I would definitely make the quilting more consistent in density over the surface. But at that time, it was important to keep costs down--so less quilting--and I avoided doing too much quilting in the fragile old printed fabrics.

I like this brown and cream quilt with just a hint of lavendar--not colors I'd use much today, but they are really striking. I like the pattern, too, and think it could fit well into a modern quilt. This quilt appears to be about the same size as the others.
The quilting does not show up much in these photos on the front or the back, but when I look closely, I see outlining in the white triangles, partial feather circles in the larger ones, and some outlining in the brown areas to create a square with points in the middles of each side. (Not quite sure how to describe that.)

Okay, one more of Becky's quilts. It's similar to others I showed a couple of months ago, but rectangular instead of square. I'm guessing it's about 20 by 24 inches. 


The quilting shows pretty well on the back.

So, as far as I can tell, that is the end of my documentation of the quilts I quilted for Becky. As I've said so many times, I loved this tiny career. But here's an unexpected bonus: my quilting for her led to quilting for others. Some of these projects came through Becky, who gave my name to people who needed to have a quilt finished. But others came through my confidence because of the work I was doing for Becky. I approached a quilt store owner and offered to finish tops for her clients. And word got around in my community, too, which led to commissions from others. So the remainder of this post is a collection of those quilts. I'm not sure "commissions" is the right word, but I'm not sure how else to describe them. 

Let's start with one I'm not crazy about. And truthfully, I never would have worn a vest like this even in the 1980's. But a local quilt store owner needed a sample for a pattern. When she asked me to make it and mentioned some trick for making ocean wave blocks I vaguely nodded as if I knew exactly what she was talking about. Eek. I had never done this before. I think I constructed the block and appliqued it on the background. I'm pretty sure the outer edge was on the bias, which might have been what the quilt shop owner was trying to help me avoid. The most fun was the crosshatch quilting. My eyes were better then, and quilting with black thread on black fabric was still doable. I made most of my own clothing in the 80's, so the vest construction was not a problem for me. I made this vest in November 1985. According to my notes, it took me 14 hours, and I used 31 yards of thread. I have no idea how we negotiated my fee. But I never made another clothing sample again. It was not my thing.
The back:

My next project--for the same quilt shop owner--was much more to my liking. In fact, it was exactly what I wanted to do. A scrap variation of Irish Chain. The top was dated January 1, 1940 and signed by the maker. As so often is the case with old tops, it was rather ripply so somewhat challenging to quilt. We knew this would be the case, but overall, it quilted out pretty well. The quilt is 38 by 55 inches. I quilted it with 82 1/3 yards of thread (paid by the yard). In addition, I was paid for the time it took to baste and mark it (4 hours, according to my records). I quilted stylized flowers in the solid squares, outlined the solid parts and quilted diagonal lines in the prints. I did not have to do the binding. (Yea!)

Here's the back--plain muslin. It looks stained here, but that is just poor quality lighting. At least it shows the quilting.

This next quilt was for a woman that went to my church. I think she had taken a sampler class and then put the top together for a twin bed. It measures 66 by 84. I think we discussed the quilting a bit, but she pretty much let me just do whatever. So I let the blocks tell me what they wanted and then surrounded them with scallops in the border. The quilt was constructed sometime around 1980. I quilted it in September/October 1987. My records indicate that there are 224 yards of quilting. It looks to me like the binding is actually a fold over from the back--pretty wide.


The shadows are terrible in this photo of the back, but it does show the quilting. I haven't looked at it for a long time and am noticing details I had forgotten about. I like those vines in the wide sashes. Do you see those tulips above the scallops? I guess those were a nod to the Dutch heritage of both the maker of the top and myself. Given the puffiness, I'm guessing the batting is polyester.

Here's another Irish Chain that I believe came in a roundabout way through Becky but was actually made by a woman who lived not far from me. The top was made by K in 1987, I quilted it in the summer of 1988. It is 74 by 92 inches. I used 314 1/3 yards of thread. the quilting is pretty straight-forward, quilted in a similar way to the Irish Chain quilt above, but with a cable design in the border. I think the binding was a fold over. I wonder if that was common back then. How about those little quilt holder helpers showing on the edge? Such cuties. (Well, I know you can't see much of them. I cropped them, but believe me, they are cute!)
 Here's the back--same green print as on the front.
 And a close-up.

This next quilt was a commission from a quilt shop owner in San Anselmo California--a referral arranged by Becky. I think it's my favorite of this batch--an antique Nosegay top, 61 1/2 by 82 inches. I finished it in March 1989 with 318 1/2 yards of thread. I also did the binding. Aren't those fabrics delicious? Even with the sketchy lighting.

Here's the back. I love how the quilting makes its own pattern

And a close up:

How about one more?

Okay, one more quilt--also a commission from the quilt store owner in San Anselmo. The top was made by a client in 1989. I quilted it in May of that year. It is 39 inches square. I used 202 yards of thread. I also bound it. I don't remember if it was marked for me, if I was given the stencils for the quilt motifs, or if I used my own.

Here's the back:

Oh, and then I have to show this last item even though it's not a quilt and I can't remember how it came to me. But it was a commission and a fun little diversion from quilting. Counted cross stitch! Before quilting, I had a long love affair with embroidery and cross stitch. So I just had to share this, because it is somehow related to those days when projects just came along through my tiny career, and I got paid for my pastime.

As much as I loved working on Becky's tiny quilts, I found these much, much larger quilts to be very satisfying. They gave me an opportunity to quilt more complex designs. I used a 15-inch lap hoop (I still use the same one) for quilting. At one point I bought a set of used rails because I thought I might like quilting on a larger frame, but I could not get used to it. I was so used to quilting toward myself and could not get the hang of going in other directions or twisting myself around on the large frame. (Also, it took up too much room that I really did not have in my living room.) It was a little scary at first to take someone else's lovingly done work and add my quilting to it. What if I messed it up?! But the joy of quilting soon took over. And I was very fortunate to get to work on such well-made tops, so they all (except that one antique quilt) came out flat and square.

I thought my TBT posts would be finished by the end of this year, but it looks like I have enough quilts left for a couple more in the new year. I hope you'll stick with me as I try to get these all documented. In the meantime, I need to get going on some new work. 

I'm linking up today with Andrée of Quilting and Learning, What a Combo for Throwback Thursday. She is subbing in for Sandra of mmm! quilts while Sandra takes a little break. Thanks, Andrée! And Sandra, I hope you are relaxing.

I wish you all a beautiful holiday season. I hope you get to do a little quilting or sewing at odd moments when you aren't celebrating or doing other things. My next project is a little soft book for a certain little grandbaby, and then I need to get going on my Rainbow Scrap Challenge quilt finishes so that I can think about what to do for RSC in 2019!