No, you're not seeing double. I've been sewing double, bit by bit, for most of 2020. The project I hinted at has been gifted and I can finally share.
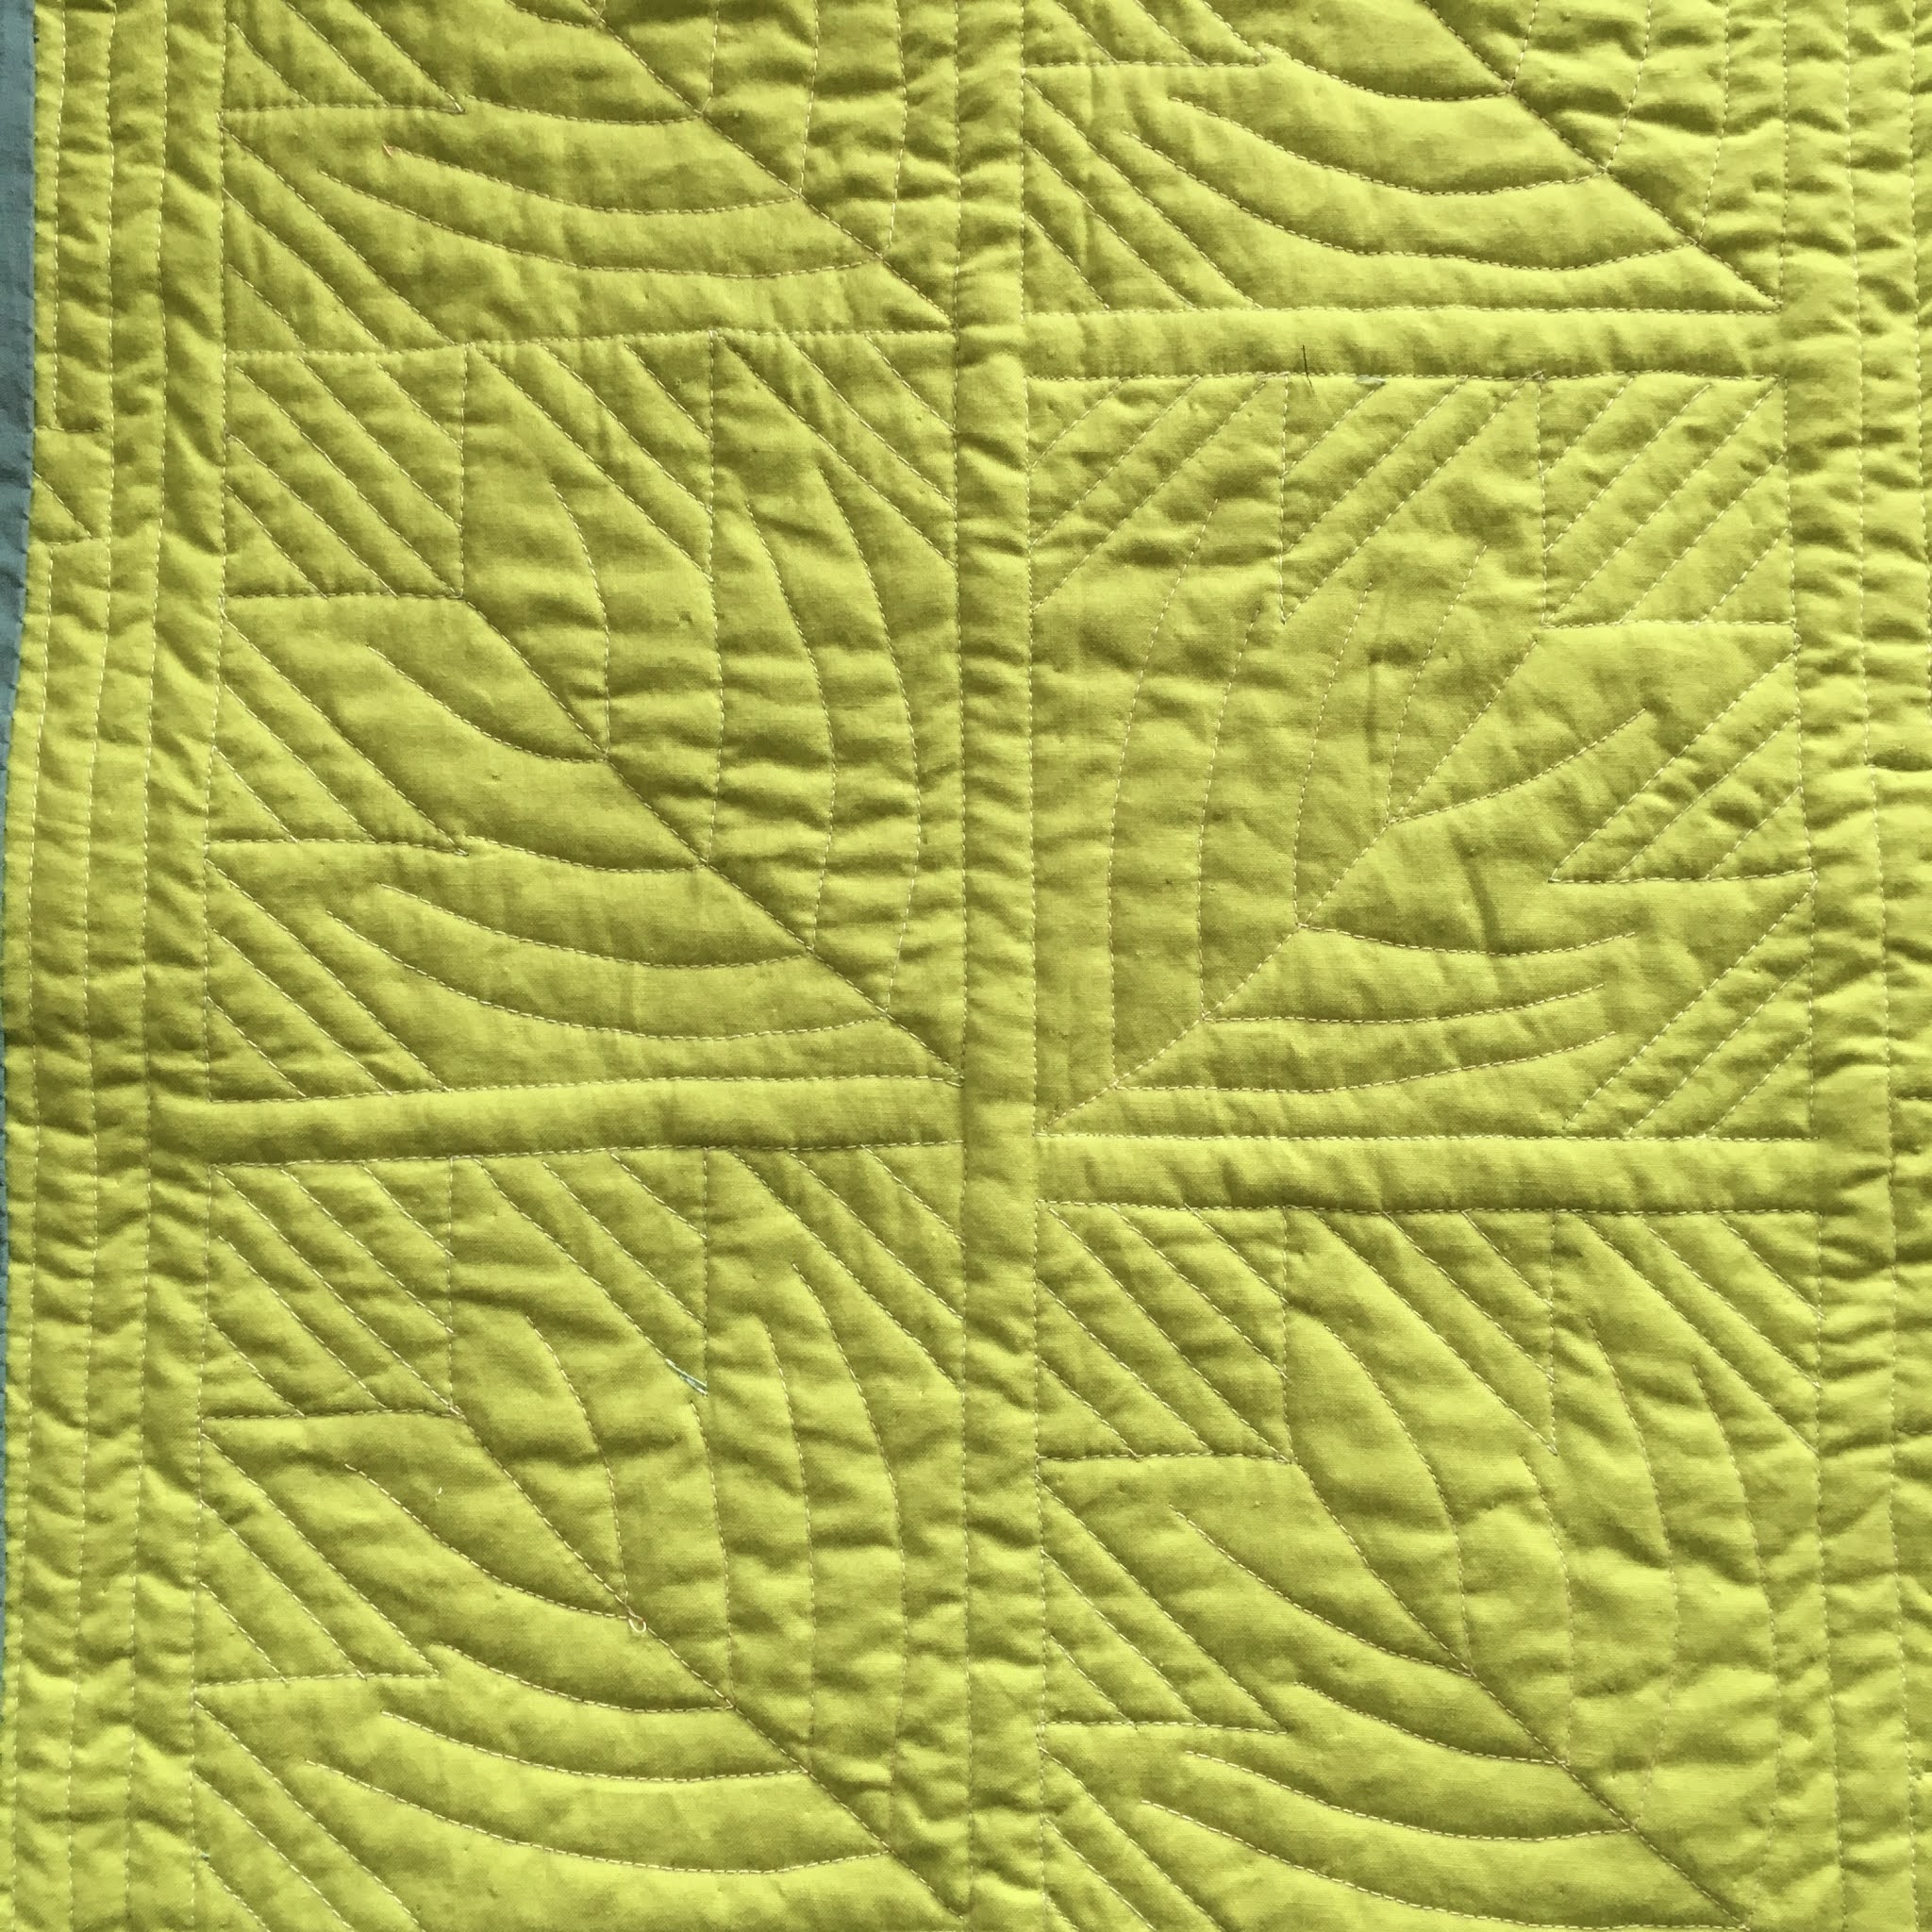
The quilt on the right is a very belated wedding present (and by now, a housewarming present) for my brother-in-law and new sister-in-law. They were married in January. Why is there another quilt? Well, let's see...This all started with a squirrel project back in mid-October--that leaf you see in the bottom right corner. I had an urge to make a freezer paper pieced aspen leaf that you can read about in the second half of this post here. At the time, I knew I wanted to expand that block into a quilt with other natural elements, but I didn't have a plan. I knew it would become part of a wedding present for M and C because they live in Colorado, where these leaves are glorious in autumn. At the time, I was also looking ahead to our church's art show in May 2020. I figured I'd make two quilts simultaneously, using the quilt on the left as my practice blocks and then entering that quilt in the art show. So while my October post showed one leaf, there were actually two identical squirrels that month. For a little extra interest, I made the central vein and stem a three-dimensional flap.
 |
Art show quilt
|
 |
| M and C's quilt (with initials and date) |
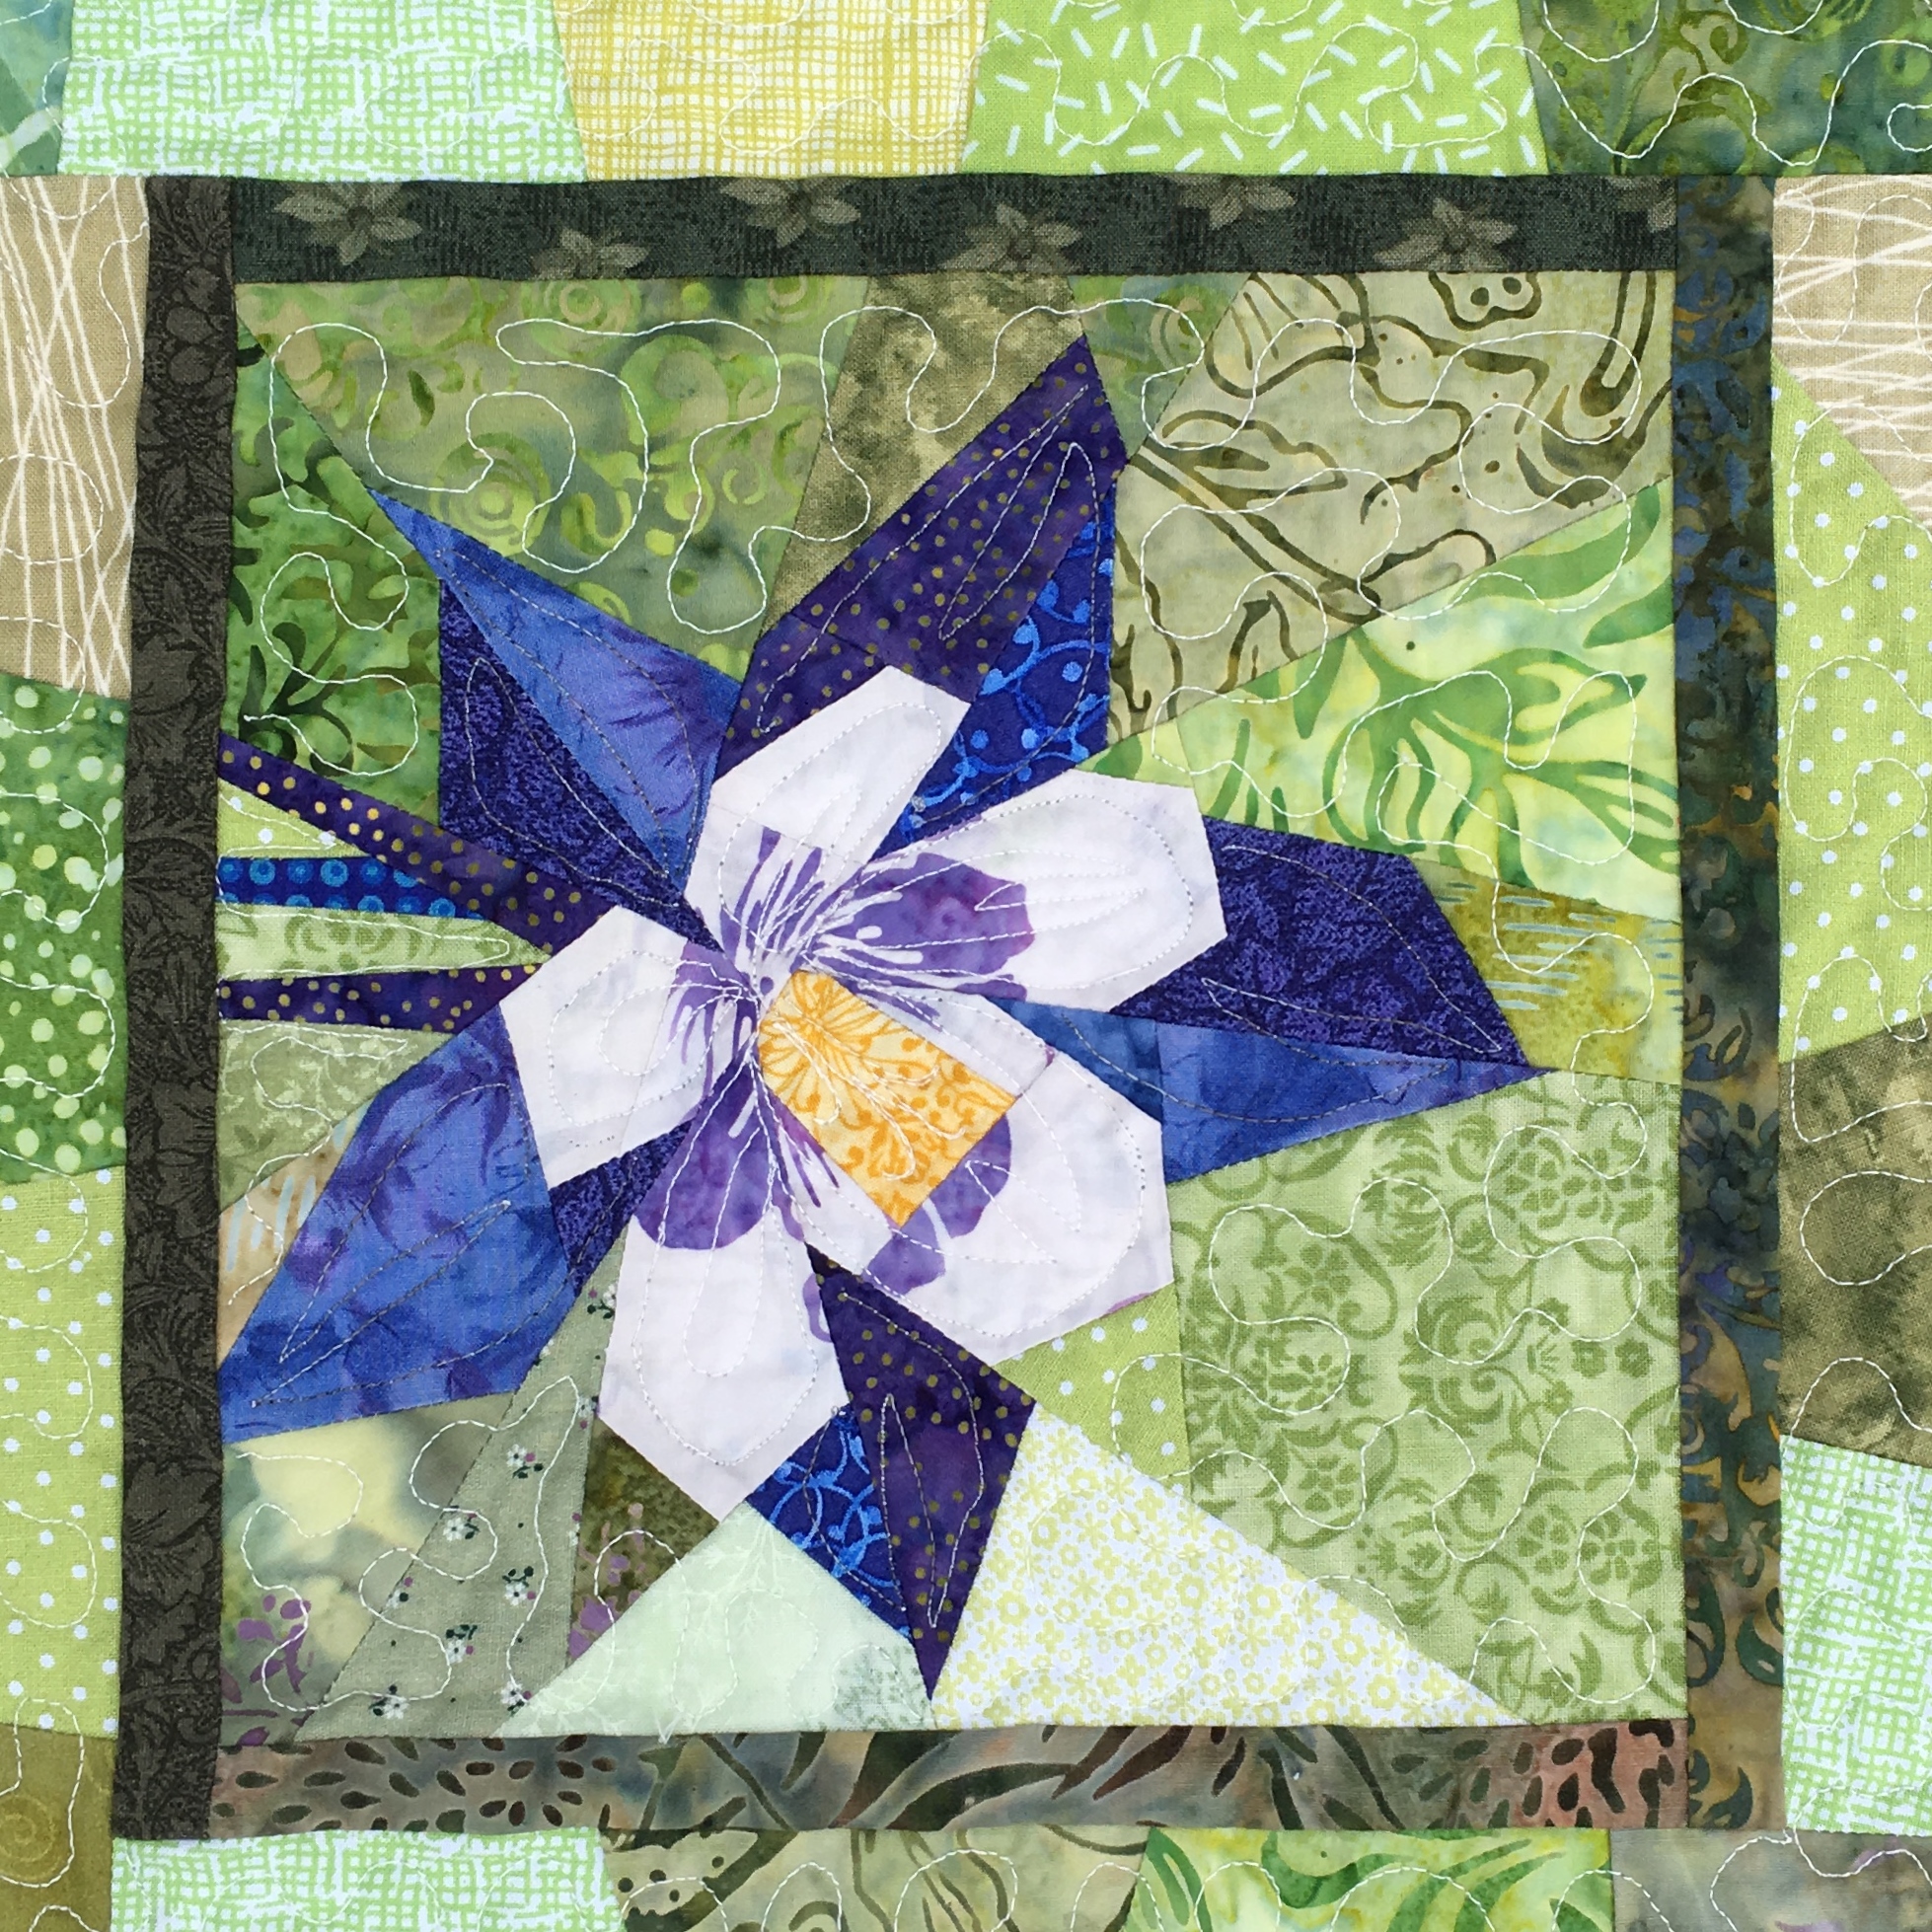
I had a nasty virus all during January, so I was slow getting started with the project at the end of the month. I knew that the next block I would make was a columbine blossom. For this one, I used a pattern from Ruth B. Mc Dowell's book Pieced Flowers. You know she's my favorite quilt artist, and I love using her freezer paper piecing, which I think of as puzzle style piecing. Her quilts often make dramatic use of fabric color, pattern, and value rather than more realistic representations. I have not mastered that, but I do love using the techniques and developing my own interpretations of color and texture. Most of the fabric used in the blocks were from my scrap bins and drawers. I had to use two different purple and white fabrics for the centers of the columbines as I didn't have enough of one fabric. Figuring out how to get the purple parts where I wanted them was a challenge with lots of do-overs, but I think they both worked in their own ways in the end.  |
Art show quilt
|
 |
M and C's quilt
|
I was a little stumped about the next small blocks because I had sort of exhausted my knowledge of Colorado nature, but an internet search revealed that the state butterfly is the Blue Hairstreak. Well, sure. I've been on a butterfly kick for the last couple of years, so that would be fun. I made my own pattern on graph paper with multiple versions to simplify the design, and then transferred it to freezer paper for the patterns. It was fun fooling around with a batik berry print to make the "eyes" on the wings. I used embroidery after quilting for the antennae and little hairs at the bottom of the wings.
 |
Art show quilt
|
 |
M and C's quilt
|
I also found that there is a state cactus: the Claret Cup. Breathtakingly beautiful in the photos I saw. I drew a pattern and then waffled about how to represent it in fabric. I tried two different ways--one with subtle red shading and the other with more pattern in the fabrics. I like both of them. By this point in the process, I had ordered some fabrics online because I wanted some that represented spines and dryness in the background, so most of the fabrics in the background are new fabrics (except the dark brown scribbly print that I've often used to represent woody landscapes). I don't often buy fabrics online because I have a really difficult time visualizing them from a computer screen, but I had no choice. By then we were in lockdown due to the pandemic. I think I bought these from Lark Cottons, and all but two worked. I loved the other two, but the designs were too distinct.  |
Art show quilt
|
 |
M and C's quilt
|
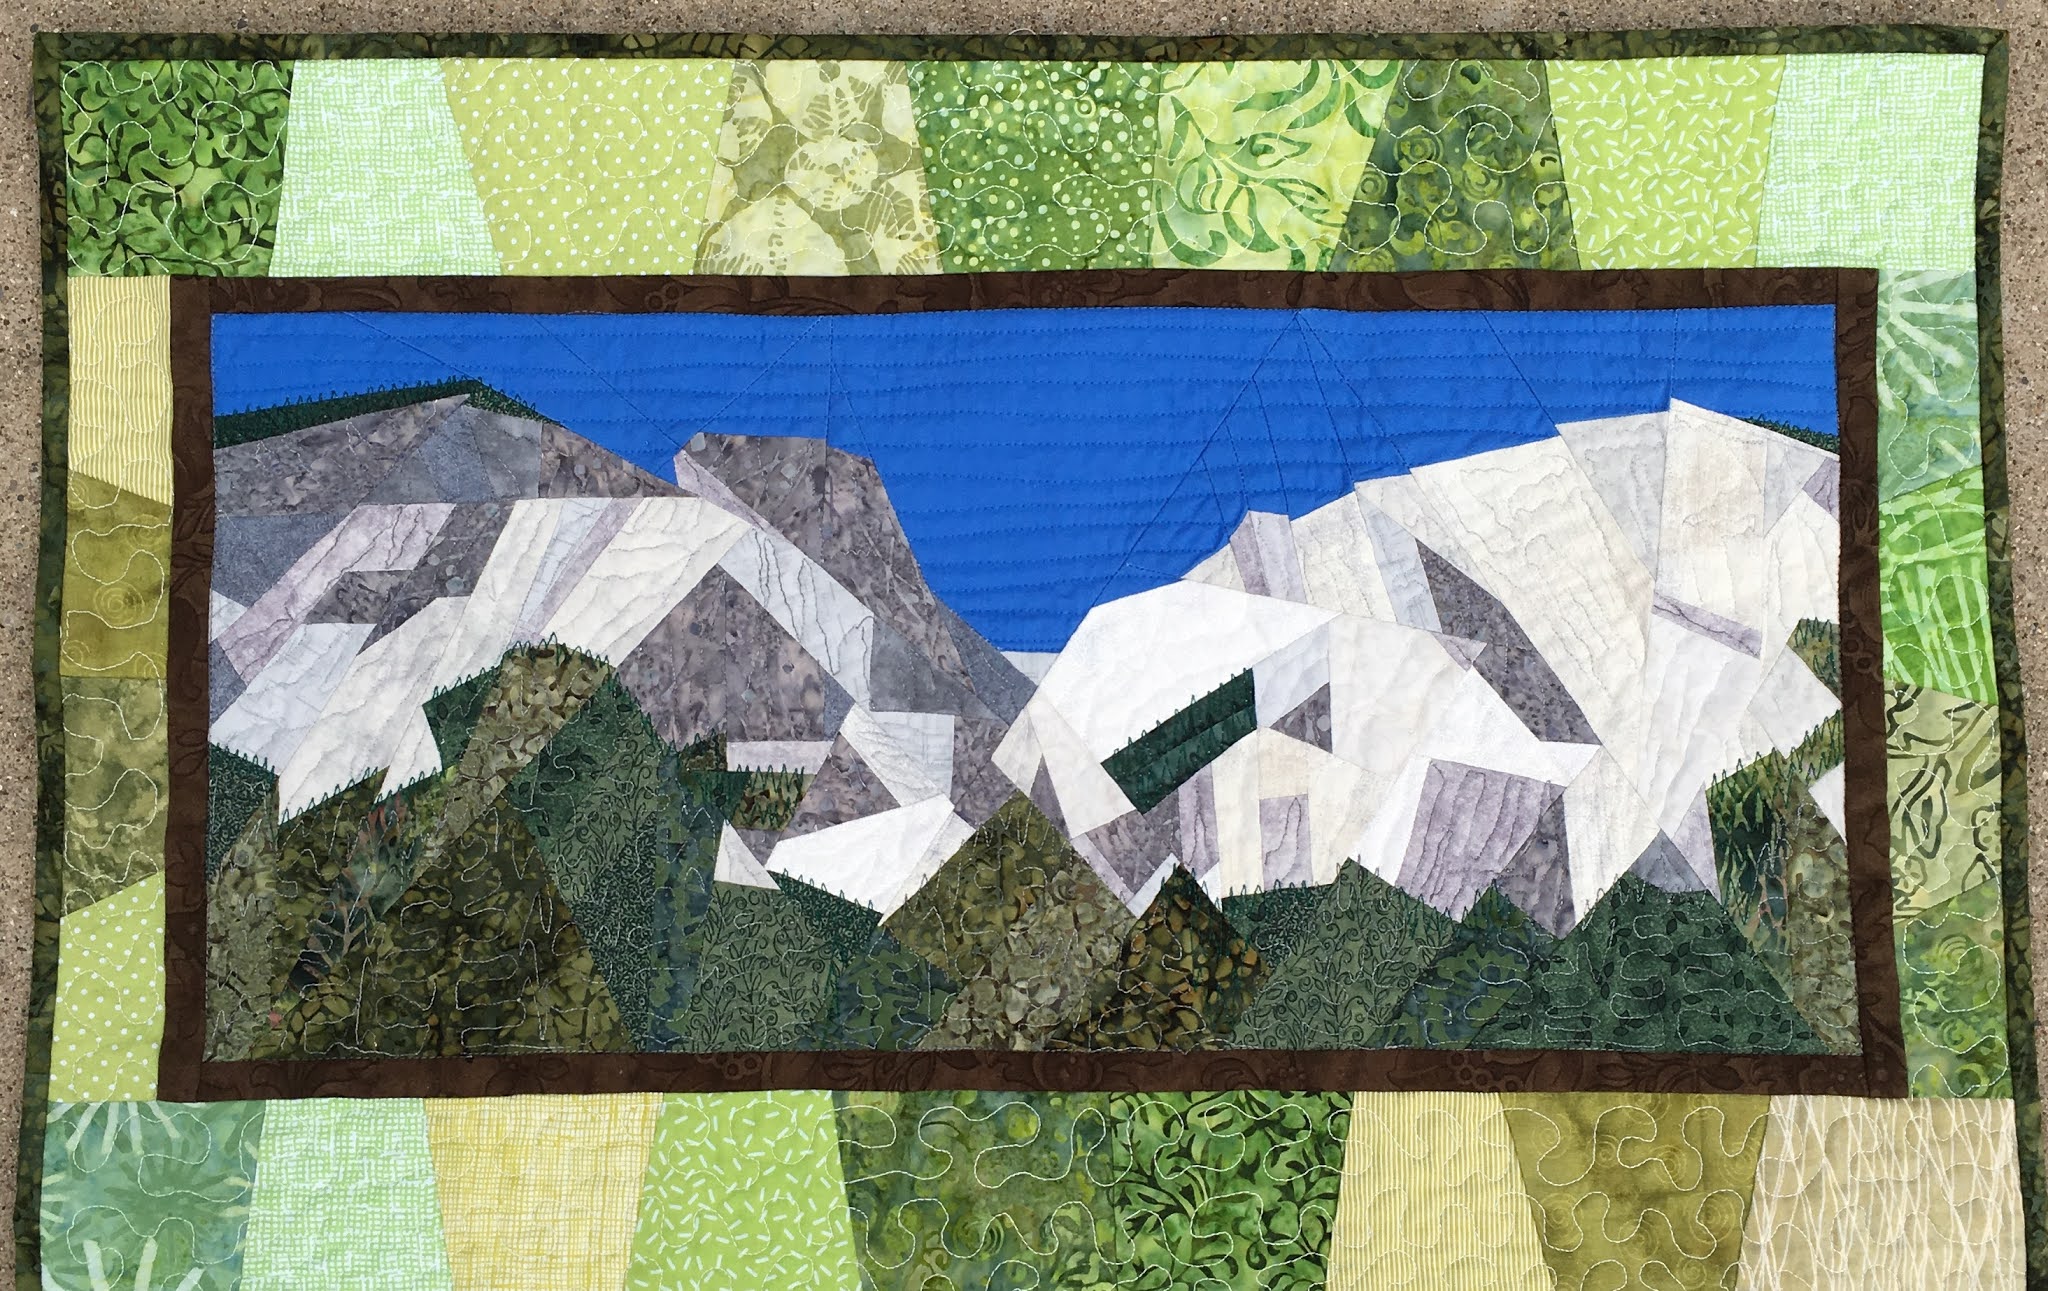
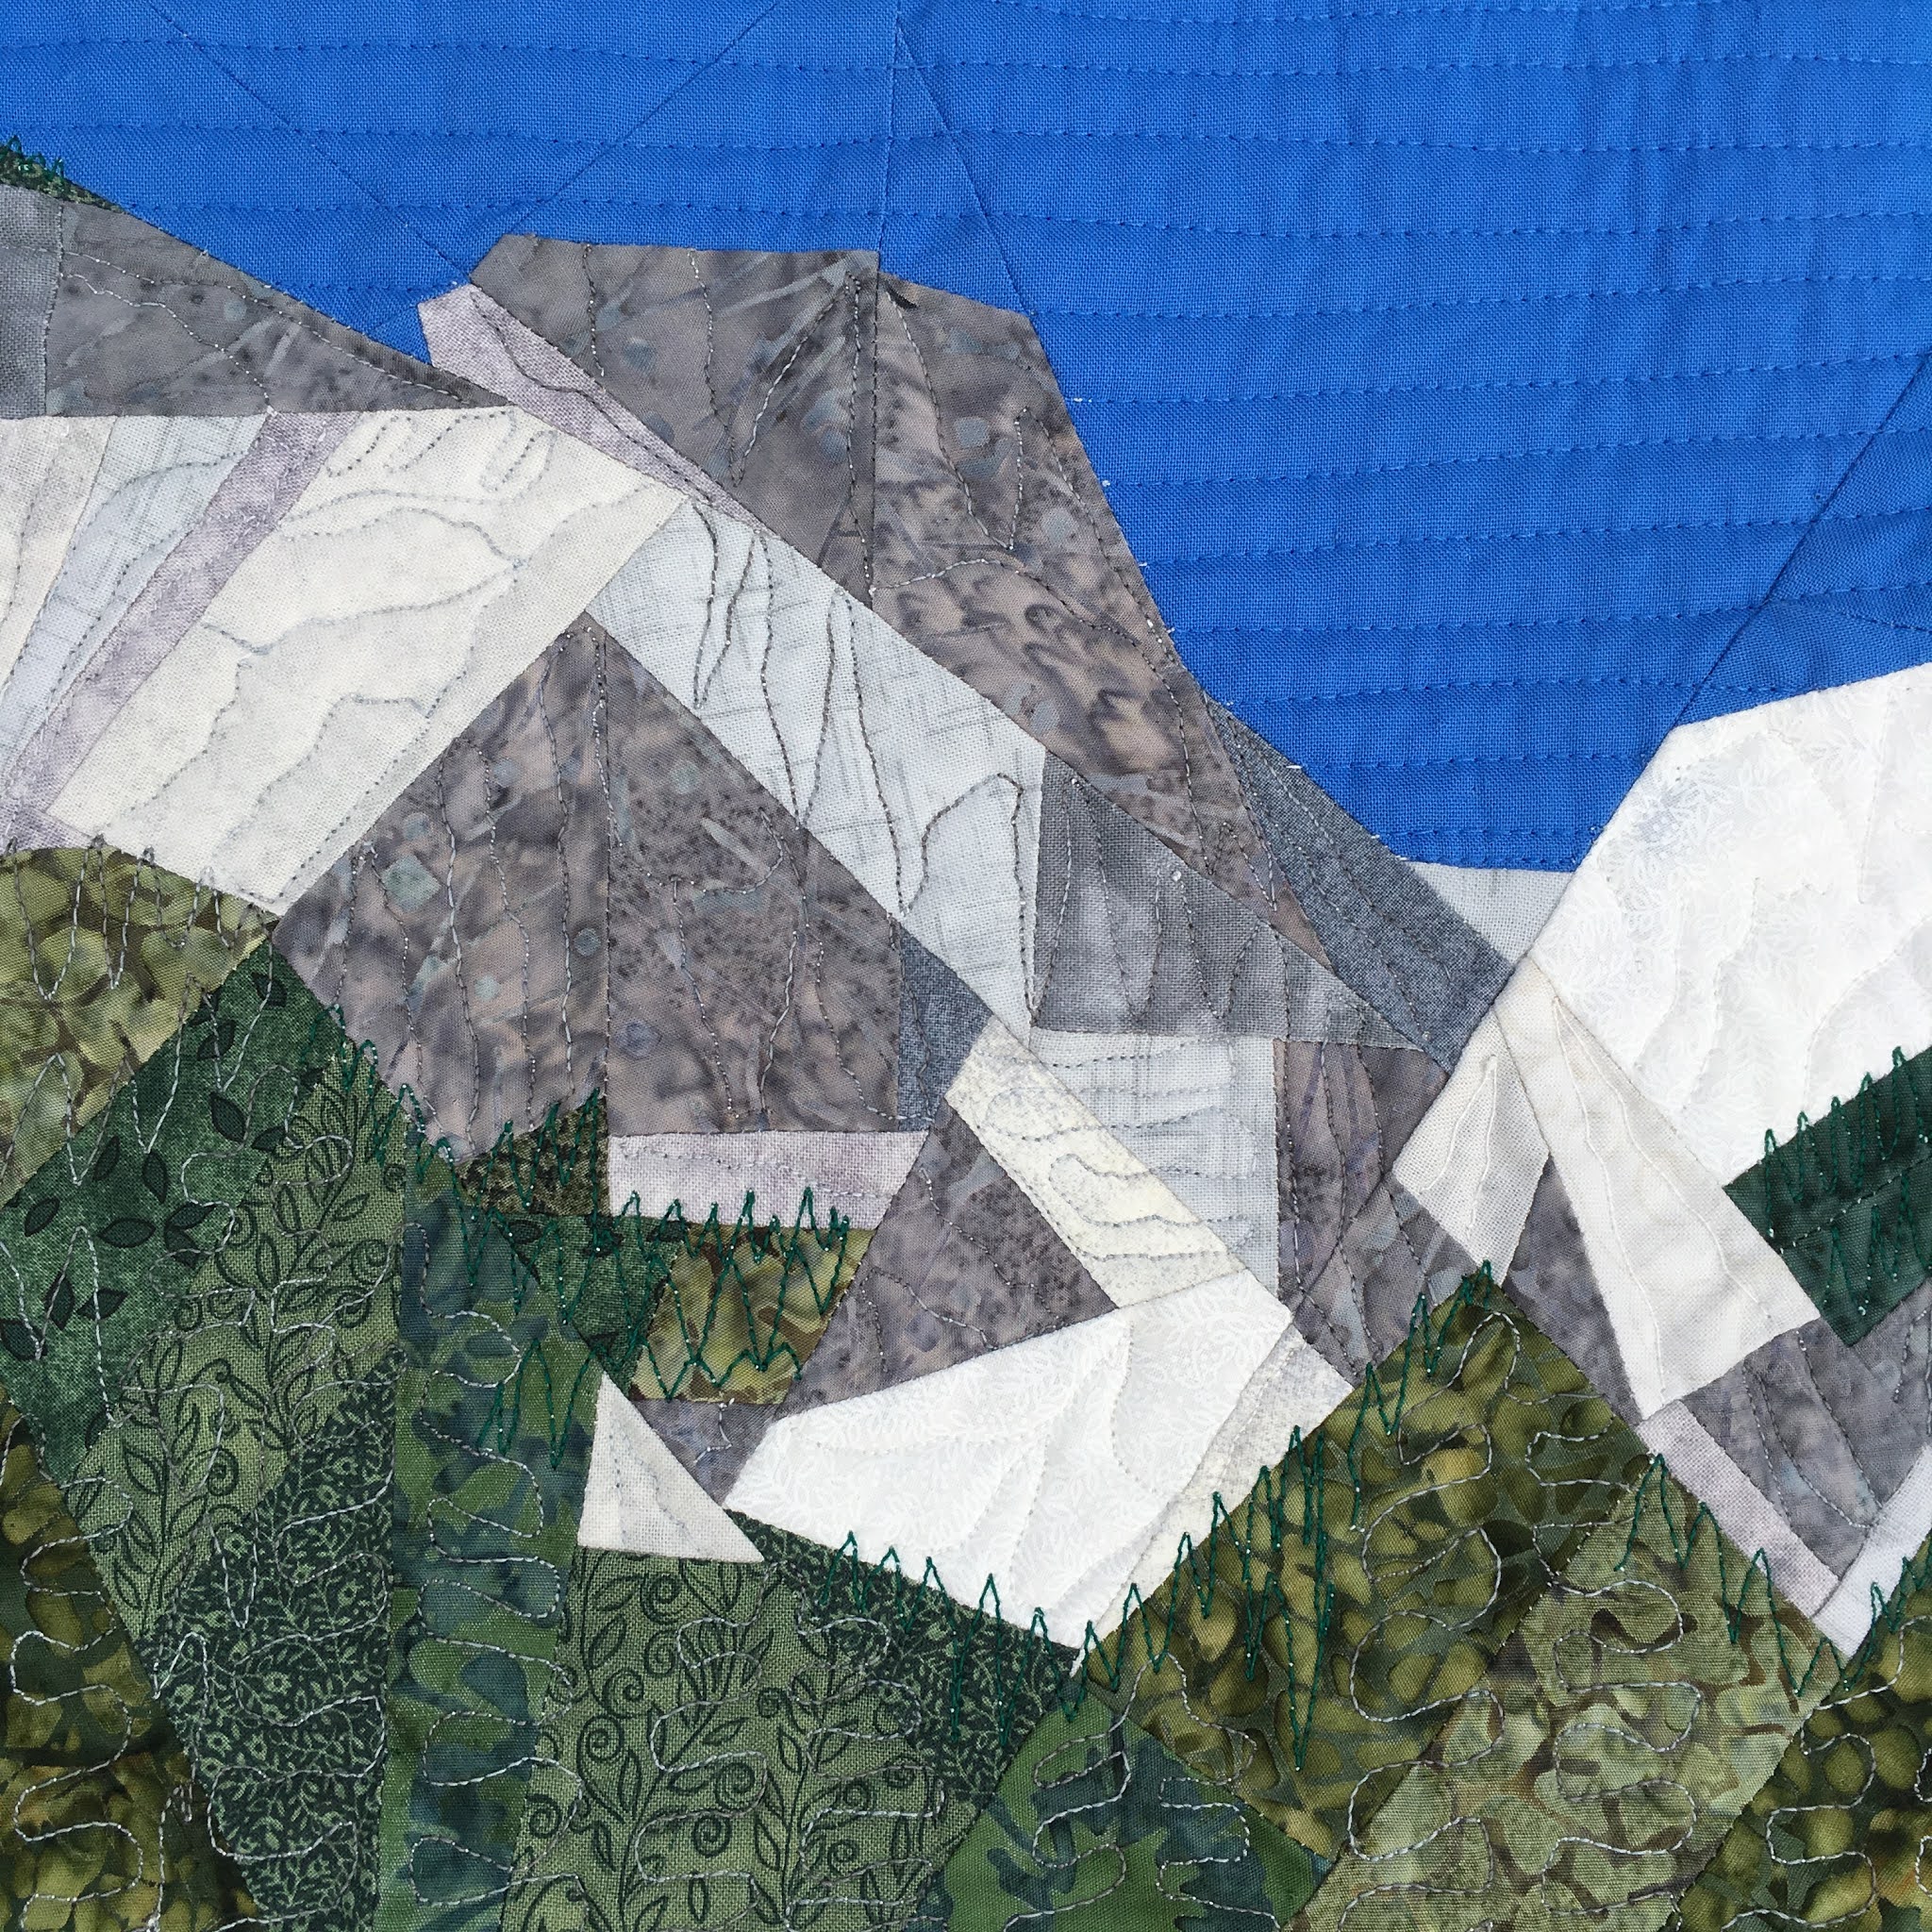
M and C live near the foothills of the Rockies with a rather subdued mountain right outside their windows, but they have a second home in the mountains looking out at the chalk cliffs of the Collegiate range. I tried making a pattern for their mountain in the foothills, but never having been there, I had a hard time figuring out how to draw it just from photos. I did have access to photos of the chalk cliffs, though, taken on a brilliant day. My brother-in-law and some of his family members are in the foreground. I've blurred them out for privacy.
I knew I had found my header block when I found these photos. I designed an abstract version of the cliffs on newsprint and then made a freezer paper pattern. After that it was a matter of, little by little, building the different sections. (Sorry, forgot to take a picture of the pattern.)I tried various patterned blue fabrics for the sky thinking they would fit with the other prints in the quilt. But, I kept going back to that brilliant, cloudless blue sky in the photo and just had to use that. And I'm glad I did.  |
Art quilt
|
 |
M and C's quilt
|
You can see that I put frames around each block. I wasn't planning to do that at first, but as I developed a plan for the background of the quilt, it started looking mushy, so I framed the mountains in brown and the other blocks in various greens according to whatever was needed for a bit of contrast. I also tried some lighter fabrics for the background, but eventually chose a patchwork of yellow greens to represent various types of foliage. After laying out what I had on hand, I bravely made my way out to a local fabric store that had just opened after the virus lockdown to buy a few more pieces of fabric. It was the first time I had been to a retail store except for early morning "senior hour" grocery shopping, and kind of scary and surreal. The shop was outfitted with clear shower curtains to separate workers and customers, X's on the floors for social distancing, and of course, everyone was masked. It was probably the fastest I ever made decisions about fabric choices, but I did find what I needed to finish the quilts. By this point, it was easiest for me to foundation paper piece strips to make my quilts similar. It also ensured that I kept the quilt as squared as possible.
If you've looked closely at the small blocks, you'll see that I kind of scribble quilted different aspects to emphasize the main design elements and then I did stipple quilting in the backgrounds. The mountains were a bit more tricky. I set up my Ipad to look at the photos of them to try to imitate some of the features of the rock faces and the trees.
I did some scribble trees in the foreground, but it's mostly texture quilting. I quilted straightish horizontal lines in the sky to add texture but not clouds. To soften the lines between the trees and cliffs, I did some zigzag free motion along the edges of the tree sections. Have you ever zigzagged with free motion? What fun!
 |
M and C's quilt
|
 |
M and C's quilt
|
 |
M and C's quilt
|
Here's one of the quilts before binding. Not a great photo, but it does show the quilting texture well. It was a bit ripply, so I had to do some stay stitching before sewing the binding on.I bound the quilts with a green batik that I've had for years for my landscape quilts. The backing is a piece I ordered from Bernie's Needle and Foot Etsy shop. I bought it while we were still in lockdown, and I'm glad I did. It is really too pretty to be up against a wall, but I'll know it's there, and that makes me smile.  |
M and C's quilt
|
The process of making the quilts was very slow. We were in lockdown much of the time, and during the early days of the pandemic, I had little energy or ability to concentrate for very long. I had another project that was a good distractor for me (which you can read about in most of my previous posts for 2020), but in between, I picked away at these quilts. I was happy if I only did one little thing on a day, whether it was cutting out pattern pieces or piecing a little section. I did not give myself a timeline--it was past the wedding anyway, and by the middle of March we knew there would be no art show at our church. (That quilt is temporarily hanging in my quilting room, but I think I have a plan for it.) So it was just a matter of working off and on as I felt like it. Over time, I got used to a relaxed--if isolated--way of living and regained my creative energy, which is why these quilts are finished now. It feels good! I did not keep good records, but here are the stats as well as I can remember them.
Pattern: My own design, except for the Columbine block, which is Ruth B. McDowell's. The other blocks are based on various photos.
Fabrics: Pieces I had on hand except as noted above. I did not keep track of new fabrics, except the backing is a Harmony with Nature print by Norman Wyatt for P&B Textiles.
Batting: Hmm, hard to remember. I'm thinking maybe bits of Dream Select Cotton. Or maybe the Warm Company. Perhaps one in white and one in natural? But don't hold me to it. My mind is mush. I think I had to piece one of them.I really need to keep track of these things, but when I make wall quilts, I always dive into the batting bin looking for scraps and pay more attention to size than type.
Thread: Superior Masterpiece in Granite for piecing; King Tut in White Linen for quilting the background and in the bobbin. Various random threads in colors to match the other elements. Luckily, I had them on hand. Treasure in Old Lace for handstitching on binding.
Binding: 2 1/2 inches cut, double layer, machine sewn to front and hand stitched on back.
Finished Size: 39 5/8 inches by 26 inches quilted. Not washed.
Machines: Singer Featherweight for piecing; Singer Treadle 115 for free motion quilting (and walking foot quilting in the sky).
And just a few more photos--
(Oh, and a question for anyone that can answer it. Some of my photos end up squished and elongated on Blogger on my phone. I've made all the photos on this post in Large size rather than Extra Large hoping that fixes the problem, but any tips you have would be appreciated. I prefer to make my photos as big as possible. Blogger is just one surprise after another, isn't it?)
Remember to take care of/for yourself and others.This country I'm living in is such a mess. Hopefully, there will be some cheer and relief in the future. I'll keep quilting, and you keep quilting, too, if you can. It is truly therapeutic.
(Just a reminder: I'm not affiliated with any company, so when I mention products, services, or stores I'm just documenting what I used or liked.)