Still no quilting going on here--it's been about 2 months now. Definitely a dry period. I was hoping to finish up two small quilts to donate, but I'm realizing now that I'll enjoy the quilting more if I wait until the new year. The quilting "studio" has been used from time to time this fall as a guest room, and now I don't want to mess it up only to have to clean up again in a few days. We've also been out of town a few times this month for family-related needs and gatherings. I wasn't going to do a blog post, but hey, I have done a little sewing, and even though it's not quilting, there were layers of fabric involved, so I can share them. They are surprises, but for little folk, so if their mothers happen to glance at this, I'm sure they will keep the secrets safe.
First up, a few weeks ago I suddenly realized that our littlest grandson needs a Christmas stocking. So I scrambled through the fabric bins to find fabric that coordinated with the stockings I've made over the years for his cousins and brother. These projects are always made on the spur of the moment with less than stellar sewing techniques--super homemade-y, but fun. I managed to find some bits of the dark green I used for his brother's stocking (I had to piece three scraps to get the size I needed) and found most of the fabrics (or close enough) I had used in the other stockings for the light bulbs. I only had to buy a little twill tape for the "string." Here it is waiting to be filled. I've rubbed out most of his name for privacy.
I also made a little soft book for A. It's from a panel by Shelly Comiskey for Henry Glass.
This page cracks me up. Unicorns are real, people!
Each year, I make ornaments for each of my grandkiddies based on their Halloween costumes. I don't know why I started doing that, but by now it's a tradition. Sometimes I quilt them, but I also like to make them from felt. This year, L was the Princess in Black, based on a book about a princess (dressed in frothy pink) who turns into a super hero (dressed in black) to thwart monsters who are going after the country's goats. (Really.) The princess's logo is a magnolia blossom, so L is getting her own magnolia ornament this year. Through the magic of technology, I can show you the front and back at the same time.
C was Thomas the Tank Engine for the second year. Since I gave him a Thomas ornament last year, I had to come up with something else this year: the windmill from the Island of Sodor (where Thomas lives). I used a brad to fasten the windmill blades so he can turn them.
Little A didn't really wear a costume, but he did wear his little bear fleece, complete with ears, to make the rounds for Trick-or-Treating. So, of course, he needed a little bear. I found this one as a coloring page online. Now I can't find it, argh! But there are lots of similar ones.
I was stumped when it came time to make E's ornament. He had chosen the Bumblebee transformer costume this year (never mind that he had no idea who Bumblebee was). I had no idea how to make the character in felt. Finally, I found this pixel coloring page math worksheet, and made it in counted cross stitch. What fun. I hadn't done cross stitch in quite a long time. In this version, Bumblebee transforms into a Camero, I think. In the new movie, I think it's a VW. Kind of abstract, but it does relate to the costume of choice this year. I used 18-thread cross stitch fabric and made the X's over three threads, except the date, which is over one thread.
I thought that might be the extent of my sewing this season, but the other day, my daughter-in-law asked if I could do a tiny project. E had been asking for a super hero cape. She sent me the links to these two tutorials: Pennies into Pearls and The Bears Four. I mashed the two patterns using the neckline from the first and the width and logo of the second to make a cape worthy of a super hero. And, why make one cape when you can make four? Here's E's cape (modeled by Mr. Bear):
And here they are all together:
Little A's is really a bib, but definitely not a drool-catchy one. I figure he can wear it as a cape during tummy time. It will give him super power to endure it. I made these all out of two layers of satin, with the shiny side out on the top layer and the matte side facing out on the lining. I'm hoping that will make them a little less slippery against clothing. It also made it a snap to sew without slippage. (I can't guarantee there won't be static, though!) I don't have a zig-zag sewing machine, so the shields and letters were a little fiddly. I used freezer paper for patterns for the shields and some stabilizer behind the letters, which I turned under and appliqued with a straight stitch. Except A's. His letter was so small that I did raw edge applique with the stabilizer (yes, I know fusible web would have worked, but I had the stabilizer on-hand) and put some fray inhibiter on the edges. The logos are cotton fabric instead of the recommended felt because I wanted the capes to be machine washable. (That also reduced my fabric scraps somewhat.) Well, that was a fun project. Not as tiny a project as my DIL envisioned, but now we can have a whole houseful of superheros. As opposed to squirrels, as these capes certainly were for me.
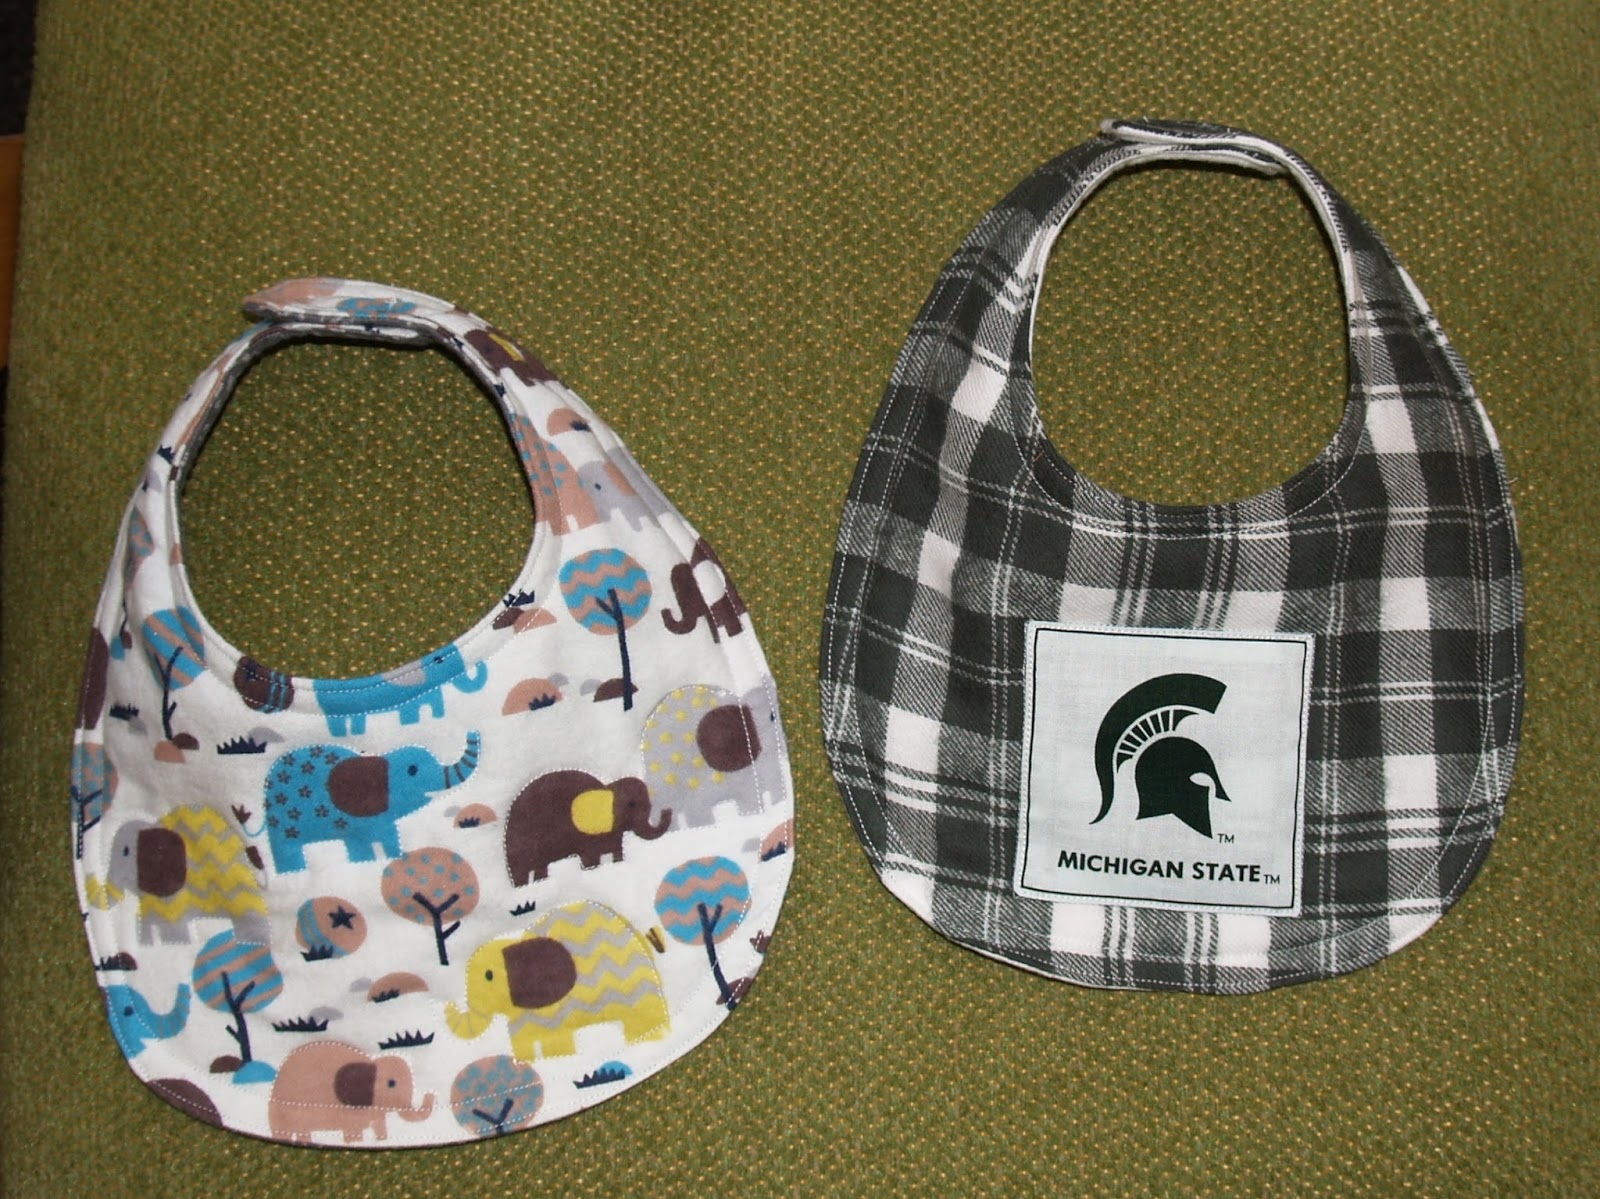
But I wasn't done yet. I decided that A needed some fresh bibs for his stocking, so I kept sewing. The bigger bib is based on one similar to this one (I don't know where I got the original), but I modified the shape to fasten it on the side. The other style is this bandana bib. These are so much fun to make--kinda like eating potato chips. You can't stop at one. Just keep going until you run out of fabric.
They're reversible.
I had to put that baseball print on in honor of my husband's and son's favorite baseball player of all time getting voted into the Baseball Hall of Fame last week. Go Harold Baines!
So there they are, not quilts, but layered sewing projects. I guess I did more sewing than I thought during the last few weeks (mostly the last couple of days).
I may try to do a planning post (yes, me, planning--or maybe I should say "planning") as well as a year end wrap-up if I can in the next few days. We don't start hardcore celebrating until after Christmas, so there may be time.
Meanwhile, here's my view from my chair: our Charlie Brown tree. Since we were out of town, we waited to get our tree until the 17th. There were only 5 left of the kind we like at the tree lot we go to. This was the best. And hey, when you get a tree that late, it's 50% off. (Not going to be a tradition, though.) Actually, the tree is okay. Lots of stiff branches and spaces for hanging ornaments. I just really get a kick out of those random poky branches sticking every which way. It looks a little bare under there. I'd better get wrapping.
Oh, and how about some comfort food? My daughter shared this Skinny Crockpot Loaded Potato Soup link with me from The Chunky Chef. We added the optional carrots and celery as well as some leftover chicken. YUM YUM! (And good eats for a sewing day).
I'm linking up with Sarah at Confessions of a Fabric Addict for Can I Get a Whoop Whoop, with Wendy at Wendy's Quilts and More for Peacock Party, and if there is a DrEAMi party at Sandra's mmm! quilts at the end of the month (I'm not sure of the holiday schedule), I'll link up there, too, because there were definitely some squirrels this month.
I hope you are enjoying your holiday season this year. I'm going to try to be back in a more regular way next year. I have lots of pent-up quilting energy, so there may be more quilts to share.
Together, let's enjoy the new year the way quilters always do, changing the world for the better, one quilt at a time.
Showing posts with label bibs. Show all posts
Friday, December 21, 2018
Tuesday, February 16, 2016
Time Out...For Bibs and a Pressing Board
We have a drooler. Yes, at three and half months old, our grandson can soak through several onesies a day. So over the past few weeks, I've been working on a remedy. More drooly bibs! I've made him (as well as his cousins) little flannel bibs like the ones in this post as part of their first wardrobes. They are fun to make, but I wanted to try something that would be a little softer. So I bought some tee-shirts in size 2T to 3T and set out to make bibs around them so that the neckline of the shirts became the neckline of the bibs. Each week I tweaked the design a bit until I had one I liked. When I work on a quilt, I usually have a pretty specific plan in place before I begin, but when I make little items for the babies in my life, I tend to just wing it--improvise. This can be a problem because I don't bother to take pictures and can't always explain how I made things. Oh, well. I'll show you a picture of what I made with a few notes copious drivel of how I tweaked the design, and then you can improvise to find what works for you if you are inspired to make bibs for a little one in your life.
I forgot to take a picture of the very first bib I made. (It's already been used and covered with drool). The first picture is pretty close in style. For that bib, I cut some bib shaped pieces for a front and a back. I turned the neck edges and shoulders under and then layered them with a piece of batting and a tee-shirt that I had cut to fit the same contour. I left a little of the back of the tee-shirt in place. On the first bib, I put the top and back fabrics right sides together on top of the tee-shirt and put the batting on top of those and then sewed around the outside edge (leaving the neck/shoulder open). Then I turned them right side out so that the order was top fabric, batting, tee-shirt, back, and I topstitched around the neck edge and finished with more topstitching around all edges. (On the second bib, I got the order "wrong" so that the back fabric was inside the bib layers and the tee-shirt was on the back. But no matter. Both ways work. You just have to fiddle with it.) I hemmed the back edge of the bib and sewed a little fabric "badge" on the back to weigh it down a bit.
The first bibs turned out a little loose around the neck and some drool still escaped. Also I didn't like the look of the floppy tee-shirt back, so for the second pictured bib I cut a slit in the back of the tee-shirt and added extensions to the bib parts (more like typical baby bibs). Because I was winging it, I cut these pieces separately from the bib fronts and ended up with kind of bulky shoulder seams. But the construction was basically the same, with the addition of velcro closures.
For the third pictured bib, I made the pieces of the bibs continuous, eliminating the shoulder seams. I liked that one the best, so I made the fourth one the same.
These bibs all work pretty well, but my daughter-in-law had mentioned bandana style bibs, so of course I had to try one of those. I found a pattern I liked here on Project Nursery.
This made up in a snap. I used flannel for the front and back and batting as a filler (the size of the back, not the front) and used velcro for a closure. It was adorable on baby E, so I made a couple more...
These are cotton on top with both flannel and batting layers inside (size of the back) and a soft jersey knit back (recycled tee-shirt material from the rag bag).
Even though I had fun making the tee-shirt neck bibs, the bandana bibs win hands down for the cool factor. And I like the last ones best.
Just have to share one more project--not baby related, but it does relate to quilt-making. Years ago, the quilt guild I belonged to at the time had a workshop for making mini pressing boards out of cutting boards. We were supplied with the board, several pieces of batting and muslin to layer on it, a piece of ticking, and some feet. As I recall, all we had to supply was a staple gun and staples to put it together. That board has been a great tool even though it has looked pretty grim for awhile now. And then a few weeks ago, the point of my iron went right through the ticking.
Something had to be done. I bought some fresh new ticking--blue this time. I took the old ticking off and used it as a pattern, then wrapped the board again sort of like a present (I reused all the old layers of batting and muslin and added one more extra layer of ticking), made a new handle, stapled it all back together and reattached the feet.
Here's the back:
The ticking isn't quite as hefty as the old ticking, so it might not last as long, but I have enough left over to redo it again if I need to. I can't wait to put it to work.
Okay, enough about side projects. Time to get back to quilting. Hopefully I'll have a finish to show you next week.
I'm linking up today with Freemotion by the River for Linky Tuesday. Have fun quilting and making those projects on the side!
I forgot to take a picture of the very first bib I made. (It's already been used and covered with drool). The first picture is pretty close in style. For that bib, I cut some bib shaped pieces for a front and a back. I turned the neck edges and shoulders under and then layered them with a piece of batting and a tee-shirt that I had cut to fit the same contour. I left a little of the back of the tee-shirt in place. On the first bib, I put the top and back fabrics right sides together on top of the tee-shirt and put the batting on top of those and then sewed around the outside edge (leaving the neck/shoulder open). Then I turned them right side out so that the order was top fabric, batting, tee-shirt, back, and I topstitched around the neck edge and finished with more topstitching around all edges. (On the second bib, I got the order "wrong" so that the back fabric was inside the bib layers and the tee-shirt was on the back. But no matter. Both ways work. You just have to fiddle with it.) I hemmed the back edge of the bib and sewed a little fabric "badge" on the back to weigh it down a bit.
The first bibs turned out a little loose around the neck and some drool still escaped. Also I didn't like the look of the floppy tee-shirt back, so for the second pictured bib I cut a slit in the back of the tee-shirt and added extensions to the bib parts (more like typical baby bibs). Because I was winging it, I cut these pieces separately from the bib fronts and ended up with kind of bulky shoulder seams. But the construction was basically the same, with the addition of velcro closures.
For the third pictured bib, I made the pieces of the bibs continuous, eliminating the shoulder seams. I liked that one the best, so I made the fourth one the same.
These bibs all work pretty well, but my daughter-in-law had mentioned bandana style bibs, so of course I had to try one of those. I found a pattern I liked here on Project Nursery.
This made up in a snap. I used flannel for the front and back and batting as a filler (the size of the back, not the front) and used velcro for a closure. It was adorable on baby E, so I made a couple more...
These are cotton on top with both flannel and batting layers inside (size of the back) and a soft jersey knit back (recycled tee-shirt material from the rag bag).
Even though I had fun making the tee-shirt neck bibs, the bandana bibs win hands down for the cool factor. And I like the last ones best.
Just have to share one more project--not baby related, but it does relate to quilt-making. Years ago, the quilt guild I belonged to at the time had a workshop for making mini pressing boards out of cutting boards. We were supplied with the board, several pieces of batting and muslin to layer on it, a piece of ticking, and some feet. As I recall, all we had to supply was a staple gun and staples to put it together. That board has been a great tool even though it has looked pretty grim for awhile now. And then a few weeks ago, the point of my iron went right through the ticking.
Here's the back:
The ticking isn't quite as hefty as the old ticking, so it might not last as long, but I have enough left over to redo it again if I need to. I can't wait to put it to work.
Okay, enough about side projects. Time to get back to quilting. Hopefully I'll have a finish to show you next week.
I'm linking up today with Freemotion by the River for Linky Tuesday. Have fun quilting and making those projects on the side!
Monday, October 26, 2015
Nesting Gramma Style
Nope, that grandbaby is not here yet. And now I can say it's officially overdue. Well, by one day, anyway.
So here's how I've been passing the time waiting. I was going to make some bibs but just wasn't that into it. Then I came across this post by Andrea at Mouse in my Pocket. I dug around in my scraps and came up with ribbon and fabric to make my own little taggie blankie. What fun! (Thanks for the idea, Andrea!!)
A lot of the fabric is from quilts I made for this little baby's cousins. The solid blue and vehicle fabrics (Daddy's an automotive engineer, so yeah) are flannel, and the tags are ribbons left over from decorating for Mommy and Daddy's wedding rehearsal party. I cut fabrics 2 and 3 inches wide and variable lengths to make the strips. The whole thing (without the tags) measures about 10 1/2 by 12 inches.
Here's the back (fleece leftover from a sleeper I made for L's doll):
I did some minimal quilting to hold it all together.
While I was rooting around in the fabric bins, I came across just enough flannel left over from C's bibs that I made in December to make a couple more. So I got into bib making after all.
Okay, I'm done. I'll link this up with Cynthia at Quilting is more Fun than Housework for Oh Scrap! (Whoa, two scrap projects in a week. I may need to post her button.) If I'm not otherwise occupied later this week, I'll link up with some other parties. Buttons are on the side.
So here's how I've been passing the time waiting. I was going to make some bibs but just wasn't that into it. Then I came across this post by Andrea at Mouse in my Pocket. I dug around in my scraps and came up with ribbon and fabric to make my own little taggie blankie. What fun! (Thanks for the idea, Andrea!!)
A lot of the fabric is from quilts I made for this little baby's cousins. The solid blue and vehicle fabrics (Daddy's an automotive engineer, so yeah) are flannel, and the tags are ribbons left over from decorating for Mommy and Daddy's wedding rehearsal party. I cut fabrics 2 and 3 inches wide and variable lengths to make the strips. The whole thing (without the tags) measures about 10 1/2 by 12 inches.
Here's the back (fleece leftover from a sleeper I made for L's doll):
I did some minimal quilting to hold it all together.
While I was rooting around in the fabric bins, I came across just enough flannel left over from C's bibs that I made in December to make a couple more. So I got into bib making after all.
| Mommy and Daddy both went to MSU, and Mommy likes animals. |
| Minimal quilting as seen from the back. |
Subscribe to:
Posts (Atom)

