Oh my. It has been a very long time. I mentioned at the end of December that I had a baby quilt to make. I really thought I could finish it by the end of January, but my quilt construction pace was as slow as...well, molasses in January, I guess. But the quilt is done, baby has come, and gift has been given, so I can finally share here. (I did do some other sewing in the meantime, and will share shortly.)
Let's just jump to the end and then we can back up a bit--or a lot.


She said she was not all that fond of the pink, but that she liked the moodiness of the other colors in the rug. She also expressed a preference for solid fabrics over prints. I loved the idea of solids and moody colors, but I will admit that for several weeks I was stymied. First of all, I was not at all sure of the actual colors in the rug. With a little research, I found it online on a store's website and printed out the photos that became my basis for choosing colors. I was still uncertain, though, because I noticed a strong LED lamp in the baby's room. I have struggled to transition to LED light in my home, and have been highly aware of how the differences in daylight, incandescent, and warm or cool LED light can affect color. I spent hours days shifting my Kona color chips around along the edges of one of the photos of the rug.
While all of this dithering was going on, I was also trying to figure out a pattern. I wanted it to be kind of simple so that it wouldn't fight with the rug. I tried a lot of ideas--a strong contender was nine-patches with solid squares based on an old Amish quilt, but I just couldn't get the gradations of color to fit my vision. Then I started playing around with the flower block from the free Floret Table Topper tutorial from Cluck Cluck Sew. After studying the inspiration rug, I knew that I wanted just a bit more variety of color in the block so I added a little strip in the center of the flower and drafted a paper foundation pattern that would finish at 5 inches. Using my Quiltography app, I laid out a bunch of flower blocks, but the design quickly became too busy for me, so I sprinkled them around and added bars and vertical sashes between. I experimented with a light background, but the colors looked too bright, and I realized that the quilt really needed both black to keep the colors looking moody and pink to lighten it up for a baby. I tried out two designs with my app. In one, the bars were all rectangles and in the other I threw in some triangles, like this:
.jpg)
This design was just a general guide. I knew I did not want regular horizontal sashes, but my app did not allow me to eliminate them. I combined both designs to make the bars as irregular rectangles or blunted triangles (yes, thanks to my math teacher dad I know those aren't the right terms, but you know what I mean). I also reversed the direction of the flower petals from my plan so they would spin forward.
Gradually I narrowed the colors down to ones that I hoped would at least complement the rug. Just before Christmas I ordered a bunch online from a new-to-me store in Ohio because my local stores only have the basic set of Kona colors. Those fabrics came in just a couple of days. Maybe they thought they were a present? Anyway, I'll shop there again.

I had no idea how much fabric I needed, so I bought a bunch of quarter yards, a few half yards, and 2 1/2 yards for the background fabric. The background is Kona Pepper rather than Black to lower the contrast just a smidgen. I could not find a Kona dusty purple that I liked (I don't have the lastest Kona swatches, so I don't know if the color even exists), but I had a couple of scraps of dusty purple tone-on-tone prints that were just the colors I wanted on their back sides, so I added those to the mix. The purple I did order was a Moda, but it was a little too strong, and I didn't use it.


I made the flower blocks first. So much fun! I used freezer paper foundation piecing for the quadrants to make them nice and crisp and accurate.
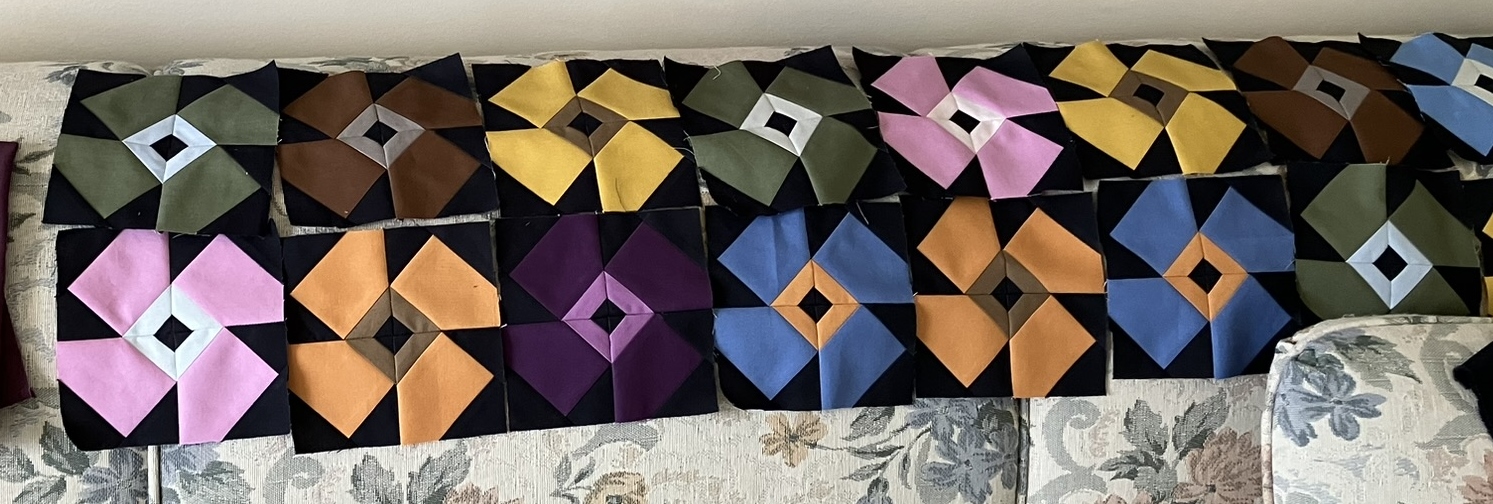

and planned to piece them no-tear style with freezer paper. I made patterns in three different lengths, that could then be varied by reversing them and/or turning them 180 degrees, I made additional copies of the patterns on freezer paper that I could use as rough templates for less fabric waste as I pieced.

I put the flowers up on the design wall in the approximate placement in my quilt plan. I would plan each strip, press the freezer paper template on, cut out the bars and foundation paper piece them, put the strip on the wall, and plan the next one. Here's how I planned each strip with folded fabric (using black construction paper to stand in for the black fabric since it was easier to use than handling a big piece of fabric).

And up on the design wall...

While I was doing all the sewing, I kept wondering what I was going to do for a backing. Long before I started planning this quilt, I had seen a wideback fabric at my local store. In fact, I liked it so much I had almost purchased it. When I started sewing the quilt I realized that the backing colors were sort of like it. I kept visiting the backing, and finally decided to buy it even though I wasn't sure if it would work. Then, whenever I was working on the quilt, I'd lay it out with my copy of the rug photo on the ironing board, trying to picture how it would all look together.

Finally the top was done, and it was time to figure out the quilting. I really liked how the top looked and although I tried drawing all sorts of quilting plans and laid thread out in different ways, I just couldn't figure out what to do. Meanwhile, the baby's due date was getting closer and closer. Finally, I decided to just quilt in-the-ditch (-ish) everywhere and let the quilt pattern be the pattern.


And, can I say I'm really proud of how straight I got that backing? My vertical thread lines are almost spot on with the floral pattern.
When I finished the quilting, I was pleased to see that I had enough fabric bits left to make a pieced binding. Here it is all laid out to make sure the seams wouldn't fall at the corners. (How about that sunshine?!)

Stats:
Pattern: Flower Blocks are inspired by Cluck Cluck Sew as noted above. The rest of the pattern is my own design.

Fabrics: Kona solids in Amber, Ballerina, Ballet Slipper, Bison, Bluejay, Cloud, Curry, Denim, Desert Green, Dill, OD Green, Pearl Pink, Pepper, Sable, Sky, Smoke and Violet (there might be a couple of these that didn't make the final cut as I was sewing), plus two old scraps of who-knows-what from my collection. Hillside Meadow wideback from Art Gallery Fabrics.


It felt so good to finish the quilt. I sent it out along with a little present for baby's big brother as soon as we received word that baby had arrived. It made it to Chicago in one day and was almost at its destination when my tracking notifications indicated an error and then completely disappeared for a day. The next message indicated that it was at the wrong postal facility not far from where it needed to go, and there it sat for several days with no word at all. It seemed it was no longer "Priority." I was really sweating it out, picturing it in a pile in a forgotten bin or worse in a corner somewhere with rats gnawing on it. After five days, the package was declared officially late, so I opened a complaint case to get it moving again. (Sometimes I think the post office needs to hire special "Moms" to look for lost things when technology fails.) Fortunately, things got back underway, and the package finally arrived. Whew!

And the tiny giftee:
.jpg)
12 comments:
my you really went through agony of choosing colors and designs - I don't think I ever put that much thought into a baby quilt. I'm sure they loved it and will enjoy the thought and love that went into the making of it.
That is a lovely quilt, JanineMarie, and I really enjoyed reading about your process! Beautiful colors and design. I get frustrated about how fabric colors look so different depending on the light bulbs you're using, too. It looks to me like you chose the perfect colors for this pretty quilt, inspired by that rug! I know your niece and family will love this quilt!
It's so nice to see you again! This quilt is nothing short of amazing. I love the colors, how you figured it all out, the irregular sashing pieces, and even the blck background. It's fantastic. I know your niece will love it, and it will get a lot of use since it doesn't scream "baby." Congratulations on a wonderful finish!
Hi Janine - What a treat to hear from you!! It has been a long time. As always, you created a beautiful gift for the baby, filled with love, much thought and very pretty colors. I like the rug so much and the quilt complements it beautifully. As always, very fun and informative to read about your process. Your "dithering" as you call it always pays off in spades.
Wow! That is quite the creative journey for this quilt! I love reading your thought processes behind it all and it turned out GORGEOUS! How are you Diann? I've been missing the quilty world and will be participating a lot more now.
Oops! I was thinking about Little Penguin Quilts when I wrote my comment to you. Sorry about that JanineMarie!
The quilt look fantastic! Love all the colors and the design. Very creative.
That's an amazing quilt - especially hearing about all the "ins and outs" of designing it! It looks like a perfect compliment to both the feel of the rug, and the colours. Well done!
This is a masterpiece! What a lucky baby, may she enjoy it in good health.
I think this is perfect! The colors reflect the rug and back is such a sweet print. Love the pieced binding, too. How odd that the freezer paper caused fraying...I would assume it was the fabric, but who knows. Great job! In awe of what you do on those good old Singers!
What a fun quilt! Really neat layout and colors.
I know I'm a week late. Your quilt is gorgeous.! Love the colors. So much work. It must be for a really special baby.
Post a Comment