Monday, March 18, 2024

SAHRR 24 Parade

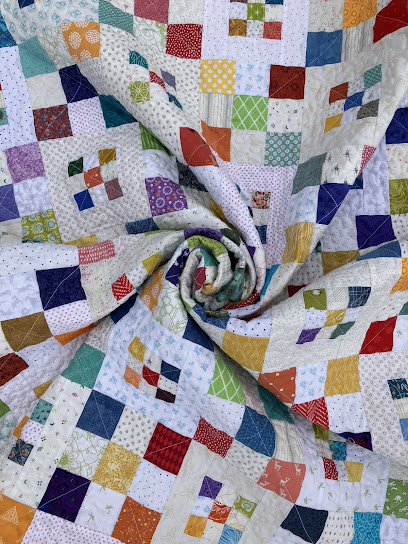
Let me start by saying that I don't do mystery quilts. I don't usually like making something I can't visualize at least in a general way, and I have trouble picturing how fabrics are going to work together if I don't know how they will be arranged. And let's face it, I just don't like not having control over a design. But this--this! I have found the kind of mystery I'm comfortable with. We started this online project with a block or panel of our choice and then added borders or whatever according to prompts each week given by one of the hosts. These kinds of quilts used to be made by making a beginning block and then shipping it off to others to add to as a round robin. I think that some fabric might have been sent along with to keep some cohesiveness in the quilt. (You can imagine the kind of control angst I would have with that kind of mystery and group project.) But during the pandemic, I think, Quilting Gail had the idea for makers to keep the quilt at home and complete it themselves using prompts from other quilters. A Stay At Home Round Robin (SAHRR). Perfect for those of us with control issues. It's become a yearly tradition. And I LOVED it. It was the perfect project to give me the control I wanted but to also challenge me to improvise and design something according to unexpected parameters. 

I’m kind of sad to be all done  But it’s also fun to have a finish I can share. If you want to read more details about the making of this quilt, you are welcome to check out the posts of the last few weeks with the label SAHRR 2024 on the right side bar or at the bottom of this post. I'll hit the highlights here. First some garage photos, because that's how I always document what I've made.

Warm, sunshiny weather! (but a little breezy)


Yup, that back is the same little floral I used on the front. I just happened to find it at the big box store where I bought the original fabric. I had ordered the earlier piece, but there just happened to be a bolt end at the store a few weeks ago, and I snapped it up. I really have enjoyed using this print in quilts over the last few years. Sadly, it's no longer available online (and I just read that that store is struggling and in Chapter 11,which explains a lot about supply issues), so I guess this is the end of it except for a piece I have leftover now after piecing the back. I actually bought enough for two quilts because I have another top that I finished while making this quilt, so you will see it once more in my next post. It's a tiny print, but I did match the seam just because. And buying the amount for two quilts was really practical. I bought 3 quilt lengths worth. I usually buy 2 lengths for one quilt and have quite a bit leftover.

I chose an allover freemotion meander for the quilting. Simple, as there was already so much going on in the pattern. And frankly, I was ready for a quick finish once all the fun of the designing each week was over. I know, some quilters would have had a much more exciting method using custom quilting for each section, but that's not me. And by meandering, I could also avoid any thick intersections. So, let's take a quick peek at the different sections and prompts. I made most of my borders about 6 inches wide, using plain (coping) borders along with the ones that were prompted. From the beginning, I decided to put my starting block off center, with two borders for each round--most of them on the right side and bottom of the quilt. (These photos were all taken after washing, so there's lots of texture.)

First, the center block. I made this during an online color workshop with Rachel Hauser during the pandemic.


Border 1: Signature block, prompted by Wendy at Pieceful Thoughts (I'm going to link to the home pages of the quilters so you can see some of their other projects). I pieced my blocks for more color variety. 


Border 2: 2 colors, prompted by Anja Quilts. I chose black and white, which became sort of a theme for the rest of the quilt. 


Border 3: Triangles, prompted by Emily of The Darling Dogwood. I made flying geese with a reverse palette of background color for the geese.


Border 4: Square in a square, prompted by Brenda at Songbird Designs. This was fun, as I had already included one in the corner of the previous border and dreamed of making more someday.

Border 5: "4," prompted by Gail of Quilting Gail, the genius behind the SAHRR idea. I chose to make groups of 4 colored squares separated by a white square. (I also put another signature block in the corner.)


Border 6: Numbers or letters, prompted by Kathleen of Kathleen McMusing. I really wanted to make scallops and figured they looked like abstract letters (D's, U's, backward C's? Take your pick.)


And then there was also my signature of quilted initials and date in that border, which also fulfilled the prompt nicely. I usually use a blended color so that they don't really show to anyone but me, but since this related to the prompt, I used turquoise this time.

Thanks so much to all of these women for setting this whole project up with the thought provoking prompts and linky parties so we could all share our tops. There were so many variations by lots of quilters. And it was a blast to touch base with each other and learn from each other as we designed our tops.

I'll end with some photos and other tidbits about the quilt. It's mud and grime season here, so not many places to take photos outside.
My quilt finished at 53 1/2 inches square after piecing, 52 1/2 inches square after quilting, and 50 inches square after washing. 
I only bought batting (Hobbs 80/20) and the backing. The rest of the fabric was from what I had on hand. Bigger pieces were mostly from the cut-offs of previous quilt backs or backgrounds. 
I used a combination of traditional piecing and foundation paper piecing (which kept the dimensions fairly even). 
I used binding a bit wider than usual, starting with strips cut 2 5/8 inches wide.

I used Superior Masterpiece thread in Granite for piecing, King Tut in Temple for quilting and Treasure in Old Lace for hand quilting the binding. 
My machines were Featherweight for piecing and Singer 115 treadle for quilting. 

If you haven't been regularly following the progress of the SAHRR, I hope you will be able to find a little time to at least check out the linky party with the parade of all of our finishes at Quilting Gail's blog. And if you ever have the opportunity to join such a project, I hope you will consider it. It is such a flexible type of project that you will surely find a way to make it in a way that is as comfortable or as challenging as you'd like.
I'll be donating this quilt soon to (I hope) cheer a recipient through it's whimsical design, uplifting colors, and cozy hug.

(Just a reminder: I'm not affiliated with any company, so when I mention products, services, or stores, I'm just documenting what I used or liked.) 


Friday, March 1, 2024

SAHRR 24 Border 6

Tada! We are finished with our Stay at Home Round Robin (SAHRR) quilt tops, fun projects hosted by Quilting Gail and friends. This final prompt is from Kathleen of Kathleen McMusing: letters and numbers. So many ways to do this--fabric printed with those symbols, blocks that have some sort of shape in them that is a letter or number, actual pieced symbols, labels. Well, I have a confession to make. I already had an idea for this round, and I just needed to make it fit the prompt. Is that cheating? See what you think. 


I had some idea in mind that I wanted something curvy after all of the sharp angles. Specifically, scallops. Not sure exactly why, but anyway, that's what I wanted to do. A bit unexpected maybe, but I knew the colors would fit in with the rest of the quilt. At first I was a bit thrown when the prompt showed up on Monday. How was I going to link the prompt with my idea? I started thinking about abstract alphabet fonts and how they have just a suggestion of a letter. Let's see. Scallops along the bottom could be U's. Oh, that works. (Incidently, my family name before marriage starts with a U.) And then I thought the shapes along the right side could be backward C's. And then I saw a TV commercial for a movie out this week and noticed that the letters in the logo of the title were abstract letters, including D. Oh yeah, my shape is a D, not a backward C. Well okay then. And I was off cutting and sewing. 

Good thing I was feeling mostly better than I had in the last week or so, but I still had bit off maybe more than I could chew. So I just chewed really slowly. This took several days to do. I returned to some really old school designing and cutting. I drew my scallops on graph paper, added seam allowance and traced them out onto cardboard for templates. I added an extra 1/4 inch all around the outside edge to give myself enough trimming room. I traced around the templates with pencil and cut them out freehand using my rotary cutter. (Not quite old school with that last step. In the old days I would have used scissors.) I'm not sure I've ever made half-circle blocks before, but that didn't stop me. I had first thought of making 1/4-circles and seaming them, but that seemed like way to many seams. I just worked super slowly. The finished blocks were to be 2 by 4 inches, a little tight, but I got there. 


Remember I was thinking of a 4-inch border of the black and white print last week? I changed my mind in the end and made a three inch border instead. That way I didn't have to do any extra piecing (although one side already had a well-matched seam as it was the cut-away of a previous quilt backing). Then I surrounded the scallop border with 1-inch finished dotted borders, and ended with a floral border that finishes at 2 1/2 inches and echos the edge of the border in the first round. 

The top finished at 53-1/2 inches square, up from 44-1/2 inches last week. Now all I need to do is remove foundation paper from some of the blocks, give the top a good pressing, prewash and seam the backing, figure out how to quilt this whimsical little top (the hardest task for me in quilt-making), quilt it, and cut and sew the binding. We will be sharing our quilts the week of March 18. Think I can get it done by then? 

Thanks, Kathleen, for a prompt that I could fit into my vision for the last round. Oh, and in case my version of "letters or numbers" doesn't fly with you, I do plan to quilt my initials and date somewhere, which is my way of signing my quilts, so there's that. 

TIme to check out all the other tops at Kathleen's linky party. Meet me there, okay?


Friday, February 23, 2024

SAHRR 24 Border 5

Today’s border for the Stay at Home Round Robin (SAHRR) is brought to you by the prompt from Quilting Gail, who put this whole quilt along together, with lots of prompting input from her quilting friends. Her prompt is “4.” Anything we want as long as it somehow relates to 4.

I had been thinking for awhile of doing something with piano keys and did a mock-up of a design, but it seemed to overwhelm the rest of the quilt. (The keys would have been 2 by 4 inches.) Not wishing to abandon the idea completely, I settled on a row of 2-inch squares. To get the element of 4 in, I separated groups of 4 colorful squares with a white square. I needed something as a buffer between the current border and the last one, so I used the little print that I used on the first border. It’s 2 inches wide, so at this point the border is 4 inches wide.

Now this may have seemed a simple process. But on Tuesday I felt a cold coming on. Sensing that it was only going to get worse, I worked like crazy to get this made before I wouldn’t feel like it. The borders went on easily, but I still had to figure out the corner. (I left a bit of the seam open, so I could add the corner block in.) By yesterday, my cold had hit hard, but I was determined to finish this up. I had some ideas for the corner, including a four patch and several versions of the signature block I had made in Border 1. I spent several hours moving fabric around and photographing to see what it would look like. (Sorry, I'm too tired to organize them to show here.) I was still bothered by the light gray print and how it was kind of low contrast with my other prints, but anything darker jumped out too much. So in the end I chose a block that echoed the one in the upper left corner of the quilt. It only took another hour to put it together (yes, you read that right). I had to make an HST patch twice because of errors in sizing and trimming. Clearly I should not have been trusted with even the simplest sewing. 

I had one more element I wanted to add. My original plan with this quilt was to make 6-inch borders, and I wanted to add more of the black and white floral to bring the border to at least that size. I had some strips that I could use that were actually wide enough to make a 4-inch border. Given the prompt for this week, I thought that was neat. But I ran out of steam before I could make the border. It would have required piecing together three pieces of fabric for one of the sides and then sewing two long seams to attach the borders. Overwhelming, and I was really worried that with my foggy thinking, I’d ruin it. So here’s a preview of how it will look when I get my energy back. I’m giving myself some sewing time off, so I can recover enough to finish up Border 6 next week.

Be sure to go to the Linky Party at Gail’s website to see how the other SAHRR quilts are coming along. I’ll go, too. It seems like the perfect couch activity while I kick this cold to the curb.

(Just a reminder: I'm not affiliated with any company, so when I mention products, services, or stores, I'm just documenting what I used or liked.) 

Thursday, February 15, 2024

SAHRR 24 Border 4

This week's border in the SAHRR (Stay at Home Round Robin hosted by Quilting Gail) is my response to the prompt from Brenda at Songbird Designs: "square in a square or an on point block." Well, wouldn't you know it, I did a square in a square block last week in my third round. I even mentioned to someone that I enjoyed making that block so much I could see making a whole quilt full of it. I felt like I needed to resist a squirrel. So this week I got to make more without chasing a squirrel after all. 


I started by making another identical SQ in SQ block with black points (rotating it for a mirror image of the fabrics). In my Quiltography designing software I made a whole bunch more with the same coloration, but it felt like the block was taking over the quilt, so I toned it all down and used white prints from the scrap bin to surround some of the lighter colors in the quilt. Because I wanted a border 6 inches wide, I added coping strips in the same fabrics as in the second round but reversed the order. (Coping strips. That is a term I learned during this SAHRR. I always referred to those as "skinny borders." Now I know the technical term.) I messed around with the placement for a bit before deciding to add sashing strips between the SQ in SQ blocks to keep the border light and airy. That took a little doing, too, because I first tried to line them up with the SQ in SQ I made last week, but with 2 inch sashing strips, I ended up with a block chopped in half at the top and left edges. (I did need to use a 1-inch coping sash in the lower right corner before using 2-inch ones in the rest of the border to make the strip of blocks long enough.) The borders are symmetrical, so I think it works okay that the SQ in SQs don't line up with last week's. My photo is a little off due to dark room conditions (snowing off and on) and dark green carpet shining through, so the sashes look kind of gray. All of the background is various prints and a few solids, with colors ranging from white to ivory. I used up a fair amount of white prints from my scrap bin.

This is how my plan looked. It took a lot of fussing around to get to this final plan, but that really kept me from wasting fabric and sewing time to figure things out. 

Oops, I see that I forgot to flip the top right block

My SQ in SQ blocks finish at 4 inches. I used the same 2 by 4 inch flying geese foundation paper patterns as in my migrating geese border from last week (freebie by Fresh Lemon Quilts), but combined them to make the SQ in SQ by taping two pattern pieces together on the seam lines. So easy. Everything came out exactly to the dimensions I planned. The quilt now measures 40 1/2 inches square with seam allowance (up from 34 1/2--forgot to include the size last week) My miter of the black striped fabric was a lot more fiddly to get in place this week (I don't know why), but I put it together the same way, sewing about an inch of each coping strip on at the corner and then hand basting the miter to make sure the stripes met accurately before sewing it by machine. Then I sewed the remaining edges of the coping strips. 

Yippee for a matched miter!

Thanks to Brenda for giving a prompt that scratched an itch for more Squares in Squares without having to chase a squirrel! If you want to see more of what everyone made this week go over to Songbird Designs for the party. Thanks to Gail for hosting this SAHRR. I never knew a QAL could be so much fun.


(Just a reminder: I'm not affiliated with any company, so when I mention products, services, or stores, I'm just documenting what I used or liked.)


Thursday, February 8, 2024

SAHRR 24 Border 3

This week's border in the Stay at Home Round Robin (hosted by Quilting Gail) is brought to you by the prompt from Emily of The Darling Dogwood: Triangles. I hoped at some point in this project to include some flying geese, so I jumped at this opportunity. 

Sorry about poor lighting. The sun shone all day until I was ready to photograph.

I thought at first of making long strings of them with foundation paper piecing. I love that technique, connecting all the geese in one process. Making geese to finish at 2 by 4 inches seemed right to keep the proportions similar to other parts of the quilt. But to do that I might need to add some borders to bring up the total width of the round to 6 inches (my plan for this quilt), and I didn't really want to make more plain borders this week. So I decided to make migrating geese instead. That would mean making individual geese, but oh well. 

I printed out free patterns for the geese from Fresh Lemons Quilts.

It's been awhile since I've done sew-through-the paper piecing, and I forgot to cut my smaller fabric triangles generously before sewing them, so I had to really take care to get the seam allowances right. It took lots of time to sew them all up, but it was so satisfying. My points were precise and my sizing stayed accurate. 

I needed to come up with some way to turn the corner, so I brought some black back in and some of the prints from my first border and made a square in square with some flying geese around it.


I found a lot of the white geese bits in my scrap bins--even triangle shaped scraps-- and was thrilled to find some of the fabric that is in the background of my starting block: that gray abstract sun print. 


Here's how the back looks with the foundations. I plan to leave them in at least until I attach the next border to keep everything stable. 

I've only taken a glimpse of what the rest of you have made for this round, but I did notice some of what I call "Peaky and Spike" triangles, named by a quilter whose name I no longer remember who is sadly no longer with us. It will be fun to see what others have done with that kind of triangle, as I haven't used them often myself but have always admired them. Be sure to check out the linky party at Emily's website (The Darling Dogwood) to see what everyone is up to, and link back from that to see other rounds. 

Until next week, happy quilting. 

(Just a reminder: I'm not affiliated with any company, so when I mention products, services, or stores, I'm just documenting what I used or liked.) 


Tuesday, January 30, 2024

SAHRR 24 Border 2

Well, that prompt was a surprise. I'm participating in the Stay at Home Round Robin (SAHRR) hosted by Quilting Gail and her friends, who give us a prompt each week to add a border to our initial block or panel. We are on our second week of adding borders, and our prompter this week is Anja of Anja Quilts. Her prompt? "Use 2 colours." (Or in my case, colors, as I'm in the US.) That was it. And then she said we could use whatever design we wanted.

I will admit that at first I was a bit...disappointed, I guess? I had envisioned my quilt as having bits of many colors sprinkled throughout. I really didn't want to pick just two of them, and have those steal the show. What to do, what to do. And then I had it. This is what's great about these prompts. They nudge us to use our creativity in ways we might not have expected. The answer suddenly seemed obvious: black and white backgroundish fabrics to set off whatever colorful bits might come next. And in no time at all, I had this week's finish.


I knew that I wanted to make a 6-inch border on two sides of the quilt. I have some good sized pieces of striped and polka dot fabric leftover from other quilts as well as some long strips of a floral cut off from from a backing. I cut the stripe at 1-1/2 inches wide to finish at 1 inch. The floral was just wide enough to cut 4-1/2 inch wide strips to finish at 4 inches. I cut the polka dot at the same width as the stripe. 


Can I say I'm really tickled with how the miter came out on the stripe? I sewed those striped borders at the corner first, starting about two inches away from the corner and then mitering them before sewing the rest of the length of the strips onto the quilt. It just seemed easier to do that to make sure the stripes would match up. I also basted them before machine sewing to make sure they stayed in place. I'm not mitering my other borders (unless I use the stripe again) but the stripes just look neat that way. 

The whole quilt now measures at 28 inches square (plus seam allowance). Thanks to Anja for a prompt that stretched my thinking! I'm sure the colorful bits will be back in another round, and those black and white prints will also come back into play. (Hmm, striped binding, maybe?)

I'm linking up with Anja at Anja Quilts, where we can all cheer each other's progress this week. You can read about the beginning of the SAHRR at Quilting Gail here, where there are also links to the other hosts who are giving us our weekly prompts. 


(Just a reminder: I'm not affiliated with any company, so when I mention products, services, or stores, I'm just documenting what I used or liked.)

Wednesday, January 24, 2024

SAHRR 24 Border 1

This is fun, but what a big mess I have. Why I decided to make two rainbow quilts at once, I don't know. Three rooms in my house are now full of scattered bits of colorful fabric. Anyway, this post is about one of those quilts. I'm participating in the Stay At Home Round Robin (SAHRR) hosted by Quilting Gail. Last week we shared our "center" blocks. I used quotes because my block is not going to be in the center. This week we are adding Border 1. The prompt is by Wendy of Pieceful Thoughts. A signature block. She noted that we had a lot of leeway in how to use the block (which is usually a light color with darker points), so I took as much leeway as I could. Here's my version. 


I knew I wanted the darker part of the block in the middle, but I also needed to think about how I wanted to balance colors, proportions, and the amounts of fabric I have available. My first decision was to add a one-inch border around my original block to make a more manageable size (16 inches instead of 14). Then I planned 4-inch scrap-pieced signature blocks using my Quiltography app.

I used colors from the "center" block to plan the signature blocks. The squares in the blocks are cut at 2-1/2 inches to finish at 2 inches. I cut 3-inch squares of colorful and background fabrics to make two-at-a time HSTs for the rest of each block. I was going to use blacks for the corner block, but when I laid them out, that block stood out more than I would like, so I subbed in a gray print for the squares. 

After sewing everything together, I added a print border (finished at 2 inches) to bring the whole finished border up to 6 inches. 


I'm not sure if I like the gray print in the corner next to the border (iffy contrast; maybe a more solidish gray would have been better), but I think I'll leave it as it is, at least for now. 

So there you have my sort-of signature blocks. Be sure to visit the links to see Gail's introduction, the beginning blocks, Wendy's prompt and the links to everyone's progress. Maybe you'll join in, too?


(Just a reminder: I'm not affiliated with any company, so when I mention products, services, or stores, I'm just documenting what I used or liked.)