Sunday, December 1, 2019

Holiday Squirrel (and Hibernation)

I've been up to my ears in quilting projects lately--the reason (or excuse) for my poor presence in blogland. I do hope to fix that. Thanks for all of your comments on my blog. If I haven't responded yet, I will try to soon, and visit your blogs, too. I have some timelines that I'm trying to meet, which in this season of holidays, is no mean feat, so I'm limiting my social media for a bit. 

Anyway, despite all of that, a major squirrel jumped out at me a few weeks ago. 
Well, yes, that one, too. This cutie has been hanging around our maple tree stuffing itself silly for a few weeks now. Whenever it snows, it goes away for while but always comes back. 

No, I'm talking about a different squirrel. 

My daughter saw a cool retro-looking Christmas tree skirt on Instagram, and could I maybe fit in that project? Well, yeah! It's based on the quilt pattern Atomic Starburst by Violet Craft, but was presented on her blog as a tutorial for a tree skirt in December 2017. It has foundation piecing in it. Okay, I'm in. All my daughter had to do was supply me with the fabric, which she brought to me on a well-timed trip to celebrate one of my grandsons' birthday. 


The colors are the teals, apple green and gray of her living room with red and gold thrown in for a bit more of a holiday vibe. 

The weather was perfect for sewing. 

Before diving into the whole project, I made one star block to test out my skills and measurements. I was a little disappointed with the center of the star because some of the seams didn't seem to match up. But looking closer at the pattern, I realized they are supposed to be that way, perhaps to reduce bulk, and the whole star does look right. You can see that off-set part better on the next photo.

Based on the first block, I cut all the rest of the fabrics in sizes needed (usually cutting strips and subdividing them) for the remaining stars and organized them by pattern number before chain sewing them. The work seemed to proceed slowly, but then all at once all twelve stars were done! 


The diamonds and sashing strips seemed really big after that tiny piecing. I didn't exactly follow the pattern's methods for cutting the diamonds. The pattern calls for cutting strips the width of the smallest measurement of the diamonds and then using a template to cut diagonals. I wanted to cut my diamonds with the long vertical measurement on the straight grain of the fabric (which might be desired if you have a fabric with a strong directional print), so I cut strips that width. That puts the diamond edges on the bias, but it was not a concern for me, as they would be sewn to sashing strips that were not bias cut. I did not have a diamond plastic template, so I folded the strips in half and used a triangle template to cut them. My template has the seam allowance trimmed for the point, but I adjusted it so that I could keep the points in my cut. This sounds complicated to explain, but it was really easy to do. (Ignore those pieces of tape. They are leftovers from another project.) 

I taped the paper template provided in the pattern to my ruler to ensure accuracy in cutting the sashings from strips. I'm sure there are rulers that do this easily, but my whole ruler collection consists of two rectangular rulers, a square one and the triangle, so I make do with what I have. (Ignore those yellow tapes. Again, leftover from another project.)

I tried several different layouts for the skirt, consulting with bothering my daughter at work by phone to see what she thought. A few diamonds here are just fabric scraps inserted under strips, as I was still debating about colors for the last four diamonds.

I tried some with more scattered placement of the darkest diamonds, but to my eye, it made the whole design look "off."
Anyway, here's the finished layout--and the finished top. 

I have to say figuring out the sewing was tricky for me at first. It is not constructed like the quilt, and the tutorial is what I think of as minimalist as far as instructions go. So my first few parts of a section involved y seams at the outside edge. I can't even tell you what I was doing wrong, but eventually I figured it out, and then the remaining pyramids went together quickly. The other thing that threw me was how uneven the edges looked. See those little notches? Well it turns out there is a lot of room for trimming at the end. By aligning my ruler one half inch below the point of each diamond, the hexagon shape of the skirt comes out right at the given measurement in the pattern. Oh, and see those white half diamonds around the outside edge? The pattern says to take care because all of those would be on the bias if the diamonds are cut as instructed. By cutting them the way I did, all but the sashings are on grain around the edge instead of bias. 

So, anyway, all was going well with my squirrel, and I was happily ready to baste. I asked my husband to bring the banquet tables up to the living room from the basement, and I got all set up to pin.

And then...I came to a screeching halt. All of my basting pins were in another quilt. I had been procrastinating finishing that quilt because I wasn't sure how I wanted to quilt it. Never mind that it had a definite timeline which was shrinking due to the recipient's teasing his mother about his eagerness to enter this world. Thankfully, he's stayed in his proper place for now. So, this squirrel had to go into hibernation until I quilted that quilt. Back went the tables to the basement, with my apologies to my husband. I am happy to report that I did get that other quilt quilted. I can't show it to you just yet, but I only have two sides of binding left to stitch down. 

So, Friday, just before we put up our Christmas tree, I asked my husband to please put the banquet tables up in the living room again for basting this tree skirt--for real this time.
Now this squirrel is back out of hibernation and ready to quilt tomorrow. Oh, and our resident squirrel is also back from a short hibernation, swaying in the maple tree. It's getting pretty dangerous now, as only the tiniest twigs have seeds on them.

Several people who saw this tree skirt in progress on Instagram showed interested in making one. I have to say, I like the pattern for the quilt and I really appreciate Violet's offering of a free tutorial on her blog for the skirt. Having said that, I think you should be aware that the instructions for the skirt are not as detailed as they would be in a full pattern, so you do have to kind of figure some things out on your own. Of course, a few things I did were completely my own decision (cutting the diamonds differently), but do be aware that you will need to figure out what works best for you for the final sewing, as the instruction in the tutorial is limited to a visual.

I'm linking up today with Sandra at mmm! quilts for DrEAMi (Drop Everything And Make it) because even though this is not a total finish, it definitely was a squirrely project with a finished top. I'll be sure to post again when it's finished for good. I only have one thing to be a little nervous about: cutting into the quilt to make the opening and maybe binding around the circle in the middle and the angles on the edge--I guess that's two things.

I hope you are having a wonderful time with your holiday projects whether they are squirrels or not!


Friday, November 22, 2019

Bed Runner

Ooh, ooh, ooh, a finish! I just haven't had many of those this year. At least it seems like it. I started this quilt way back in July. It's been sitting around for the past few weeks with the binding ready to sew down. I had been saving it for a take-along task, but realized this week that I could just finish it because soon I'll have a couple more take-along projects. (Yes, two other projects close to a finish. I've been a quilting machine during our early winter weather.) So, after a couple of evenings of TV watching and staying cozy while binding, here it is: our bed runner, aka Gently Down the Stream Again, from a pattern by Christina Cameli. I say Again, because it's the third quilt I've made from this pattern. (Can you tell I love it?!)
I have to say that I am more pleased with my fabric selection for this quilt than I have been for any other quilt I have ever made. Everything came together so well. I went to the biggest independent fabric store in my area and challenged myself to do a pull from just that store (in addition to four pieces I had at home.) I stood back about 10 feet from the shelves and pulled whatever I thought might work in my scheme of coral, turquoise/aqua, gold and green. 

This is pretty much the entire pull. I had an aqua print and a light coral at home. I couldn't find a turquoise I liked, but I knew I had two at home. After I got home, I deleted the aqua fat quarter you see on the lower left. I had another darker turquoise in the mix, too, but I rejected it as too dark for the quilt. The thing that thrilled me most was that each of the more complex prints had other colors from the pull in them. My favorite is that aqua paisley. This really just "happened" as these are from a lot of different fabric lines. As you can see my favorite fabrics are tone-on-tone prints, but there was just enough movement in the prints to satisfy me. For the zigzag feature in the design, I chose Kona Bone because it matched our bedspread.

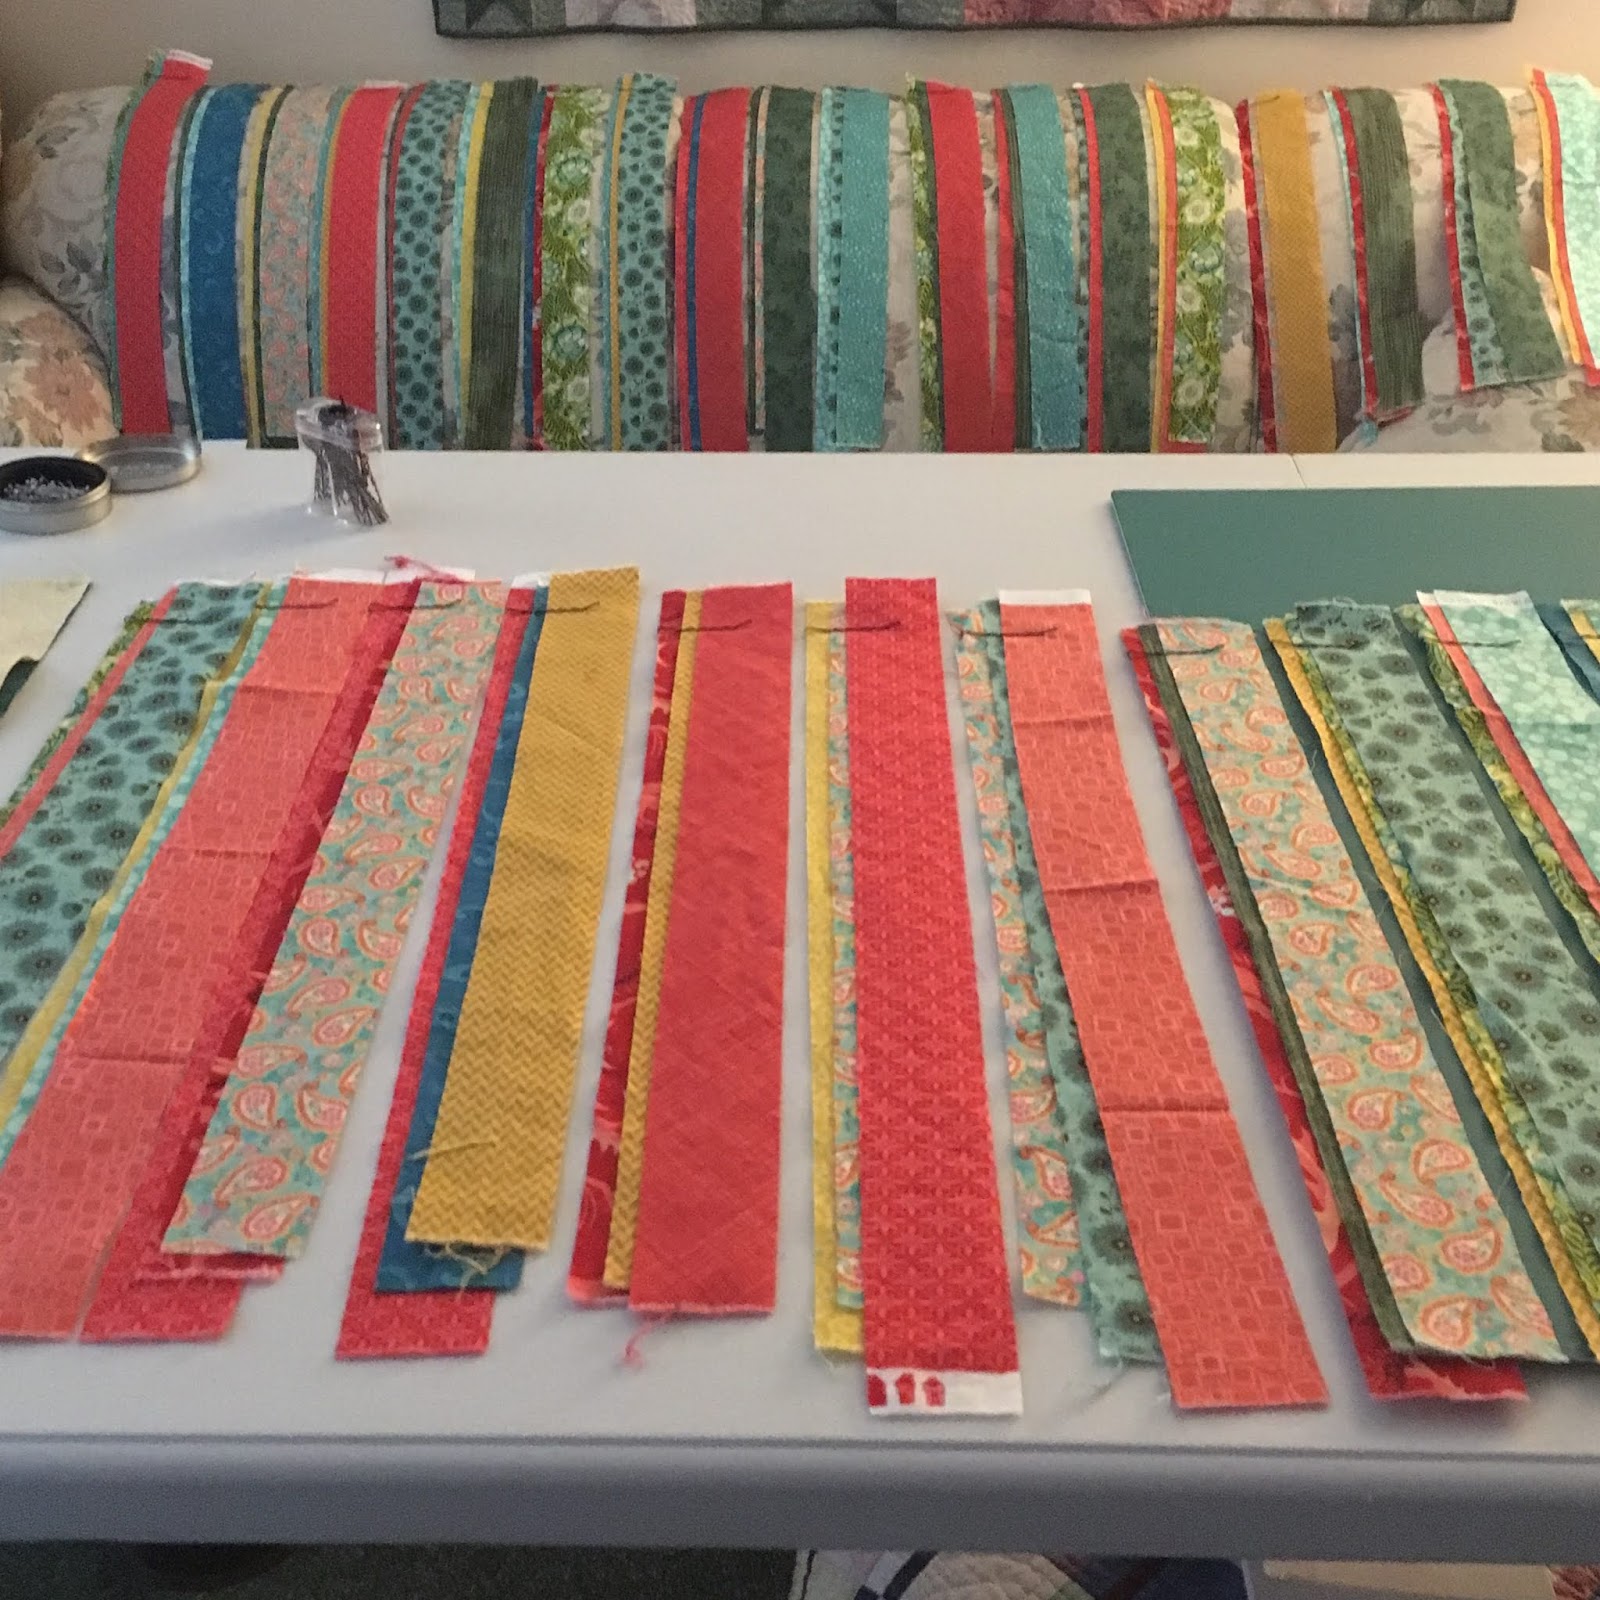
This quilt is built with strip sets, and laying them out to get varied combinations took a lot of space. I ran out of room on my banquet table and had to use my couch, too. Somewhere along the way, I figured out how many combinations of three you can make from 14 fabrics. Let's just say it's A LOT. (I can't find my notes, or I'd tell you)

To keep them all together, I used bobby pins. I had recently needed a couple of bobby pins for my hair. Of course, I had to buy a bunch because that was how they came, but they came in handy for this kind of project. I pulled out a few to keep in my vanity drawer, but the rest became a sewing notion. They are in this nifty little magnetic case. I love how you can make sewing notions out of all kinds of things.

I quilted the quilt sort of as recommended in the pattern, with squiggles in the zigzag area and mostly meanders with a few kinda, sorta flowers in the colorful parts. My rule was no picking out anything unless there was a major tension issue or pleats in the fabric. So there are some wonky stitches, but I don't care because we are wonky people and this is our quilt. Free motion quilting went fast because I could go from one end to the other without stopping except to change a bobbin. (So much to love about this pattern!) I used leftover fabric in strips for the binding, first laying pieces out around the quilt edge to make sure that a particular binding fabric didn't touch the same fabric in the body of the quilt.

Here are some close-ups of the front.


And my initials and date:

I chose to use Kona Bone on the back. Not sure exactly why--maybe a thought that a color would eventually crock onto the bedspread? Probably a ridiculous idea. Oh well. I didn't seem to have that worry when it came to the binding. Anyway, now that it's done, I love the back because it shows the quilting so well. 

Here's the back on the garage:

And some close ups:


So there you have it. But wait, how about some pictures on the bed?


I love how it looks with our green walls--and it's just the pop of color we need. I have some fabric left (there are a lot of cut-off edges as well as some extra triangles), so maybe a throw pillow is in the future--but don't hold your breath waiting.

Here are the stats:
Pattern: Gently Down the Stream by Christina Cameli. The pattern was in a magazine, but I think you can purchase it from her. I made my version longer and narrower.
Fabrics:  A variety (sorry, I'm not good at keeping track of them) plus Kona Bone.
Batting: Hobbs Heirloom 80/20 
Thread: Superior-- Masterpiece in Granite for piecing; King Tut in White Linen for quilting; Treasure in Old Lace for hand stitching binding.
Binding: 2 1/2 inches cut, double layer, machine sewn to front and hand stitched on back
Size: I forgot to measure (or maybe write down) the size before quilting; 83 1/4 inches by 27 5/8 inches after quilting. I don't plan to wash it until it needs it.
Machines: Singer Featherweight for piecing; Singer Treadle 115 for free motion quilting.

I learned one big thing with this quilt. If it's going to take a long time between start and finish, keep all notes in one good place so you can find them later when you want to write about it. Of course, that doesn't guarantee that I'll know what the notes say, as they are usually a kind of stream of consciousness/problem solving indecipherable scratch. 

We put the quilt on the bed last night. It felt good to have that extra bit of weight at the end of the bed. There is a mysterious elf at our house that often pulls our blankets off the bed--almost always on my side. Hmm. Well, that runner seemed to stay on the bed most of the night, but did slide off sometime in the wee hours. I'm blaming the elf. At least the bed looks pretty during the day.

It seems that no modern blog post would be complete without one of those swirl glamour shots, so here it is!

I'm linking up this week with Sarah of Confessions of a Fabric Addict for Can I Get a Whoop Whoop and  Wendy of Wendy's Quilts and More for Peacock Party.

Have a good week. And if you are in the US, have fun preparing for Thanksgiving.

(I'm not affiliated with any company, so when I mention products, services, or stores I'm just documenting what I used or liked.) 


Thursday, November 7, 2019

My Last Quilty TBT

Here we are at what I'm pretty sure is my last Throwback Thursday quilt post. So let's get right to it. I made this one for my daughter and son-in-law in, I think, 2006, about a year after they got married--sort of a first anniversary gift, I guess. For some reason I had no photos of it and didn't think of it until just recently when I was searching for photos for my previous TBT post. So I asked my daughter to take some current photos, and while she was doing that, she came across an old one she had taken. Here is the quilt on their bed in 2009. I think my daughter might have been sentimentally taking photos as they were getting ready to become homeowners.
The quilt is based on colors that were popular at the time in an upscale home decor store, so I've always thought of it as the PB quilt (initials of the store). Although I have no photos of my own, I did find some documents on my computer of some of my plans for the design and color arrangement. It seems that I downloaded some graph paper and painstakingly colored in the squares using my paint program on my computer. Yipes! I'm not even sure how I did that. Here are some of my ideas:


I'm pretty sure the one on the left in that last picture is the final design. 

Here are some photos of the quilt in their current bedroom:
She had to dig it out of storage, so it's a bit scrunched up. It now only lives on the bed under their current quilts in the winter when it gets really cold. 
Here's a close up so you can see some of those tone-on-tone fabrics better. And you can also see that I tied it with pearl cotton. I was not yet retired back then and had no time to quilt it. I was only doing hand quilting at the time. They would probably still be waiting for it today if I had quilted it. I don't know the exact size, but it fits a queen sized bed, and the last time I hand quilted a quilt that size, I think it took 17 years. (There's a TBT post about that other quilt somewhere on this blog.) The back of this quilt is off-white--probably a good quality muslin. I'm certain that the batting is polyester given the distance between those ties.

This is, as far as I can tell, my 52nd quilty Throwback Thursday, a series of posts I have devoted to the quilts I made--or quilted--before I started blogging sometime in 2014. During that time I have documented at least 174 quilts--all the ones I could find photos for. There were a few more quilts along the way, but those were either exact duplicates or ones that slipped away from me without any documentation. I started this series in October 2014 when I found a blogger who was featuring TBT posts. Alas, the following week, she disappeared from blogland. For a few months I linked up almost weekly with another blog (Kelly at My Quilt Infatuation, which is still going strong), but that didn't feel quite right because the quilts featured on that blog were new ones. In the fall of 2015, I found Jenn at A Quarter Inch from the Edge, and I linked up with her monthly TBT linky party until life caught up with her in the fall of 2016, and she discontinued the party. I took a TBT break until January 2018, when Sandra at mmm! quilts revived TBT the first Thursday of the month. She now shares the hosting of the party with  Andrée at Quilting and Learning. So a big thank you to all of these women, and especially Sandra for reviving TBT. 

I have a real sense of accomplishment completing this documentation of old quilts. Looking back, I see that I used to write often about one quilt at a time. As my blogging rate tapered off, I started grouping quilts.There were some posts that wrote themselves--the ones where there was a poignant, or at least interesting, back story. Others relied on details and statistics because that was really all I had. Anyway, if you are new or newish to my blog and are interested in my old work and previous TBTs, just click on the "throwback thursday" label on the right side bar or at the bottom of this post. I think that will take you to most, if not all, of them. 

Again, thanks to the wonderful bloggers who have made these TBT parties possible. I'm linking up today with Sandra at mmm! quilts, where you will find her ALWAYS fascinating TBT blog post (really, she has total recall of the quilts she made before blogging and great photos) and the link party for you to share your own pre-blog quilts if you can. Even if you don't have any to share, be sure to read about the others at the party. 

I'll be back soon with more on my current projects. Until then, keep quilting!


Saturday, October 26, 2019

Black Crumbs and Other Scrappy Fun

Ooh, just realized it's the last Saturday of the month. I've had these little patches done for a couple of weeks but no time to blog. Anyway, here they are--the last of my rainbow crumbs for Rainbow Scrap Challenge 2019. I don't have a lot of blacks in my stash, especially when I left out most of the tone-on-tones that looked mostly solid, so these crumbs are a bit repetitious, but that's okay. There are some interesting prints. The photo's not great. It's very dark in the house today, so I put took these in front of the slider door to the deck.
Here's one with some of its friends and the background fabric (in the upper left) that will be the sashing. 
These will get trimmed down to about 5 inches (or 5 1/2 if I can manage it) before sashing. There are 48 blocks in all. 

I hope to finish the RSC19 quilts by the end of the year, but that may be pushing things a bit, as I have some other things going. 

I have been sewing, but one project I can't show right now. It's so hard not to share, but all will be revealed eventually. I can show you a bit of a squirrel that crossed my path this month--well, not literally, although that does happen from time to time. And it fits in with this post as it is a scrap project. Mostly. In the middle of it, I ran out to buy one tiny bit of fabric--the yellow one with large gold dots on the left--because I felt like it needed something a little more dramatic than I had on hand.

Here's what part of the process looked like. I drew a pattern on graph paper and then made templates from freezer paper using techniques I learned from Ruth B. Mc Dowell's books. This is my favorite kind of piecing--like a puzzle. And this one has the added dimension of a flap for the central vein and stem. I think I'll add more blocks from time to time with other leaves, flowers and natural elements, but I don't have a real firm plan at this point.


So that's it for this week (month?). Today, a great big squirrel dropped into my inbox in the form of a pattern and request from my daughter for a Christmas Tree skirt. Ooh, part of it is foundation pieced! This is just in time, since I can't share the other project I'm working on. 

I'm linking up this week with Angela at So Scrappy for ScrapHappy Saturday and with Cynthia at Quilting is more fun than Housework for Oh Scrap. And since there is a little squirrel here, I'll also link up with Sandra's next DrEAMi (Drop Everything and Make It) party at mmm! quilts

I hope you're having fun playin' in the scraps.

(I'm not affiliated with any company, so when I mention products, services, or stores I'm just documenting what I used or liked.) 

Saturday, October 5, 2019

Brown Bits, Etc.

The past month has been full of activities--so full that I haven't been on social media as much as usual, which is fine, except that I have not been good at responding to comments or at browsing blogs. So, if I haven't commented on your blog or acknowledged a comment from you, I am so very sorry. I haven't done much quilting either--so no squirrels or throwbacks. Oh, well. I do have a few things I can share. One of them happened this week! The color of the month for Rainbow Scrap Challenge is darks--browns, blacks, grays. I've been waiting for this month for so long. My butterflies needed bodies, and I knew my big stash of browns was ready to meet the challenge. I made 56 little bodies, which took longer than you might think because I had about 25 different pieces of fabric to cut into. They are done. And not only that, but I sewed them to the wings of my butterflies, AND I sewed the background triangles to complete the blocks. Here are just a few of them.

I'll share the rest after I get the whole thing together. I love how they look with the green dotted background. I always think of brown as an old-fashioned color--the age of the scraps I used confirms that, I think. Many are from the mid-80's. But really, brown looks so neat with any bright color. I especially love it with turquoise. Maybe sometime I need to feature it more in a quilt. Anyway, these little blocks are done. Now I have to figure out why on earth I decided to make 56 of them. My original plan was to make 48 for a quilt about the size needed by my usual organization for quilt donations. Was I going to put some on the back? Should I cut them down smaller? (There's enough excess to do that.) Should I keep them big and donate to an organization that needs a bigger quilt? I just don't know. I will have to ponder this a bit while I make my other blocks for RSC this month. (Black crumbs!)

Meanwhile, I did a little quilting on my Hollyhocks quilt. 

This is a really long-term project that I pull out on vacations. It's the perfect take-along hand work project. I'm quilting texture into the background. 

The stitches aren't real visible, but the texture is luscious. And because it's just stipple quilting, there's no marking. I'm up to the border now, so I cut some scrap fabric that I pin onto the backing so it will fit into the hoop.
For the interior part of the quilt, I used hot pink thread because I had it and it is the same color as the hollyhocks. For the border, I'm using some leftover variegated blue to amuse myself. I don't know if I have enough, so I'm using it on the upper half or two thirds of the border--kind of like sky. These won't show that much, but it's fun to use up the thread. Actually, the back is looking pretty interesting because it's a more solid fabric so the stitches show a lot. Again, just amusing myself. This will never show on the wall.
I can't end without sharing a few photos of where this project went with us last week. We stayed in a little house in Rogers City along Lake Huron in northern Michigan. There is a gorgeous bike trail there that goes along the lake to a state park and a lighthouse. There is also a waterfall a few miles away, and two more lighthouses a short drive down the coast. Our house had a lake view (lots of ship watching) and was right on the bike trail. Here is a sampling of photos. Such a beautiful area.


40 Mile Point Lighthouse
Of course, I have to share a photo of one of the sewing machines there.
New Presque Isle Lighthouse (1870)
Old Presque Isle Lighthouse (1840) The cottage is not as old.
A peek at a quilt through the cottage window. (It was closed while we were there.)
Ocqueoc Falls. We went here three different times. There is a stone amphitheater to just enjoy the view. One day we saw salmon trying to jump the falls. 
So many natural wonders along the hiking trails. There is a tiny scallop along the edge of these mushroom tops.

A bit of color
And always the Lake...


So much inspiration.

Even though this post is short on scraps, I'm linking up this week with Angela, the host of RSC19, at So Scrappy for ScrapHappy Saturday and with Cynthia at Quilting is more fun than Housework for Oh Scrap, just to keep you up-to-date on my scrap projects.

Just one more photo of my favorite season, now that we are back home. I hope you are having a beautiful month.