Thursday, June 9, 2016

Bring on Summer

There is a dark hallway upstairs in my home where I alternate a couple of quilts for a little spark of color. And recently I made the switch for the summer to this little number. Just in time too. It was in the mid- to upper-80's all week! A little over the top if you ask me. (Luckily, this week temps are down to a comfortable range again.)


I'm not entirely sure when I made it. It's from this magazine from March 2008,


which I think I bought in preparation to make a quilt with photos printed on fabric, so I probably made it that summer. In the magazine, there are a lot of great patterns for memory quilts (well, duh, it says that right on the cover). I did use the tips in it to make a memory quilt, but I also liked this pattern by Shelly Burge.


In fact, I liked it so much I tried to pretty much duplicate everything, including the fabrics. It's a nice combination of paper foundation piecing and large scale piecing. I was particularly taken with the gradations in the background. 

After years of hanging the quilt from a sleeve (messily) sewn on the back, I decided to add the (messily attached) tabs that continued the gradations of the sky. (I actually had just enough of the right scraps in my bins to do that.) I'll show you the back if you promise not to judge my sleeve- and tab-making more than I already have. 
It looks dirty, but that's just from a yellowish light nearby.

This is the pattern where I learned how to do a faced binding. I really enjoyed that and think it's time I do another one of those. 

The quilt measures 28 1/4 inches long (31 3/4, if you include the tabs) by about 31 1/2 inches wide. It's hand quilted with a polyester batting. 

I liked making this quilt so much that I immediately (if not simultaneously) made another quilt just like it for my daughter's office. I'm a little less enamored of it now, but it is fun to hang for the summer. My daughter's also tired of hers, so I've been making her another quilt to replace it. The project is a little stalled out right now. Got to do something about that.

Before I go, here's a little close up:


Whew! This must be the shortest TBT post I've ever written. Oh, well, I've got lots of other things to attend to which I'll share in due time. I'm linking up today with Jenn at A Quarter Inch from the Edge for Throwback Thursday. Go there and see the other oldies but goodies. And have a great weekend quilting in your little neighborhood!

Tuesday, June 7, 2016

True Kona Story

No sewing to show this week. We took time off from our everyday lives last week to do daycare for two of our grandkids. So. Much. Fun. We played and played. We celebrated our granddaughter's half birthday. With cake and 4 1/2 candles! (How did she get to be that old already?) Our grandson seemed to have a new word every minute and kept us in stitches with his physical comedy. Eventually, we had to come home. Sigh. Good thing we have Skype. 

This past weekend, I started planning the colors of a new quilt using my Kona card. You know that I made my own Kona swatch book a few weeks ago. But I don't have a wide range of fabrics, and my book is kind of limited at the time. So I used the card. You know how those Kona swatches are glued down, and you try and try to figure out the subtle differences between the colors so you can pick just the right one? Sure you do. I love my Kona card. But I don't want to mess it up by bending it to make close comparisons, so I pretty much spent Sunday off and on squinting, picking colors and then second guessing myself and starting over and generally driving myself crazy. 

Now I know that lots of quilters cut up their cards. Many a time I have been tempted to cut up mine. But you know, I backed out every time. It's kind of like cutting into a favorite bit of fabric. Finally, before I went to bed, I decided that I just had to cut up the card the next morning. Then I remembered that Lara over at Buzzinbumble.com was having a final post for her month-long blog hop celebrating her new book, so of course, I had to check it out before I logged off the computer. And then I squealed. There in the post was my name paired with a giveway: A KONA COLOR CARD!!!  Right then I knew that I could have my cake and eat it, too. (Is that old phrase even used anymore?) Monday morning, I happily cut up my card. I'm going to mount the chips on a board with velcro and then keep the card from Lara nice and neat for reference. Once my chips were cut, I figured out my quilt colors with only about 15 minutes of auditioning. I can show you a few of the chips from the card, but the color decisions for the quilt are a secret for now. Sorry.


If only I had read Lara's post earlier. Second sigh this post. 

Today, I spent a good chunk of time pressing a zillion eighth-yard cuts of fabric. It was a chilly day, so I didn't mind working with the iron. Can't show you. Now I'll start cutting fabric while I wait for my Kona order to come. 

The other thing I did this past weekend was plant my flower pots. We usually do that on Memorial Day weekend, but we knew that we'd be gone for several days and that no rain was predicted. To avoid coming home to parched flowers, we waited until we came home from daycare. I got the flowers planted 15 minutes before it started raining. Yea! 

So because I have only one fabric/quilt-related picture to show you, I'll finish with some pictures from the garden. And you'll see that Eldin the painter has been at it again. (If you read my blog regularly, you'll get this. Maybe he needs his own label?) We have a lot of sort of floppy perennials. This year I decided to be proactive in helping them stand  So I bought tomato cages and put them over the plants as they emerged. I wanted colorful cages, but because they cost 4 times as much as plain metal ones, I bought the cheaper ones, and Eldin helped me pretty them up with some old spray paint. Also, our hummingbird feeder hasn't done a very good job of attracting birds, so I bought a metal pail, and Eldin painted that, too, so I could hang some flowers instead. 


Okay. Time to go. I'm linking up this week with Freemotion by the River and Sew Fresh Quilts for their linky parties. Buttons are on the right side bar. 

And Thursday I'll link up a post about an old quilt with A Quarter Inch from the Edge. Really. I was going to last week, but Jenn was taking the week off to go to a quilt camp. (The nerve of her!)

I hope you are having a great week whether you're sewing, quilting or picking colors!

Tuesday, May 31, 2016

Ruler Keeper

I bought some fabric last week. No, that's not true. I bought a lot of fabric. But I can't show it to you. Not yet. So instead, I whipped up a little project to complete my closet makeover. I took pictures as I went, not really knowing just how it would end up. Interesting: when I make quilts, I'm more of a planner, but these little projects are my kind of improv. I like how it turned out, so I'll show you how I did it. 

When I was cleaning out my closet, I decided to put up some hooks to hang my rulers on the wall. Most of the rulers had holes in them for hanging, but a couple didn't. I could have drilled holes in them, but that would have been too easy. (Or maybe not. I might have split them.) And I wouldn't have made this little ruler keeper, used up some stash and had something to show you. Here it is: 


And from the back:


Now, if you just want to see how it looks in the closet with the rulers, you can skip to the end. But here's how I made it. It's in three quilted layers, starting with the back layer.

Back layer
First I cut the backing: a little over 26 inches by a little over 8 inches wide.
Then the front: 26 by 8 inches, but I was working with limited fabric amounts, so I cut one piece 12 1/4 by 8 inches and one piece 14 1/4 by 8 inches and sewed them together. 


Middle layer
Backing: a little over 16 inches by a little 8 inches wide.
Front: 16 by 8 inches (but again, I was working with smaller pieces, so I cut two pieces 8 1/4 inches by 8 inches and sewed them together. 


Front layer
Backing: about 10 inches by 8 inches wide. 
Front: 10 by 8 inches.


I cut batting pieces the size of each backing piece then layered each layer and quilted them. 

I used my walking foot for the back layer to make lines about 3/8 inch apart. 


For the middle layer, I tried some FMQ that I hadn't tried before (leaves on stems and feathers) on the lower half. Don't laugh. It was pretty awful. I learned the value of practicing the design with pencil first and what happens when you don't do that. But it didn't matter because no one will see it! I did little stipples in the top half.


For the front layer, I scribble quilted around the floral design.


Here's how that layer looks on the back--but no one will see it.

I trimmed everything up nice and square. Then I put some binding on the top edges of the middle and front layers. I cut 2 strips 2 1/2 inches wide by the the width of the layers. I turned up a long edge leaving about 1/4 inch and pressed it, then sewed each strip on a layer using Edyta Sitar's binding method. (Thank you for this idea, Lara!) 


Then I topstiched them twice to firm up the edges. 


I laid everything out to make sure it would all fit together well. 

But before binding it, I stitched the middle and top layers together down the middle to make two separate pockets on the front. 


Then, one more thing: I cut two 3 1/2 inch squares, folded them into triangles and laid them on the back for hanging. 

I cut binding from 2 1/2 strips of fabric and again used Edyta's method. Because my strips were pretty wide, the binding on the back is fairly wide but it gives good body. I handstitched the binding to the back. I was going to hang the ruler keeper with a bamboo stick on a hook, but the hook made the binding bump out. So instead, I took a length of ribbon, tied it in a bow, slip knotted it to the bamboo stick, and hung the whole thing from the ribbon. 

Here's how the ruler keeper looks in my closet with the rulers in it as well as my batch of bamboo sticks that come in handy for everything. 


I think my closet is done for now. Soon I'll do a separate post of the finish.

I'm linking up with Freemotion by the River and Sew Fresh Quilts for their weekly Tuesday and Wednesday linky parties. Buttons are on the right.

Have a good week. I hope you've tried a little project to make your life a little prettier, even if it was more complicated than it needed to be.

Oh, and tomorrow is Throwback Thursday over at Jenn's A Quarter Inch from the Edge. Yippee! Remember to share something from your pre-blogging days.  Oops! Throwback Thursday isn't until next Thursday this month. Sorry. That will give you another week to find something to share!


Sunday, May 22, 2016

Hands2Help Finishes

When I decided to join the Hands2Help challenge hosted by Sarah at Confessions of a Fabric Addict, I knew that I would use a group of charm packets I had "won" in a giveaway from Moda. (You can read that story here.) What I didn't realize until I started planning the first quilt was that I had plenty of charms to make two quilts--with more to spare. The charms were from a lot of different collections, but they coordinated well together with similar vintage-y looks and colors and a good spread of values. 

For the first quilt, I included charms with floral motifs and then filled in with other patterns. I did not pay much attention to color, but focused on dark, medium and light values, and I named the quilt Old Fashioned Values because--well, vintage and color values. The pattern is based on Flower Patch Quilt by Kathryn Ludowese.


Even a light breeze makes a quilt into a sail. I fought it with hangers attached to the bottom of the quilt. Not too classy, but they did the job. 


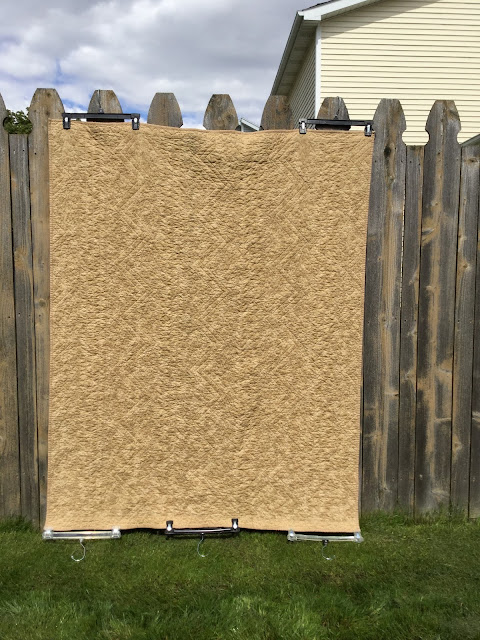
If you look closely at the back, you can see narrow strips of another fabric at the top and bottom of the backing. I wasn't planning on making pieced backs for these quilts because I knew that my time for making them would be limited, so I bought one length of fabric for the two quilts. I forgot to compensate for shrinkage when I pre-washed it, though, so it was about four inches too short. I happened to have some fabric in my stash that was a good match. So this backing got just a bit of unplanned piecing, but it all worked out fine in the end, and I was able to use up some stash. Always a good thing. I used a combination of walking foot quilting and FMQ. I even learned how to use the guide bar thingie that came with my walking foot to help space the lines. I really like how the alternating lines and meanders look together--and they show up nicely on the back, too.

For the second quilt, I bought a light print to use as a background for the remaining charms, then pieced them randomly. After I put them up willy nilly on the design wall, I decided to try a gradation of values from very dark in one corner to very light in the opposite corner. I spent a WHOLE DAY arranging and rearranging and generally driving myself crazy taking picture after picture to view in grayscale. In the end, I decided that I just didn't have a good variety of values left to make it work, so I went back to the random layout.  I'm calling this quilt Leftovers! After I made it, it occurred to me that the general design--especially the layout I was trying with the values--is similar to Pocketful of Sunshine by Sandra at mmm! quilts (the pattern that got so many downloads on Craftsy). I told her I was unwittingly channeling her! So, yeah. Sandra is my inspiration for this one. 

I worked really hard to make widely spaced meanders (not like my usual denser quilting). I like how soft the quilt feels with less quilting. I also confirmed with this quilt that I prefer quilting away from myself (pulling the quilt toward me) when I can. I can see what I've done, and I don't put as much drag on the quilt as I pull it around. 


Now, don't go away yet. There are more pictures to share. I usually take pictures of quilts on my neighbor's fence, but it slopes downhill a bit, which makes things a little wonky, and it's getting boring. So I am determined to find and use more attractive locations. This past week, I ventured out beyond the confines of my backyard to visit our neighborhood sledding hill for a photo shoot in nature. I'll show those pictures in a minute. But first the details for these quilts: 

Old Fashioned Values Quilt
Size: 68 by 54 1/2 inches before quilting 
         67 by 53 1/2 after quilting 
         63 7/8 by 51 7/8 after washing/drying

Batting: Warm and Natural
   
Leftovers! Quilt
Size: 69 by 57 inches before quilting 
         67 by 56 after quilting 
         64 1/4 by 53 1/4 after washing/drying

Batting: I'm not sure. I'm pretty sure it was all cotton. I bought it off a bolt awhile ago thinking it was Quilter's Dream Select, but I'm not sure it was. It was harder to quilt than the Warm and Natural--my needle seemed to have some trouble piercing little "knobs" across the surface. It does have a good drape and feels a little spongy--in a good way. 

Sashing: 2 inch strips (1 1/2 inches finished), tan-on-white vine print from Joann (no info on selvage).
Borders: 2 1/4 inch strips (1 3/4 inches finished), same print from Joann.

Both Quilts  
Machines: Singer Featherweight for piecing; Singer 115 treadle for quilting

Thread: Superior Masterpiece in Granite for piecing. Superior King Tut in White Linen for quilting. 

Collections of Moda charms: 
Collection for a Cause Mill Book Series circa 1889 by Howard Marcus
Garden House by Jan Patek Quilts
Larkspur by 3 Sisters
Lizzie's Legacy 1850-1880 by Betsy Chutchian
Songbird Gatherings by Primative Gatherings
Southern Exposure by Laundry Basket Quilts
The Potting Shed by  Holly Taylor
Ville Fleurie by French General

Backings: Mostly a vine print by Fabric Traditions, plus a little extra unknown print from my stash for the shortage on the Old Fashioned Values quilt.
Bindings: Unknown old print from my stash (leftover from a quilt I made for my son-in-law when he was in college).


Okay, more pictures. After all, they'll be all I have left after I give the quilts away.


It doesn't look like it, but that's quite a big hill for sledding.

Play structure at the top of another hill.


I'm still learning how to display the quilts, but it was a fun photo shoot, and now I know I'll be on the lookout for other places to record my quilts.

I am truly grateful to Moda for sending me these charms. At first I didn't think they were my style, but I really had fun sorting them by value and motif, and now that the quilts are done, I like them! A lot! I don't have much experience sewing with charms and wasn't sure I'd enjoy it. But I was impressed with how neat the tiny pinking on the edges stayed through a LOT of handling. I would definitely sew with charms again. 

These two quilts will be on their way to give comfort and hope to patients through Happy Chemo. 

I'm linking up today with the Hands2Help linky party at Confessions of a Fabric Addict, and the rest of the week, with My Quilt Infatuation, TGIFF, Free Motion Mavericks, and Crazy Mom Quilts. I'll add the links as the week progresses. Buttons for most are also on the right sidebar.  


Confessions Of A Fabric Addict

Have a lovely week, no matter who you are quilting for!

Tuesday, May 17, 2016

Swatches

I'm sort of between projects this week. I just finished two quilts, but I'm not quite ready to share them. I did venture out beyond the confines of my own yard to take pictures of them, and I'll have a post up on the weekend. My next big project will be some secret sewing that I can't share for quite awhile. I do have a wall quilt that I'll work on in the meantime, and I hope to also have some other little projects that I'll be able to blog about for the next month or so. 

At loose ends today, I tackled a little project that I've wanted to do for some time. Homemade swatches. I have a Kona color card, which I love, but I wish that I could move the fabrics around. I know there are nifty ways to cut up the card and mount the little swatches, but I just wanted to do something quick. I also wanted bigger swatches. So today I went through my Kona bin (there are also a few other solids in there) and cut squares of about 4 1/2 inches. Then I pinked the edges and labeled each square with the brand, color name, and color number (if it was Kona) using a permanent marker on light fabrics and a white colored pencil on the darkest ones.


I probably should have pressed my fabrics, but I was in the making zone and couldn't be bothered. I tried using a paper puncher to make holes in each square, but it jammed, so I traced the circles and then just cut the holes with sharp embroidery scissors. So far they are pretty crisp. If they start fraying, I'll put some Fray Check on them.


I cut front and back covers from scrap template plastic (only one shown here) and two card stock flyleaves (only one here) for my little swatch book. 

Then I loaded up my swatches onto a jump ring I found in a junk box. (Kind of wish I had pressed those fabrics.)


Here's how the book looks with the swatches fanned out:

And here it is closed:

I suppose I could decorate the front, but this works for me. The flyleaves give it a clean look, but they are also useful to place behind light fabrics when they're fanned out to ensure that the colors are true. 

This will be an easy swatch book to slip in my purse when I'm shopping or for general planning at home. I only have about 30 solid swatches right now so the 1-inch jump ring worked out fine. If I add a lot to the book in the future, I'll need a bigger one. But hey, this one was free and now my junk box is a tiny bit less stuffed. 

I'm linking up today with Freemotion by the River for Linky Tuesday and tomorrow with Sew Fresh Quilts for Let's Bee Social. (Click links here or the buttons on the right.) I'll be back on the weekend to share my finishes. (If you want a sneak peek, click on my Instagram link on the right.)

Have a great week with your quilt related projects--big or small.