Friday, June 30, 2017

Sew-along Finish

A few months ago, Bernie of Needle and Foot announced a fun little summer activity--a sew-along to make a top. Yes, garment sewing! I know. I'm a quilter. Why would I want to sew a top? But I was all in. You see, before I was a quilter, I was a garment maker--as in, I made almost all of my own clothing. I learned to sew on my mother's Singer featherweight (now mine) during the summer between 7th and 8th grade--exactly 50 years ago. We were living in graduate student housing at Syracuse University in New York that summer while my dad was attending a math institute (or maybe it was early computing). Anyway, it was the perfect time to learn a new skill, and I loved it. I caught on pretty quickly to machine sewing, although I hated finishing work. When it was time to hem something, a garment could hang for several weeks before I got around to doing it. 

For the next five years, and then during summers when I was in college, the basement of our home was my domain for sewing projects. I would work late into the night--too late, really, working far beyond the time I should have quit. Almost always at some point I would run into trouble, and I was sure I had ruined everything. My mom would have to bail me out. It wasn't the sewing so much, but getting things to fit right. I never took classes to learn to alter patterns. That would have helped, I'm sure. But I was hooked on making my own clothing despite the challenges. When I went to college, I was assigned a roommate who also sewed. We both arrived with our machines, patterns and fabric. How neat that the housing office recognized this as a good match. She was a better seamstress than I, helping me through the rough spots with lots of tips and encouraging me to try patterns I would have otherwise shied away from. 

I kept on sewing clothing for several years after college--until I discovered quilting and realized that what I made didn't have to fit (except in a general way). I don't remember exactly when I finally quit making clothing for myself. Probably around the mid-80's. But in recent years, I've been intrigued by the apparent comeback of home garment construction. So, as I said, when the opportunity to sew along with Bernie came up, I was all in. 

I'll share one picture of what I made and then tell you a bit about my journey back into garment sewing and add a few more photos.

Doesn't that look comfy for summer? It is. I'm wearing it right now--it's supposed to be 85 degrees and humid today. Perfect.

Here's the pattern:

The sew-along was to make View C, but I decided to make View A (the yellow one) without the long hemline in back. I loved all those tucks! My first dilemma came on immediately. The pattern came in two different sets--one size XSmall to Medium and one size Large to XXLarge. Which size pattern was I? When I took my measurements (actual ones, not fantasy), my size fit most closely with Large (and if waist was considered, XLarge). Bernie mentioned that the pattern was roomy, so I decided to ignore the measurements, cross my fingers and go with Medium instead. Memories came flooding back. Even though I was toothpick sized and shaped when I was a teenager, patterns never fit quite right. Armholes were always too small and waistlines too tight. Was this pattern going to work? 

My fabric was a dream to cut and sew. It's Gossamer Wire Flowers in Twig by Sharon Holland for Art Gallery Fabrics. I bought it from Bernie, of course, through her etsy shop. My thinking was that if the top didn't work out, I could cut it up and quilt with the fabric. See, there is a quilt connection here. I even bought a little extra fabric for a future quilt. Looking back, a darker color might have been a little better for my skin tone, but I really like how the color works with both jeans and black yoga pants--pretty much my whole wardrobe. 

The first thing I noticed when laying out the pattern was the durability of the tissue paper. There seems to be a bit of a shiny coating on one side now that probably makes it stronger. It did slide around a bit, but I tamed it with lots of pins. Printed directions seemed to be smaller than I remember on the pieces. Oh wait, that's probably me. Aging eyes. There were fewer markings than I recalled for tailor's tacks, but I did make some of my own to mark fold lines just because I didn't have a marker handy. 

Thinking to save myself some time (as well as fabric for future sewing projects), I eliminated a seam down the back by overhanging the pattern.

Bernie talked us through the pattern, a little at a time, allowing a few days for each step. This relaxed pace was just right for me. No late night trying to obsessively sew it all at one time. First, I sewed the tucks and admired them. 

Next, it was time to check the fit and sew the side and shoulder seams. I pinned everything together and tried it on. Uh oh. The top was voluminous on me. I mean, it was a tent! All the memories fits about fit resurfaced. Looking back at the pattern picture, I could see it was meant to be flowy, and that was fine with me (most of my T-shirts are swing tops, which I love), but this was just really wide. I tried pinning the sides narrower, but it didn't help. So I did what I have always done when fit is a problem. I fiddled. First, I lengthened the tucks five inches--all the way down to my waistline to take up some of the excess fabric. 

And at the end of each one, I sewed a little diagonal line to keep the tucks flat. 

Next, I recut the shoulder seam and the back neck edge, along the size Small cutting line. I'm not sure why this helped, but I remember having to do that sometimes even with ready-to-wear clothing. 

After sewing the sides and shoulders with french seams (thanks, Bernie, that is a wonderful way to finish them), I attached the bindings (so fun, just like with quilting). I used the size Medium measurements for the bindings, which worked fine. I did recut the armholes a bit at the bottom to compensate for the amount I had taken them up when I redid the shoulders. 

Well, after all that, I tried on the top, and with all the fiddling I had done on the front, the back didn't feel quite right to me. It still felt wide. I have a large waistline, but I carry the weight all in the front. I tried adding ribbon ties to the sides to tie in the back and gather it up, but I didn't care for it. So I did one more tweak. Actually, five. I made darts in the back about 12 1/2 inches long. I started by marking a fold down the middle of the back. (Remember the seam I eliminated at the beginning? Ha. Now there are lots of seams.) Then I added two on each side of it about 2 3/8 inch away. The spacing wasn't really planned. That's just how far the second fold ended up, so I used that as a guide. I sewed the darts about 1/2 inch deep in the middle, tapering them to nothing at each end using my trusty sewing manual to help me remember how to do that. (It was a high school graduation present.)
 Here's how the darts look:

The last step (well, almost the last step for me) was the hem. Remember I said I used to put that step off? Well, I couldn't because, you know, sew-along. Time was ticking. But this is what is so neat. This hem was a narrow hem. All by machine, I'm not sure if I've done one of those before. So easy! No need to procrastinate. 

And then, I can't believe I did this. I took in the side seams even more to nip them in and give some final definition. I needed to be careful because the top needed to be roomy enough to slip my arm through and then over my head. I have the little issue of not being able to lift my left arm over my head due to a wonky rotator cuff, but it worked.

So do you want to see? Here it is!


And the back:

I'm so glad I participated in this sew along. Bernie's directions were detailed and her pacing was perfect. My top didn't turn out as I first envisioned it. I still had the same fits over fit that I had as a teenager (even with 50 more years sewing experience and nearly 50 more pounds than when I sewed those first garments). But it's still roomy and comfortable, and I love the tucks. The extended shoulder is just long enough to hide most of my scars from surgery but short enough to be almost sleeveless. Would I make a garment again? Well maybe. This one anyway. I'm still unsure about pattern sizes. It would seem that I'm about four different sizes. If I ever got serious about garment construction again, I think a dressmaker's form would be really helpful. But I made lots of notes so I could make this one again using different cutting lines. Perhaps a thinner more flowy fabric would have worked better for me, but I have to say the Art Gallery fabric is soft and smooth (not at all wrinkly even after wearing) and so cool and comfy that I'm glad I used it. I'm eager to see the finishes of the other sew-along participants and to read about their experiences. I think it's neat that I tried this exactly 50 years after I made my first outfit. It was a fun (sometimes frustrating, but that was historically typical for me) way to go down memory lane. And it showed me that what attracted me to sewing all those years ago--the details--still grabs me. 

Thank you, Bernie, for encouraging us to give garment sewing a try. I think I'll probably just stick to quilting though. No fit needed. Now that I've done this little sew-along, maybe it's time to consider a quilt-along?


I'm linking up today with Bernie at Needle and Foot. Of course! Do go there and see the finishes of other sew-alongers and maybe consider participating in the sew-along yourself. All the posts are up from the last few weeks. And please don't be deterred by my experience with my wonky sizing. I'm also linking up with Crazy Mom Quilts for Finish it up Friday (because it's a finish, for sure, and if I get tired of wearing the top, it just might end up in a quilt someday!)

Tuesday, June 20, 2017

The Grunge Quilt

You probably noticed that it seemed like I wasn't making much lately. That's because there was a bit of secret sewing going on. At the end of May a giant squirrel rose up in front of me in the form of the realization that my brother and sister-in-law were having an anniversary in June. An anniversary ending in zero. What to give them to celebrate that milestone? Well, of course, a quilt!! I had made them some tiny wall hangings over the years, but I hadn't made them anything bigger since the baby quilts for their girls in the 80's. Could I make a quilt in less than 3 weeks? Well, sure! If I didn't do anything else, like clean or cook, or--wait, I don't do much of those things anyway.

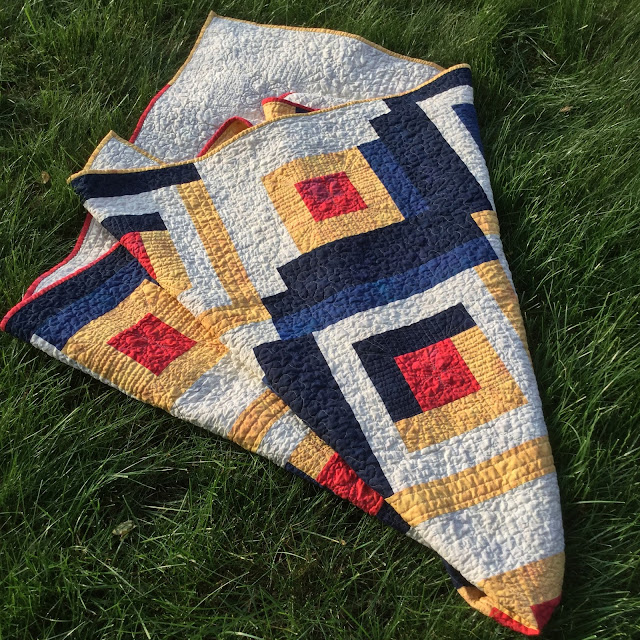
Now that my brother and sister-in-law have the quilt, I can share it. Let's look at some photos and then I'll tell you more. 
Helpful Hubby holding quilt. It was too long for the usual fence shot.


I knew that I needed to make a simple pattern due to the short time. I also knew what their living room furniture looked like and had some photos of family gatherings that seemed pretty true to color. They have a dark blue couch, golden yellow chairs and some red accents. Using my Quiltography app, I colored in the courthouse steps block in two different ways, going for a bold, kind of modern design. For the first time, I also used the yardage calculator on the app instead of trying to plan the yardage myself.

I went to the closest fabric store to see what I could find that would work. I was thinking solids to continue the scheme of the living room, but I wanted a little texture and was having a bit of a love affair with Moda Grunge fabric. I found exactly what I wanted in two different blues and a red. There was a yellow that was too light. But here's the neat thing. This store is a half block away from another fabric store, and when they buy fabric, they coordinate so that they have different colors of the same lines. The first store sent me over to the second store, where I found the exact shade of yellow I needed as well as a cream color that had some gray in it to coordinate with another living room chair. It was the easiest fabric search I have ever done. 

Here are the two versions of the block:


My initial plan was to make them 14 inches square but somewhere along the way, I went with 16 inches instead. This was supposed to be a throw quilt--now it's big enough to cover two people. But that's fine for an anniversary quilt, right? I added the lighter blue in random places and alternated the blocks in a 4 by 5 layout. When it came time to choose a back, I decided to go whole cloth instead of my usual piecing. I tried to find a floral or abstract print with all of the colors. I looked in all of the nearby stores and couldn't find anything. I did see a couple of fabrics online that might have worked, but I just wasn't certain--and then there was the whole problem of losing time waiting for the mail. So I went back to the second fabric store and bought the cream Grunge for the back--it was a wide backing, which really saved time. 

Here's a close up to show the quilting. 

Planning it really stumped me. I hadn't done much free-motion quilting since I broke my shoulder last year, but I didn't really want to do the whole quilt with my walking foot. I ended up using the walking foot for three parallel lines on the yellow strips and then did free-motion quilting for the rest of the quilt--meanders in the cream and blue areas, back and forth squiggles in the borders around the middles and free-form flowers in the red squares. I really wanted to do a vine with leaves in the blue parts, but decided that was really pushing it for my arm on a quilt this size. The squiggles and flowers are pretty wonky, but intentionally so. I knew I wouldn't have the greatest control, so doing it in a more folksy style was the solution. I did my usual initials and date in the lower right corner. I used two different thread colors, lighter in the cream and yellow fabrics and gray in the blues and red.


I love how the setting sun shows off the texture of the quilting.


The back ended up much better than I thought it would. I used a very thin cotton batting because I wanted a light weight, scrunched up quilt, especially since it was bigger than I had first planned. My machine was not thrilled with the batting. My needle sounded like a hammer on nails the whole time I was quilting. In addition, I may not have pulled the backing taut when I basted. The combination of unfamiliar batting for machine quilting, lackidaisical basting with an unfamiliar backing (wide back--different thread count?), and less than optimal control with FMQ resulted in some concerning puckers and pleats on the back. (Nevertheless, she persisted!) Aside from running my finger along the underside to check the tension from time to time, I stopped flipping the quilt to check the back because it was too discouraging. I just crossed my fingers hoping that washing would cover a multitude of errors in the end. And you know what? It worked. The puckering and pleating blended in to an acceptable degree, and I advised my brother and sister-in-law that if it shows up more over time, to just rewash and dry the quilt. I do love the scrunchy effect of the batting even though it was hard to quilt. It's just what I was hoping for.


For the binding I chose both the red and the yellow--partly because I only had enough red fabric left to cover a couple of sides. I brought the two colors about 8 inches around the corners so that I wouldn't have to splice in right at the corners to make the color change. 


Here are the stats:
Design: Courthouse Steps, with Quiltography app used to help plan and figure yardage.
Fabric: Moda Basic Grey Grunge in Peacoat, Regatta, Red (I think it is Rocacco), Elafin (yellow) and Creme. The Creme was wide back.
Binding: Rocacco and Elafin cut to 2 1/4 inches and folded. Machine and hand applied.
Threads: Superior Masterpiece in Granite for piecing, Superior King Tut in White Linen and Silver Bullet. Superior Treasure in Old Lace for hand sewing on binding.
Batting: Mountain Mist Cream Rose, cotton
Size: Blocks--16 inches square with 2 1/2 inch cut strips (finishing 2 inches wide) and 4 1/2 (4) inch centers.
Quilt: 64 1/2 by 80 1/2 inches before quilting, aproximately 63 1/4 by 79 inches after quilting, approximately 59 by 75 inches after washing/drying.
Machines: Singer Featherweight for piecing; Singer 115 treadle for quilting

Here are some closing thoughts:
1. Overall, I'm really pleased with the quilt, but I might need to have a stern talk with myself if I am tempted to make an almost twin sized quilt in less than three weeks again, and I would definitely check weather predictions. Not only was I racing an anniversary date, I was also racing to get most of the quilting done before a heat wave set in. (My quilting room is in the least comfortable room in the house, even with air conditioning.) Thankfully, the weather has settled down this week. I won't even complain that I had goosebumps writing this on the deck and had to come inside to warm up. 
2. I love the look and feel of Cream Rose batting. After washing, it is light and scrunchy. I used to use it a lot in hand quilted work. It was a bit much for my machine, though, so I would need to consider that for future projects. Maybe I need to figure out an alternative to topstitch needles for quilting with it. 
3. I love the look of Grunge as an alternative to solid fabrics. If I use the wide backing again, I may need to be more vigilante about anchoring it tightly when basting. 
4. I can free motion quilt again if I'm not too picky about consistency in my design. With time, though, I might improve. 
5. I was pleased with the Quiltography app for figuring yardage. It was generous without being over the top, and a real time saver. The app doesn't show how to lay out the fabric, of course, but that's understandable and okay. At least I had reasonable figures for how much fabric to buy.
6. I should probably stop calling this the Grunge Quilt. How about J and J's 40th Anniversary Quilt? That sounds better. But Grunge Quilt is accurate.

Okay one more photo. Here's the quilt in its new home:

I'm linking up this week with Freemotion by the River (Linky Tuesday), Sew Fresh Quilts (Let's Bee Social), Confessions of a Fabric Addict (Can I Get a Whoop Whoop?) and Crazy Mom Quilts. This will probably show up on mmm! quilts (DrEAMi--Drop Everything and Make it) at the end of the month. Buttons for most are on the side bar. 

If you'd like to see what I'm up to in non-quilting, check out my Instagram button on the sidebar. I'm making a blouse! Garment sewing in a summer sew along with Bernie over at Needle and Foot. Fun! And a real trip down memory lane. It's not too late to join!

Now it's time to tell the squirrels to go away. I've chased them a lot the last few months. I need to get back on track with my Deconstructed Coins quilt. Have a wonderful quilty week. 

Wednesday, June 14, 2017

Mini Board Storage

Lots of sewing going on here right now, but today I'm going to focus on organization. At the end of my last post, I showed you the neat gift I got from the Academic Quilter to kickstart my improved fabric storage system. Comic book boards! Well, I'm happy to say I've started using them. It's the perfect way to spend a few hours while watching TV (a great activity in the 90-degree heat we've been having). I even ventured out to a local comic book store for more boards. 

Since my storage needs are unique to me--but perhaps similar enough to yours for this to be useful to you--I thought I'd share what I've done. 

I have six drawers of a dresser where I keep my larger-than-scraps fabric. Most of the pieces are fairly small, but there are a few that are large enough to fit on comic book boards, which are about 10 1/2 by 6 3/4 inches. The typical way of using them for storage is with the long side vertical on a shelf. I won't go into the specifics of folding fabric here. You can read about it on this site or many others online. The shelf I want to store them on is only about 8 or 9 inches high. So I folded the fabric to store them with the shorter side vertically. The folding method is the same--I just adjust the folding to accommodate the board in the other direction:

Here's how a few fit on the shelf:

Because my drawers are fairly shallow, I cut the comic book boards in half for storing smaller pieces of fabric. I also bought a supply of plastic coated paper clips to neatly clip the fabric to the board. Those won't rust if the fabric stays in the drawer for an extended time period--likely!
The cut boards are just the right size to fit in my drawers with the short edge vertically. I try to fold the fabric so that raw edges aren't exposed:
Then I fold it onto the mini board in the usual way


and clip it with a paper clip to keep the edge in place.


If the fabric is narrow (such as an eighth yard), just fold it with the raw edges showing and clip the paper clip at the bottom. 
That's a little messy, but preferable to the mishmash I used to have in my drawers.
If the piece of fabric doesn't fit neatly on the board
I declare it a scrap and throw it in my scrap bin. That's new for me since my scraps are usually much smaller. 

So here's what I have so far:

Doesn't that look a lot better than this?
I have folded about one third of a drawer's worth of fabric. 1/18 of the way through. Good summer project. One thing I've noticed though. I'm really getting to know my stash, and these fabrics are OLD!! I'm hoping to get serious this year with some string piecing, so maybe lots of these will get used up. But I also think that some might be on their way (eventually) to a new home somewhere else. If I haven't used them in 30-some years, what are the odds I'll ever use them? Meanwhile, my drawers will be so pretty, I'll just want to admire them. 

This weekend I'm going to start a sew-along project with Bernie over at Needle and Foot. 

I haven't sewn clothing for myself in many, many years, but this blouse looks like a fun project, and I think it's neat that home garment construction is back in style, so here goes. Maybe as I share my progress, I'll share some pictures of things I made years ago. (I can't believe I wore some of them!!) So stay tuned. (I'll probably post about this mostly on Instagram.)

I also have a squirrel I've been working on, but this post is long enough, so I'll share that another time. 

I'm linking up with Sew Fresh Quilts today. Keep quilting! Or, maybe, try a garment. (And if you live anywhere near me, stay cool. I hear a cool-down is coming.)


Friday, June 2, 2017

Hexie Care Package

What do you call a project that interrupts a project that interrupts a project? I guess most quilters would call that typical sewing. But it does have me rattled. I kind of like to work on one project at a time--or at least one type of project. I might have a long-term one on the side (such as hand quilting), but I'm usually most comfortable working on a project until it's done. Until this year. I blame Sandra at mmm! quilts for her DrEAMi (Drop Everything and Make it) linky parties because for some reason, I keep interrupting myself to make something else. 

It happened again this week. I was working on a project that was already a "squirrel" (I'll share that one another day) and then I read on Instagram (madebychrissied) that the Manchester Quilting Bee is collecting blocks to make quilts for the families of victims of one of the most recent terrorist attacks. They are collecting 6 1/2 inch blocks with hexagons appliqued to them. You can read more about the project at the above Instagram account or at Manchester Quilting Bee (either on Instagram or Facebook). There is a template for the hexies as well as instructions for how to make and send them. The timeline is tight, but the project is easy. The hexie shape refers to the worker bee, the symbol of Manchester and now a powerful symbol of their unity in the face of this tragedy. 

I just had to stop my current project and make a couple of blocks. In past blog posts, I've talked about my need to contribute to these kinds of quilts, so you know how I feel about them and the way our quilting community all across the planet gathers in support of those who are suffering great losses. 

I had some honeycomb fabric as well as a piece of floral fabric with a bee-like creature on it. Because the two fabrics were of pretty much the same value, I used a dark turquoise as a background for better contrast, and pretty much improv-pieced the hexie. 
I could have pressed that better!!
Then, on a shopping trip I saw some fabric with bees on it. Actually, there is a lot of fabric out there right now with bees! I just hadn't been paying attention before. I used that with a bit of a black print from my stash for the other block.

Because of the overwhelming amount of work to make these quilts (there are 99 blocks in each!) the Manchester Quilt Guild has asked block makers to stitch their blocks together to help ease the task a bit, so before popping these in the mail I sewed a quick seam.


There are various collection sites for the blocks to make getting them to Manchester more efficient for people who live in other countries. You can read about that on the sites noted above if you are interested in making a block or more.

That kind of sewing, although unwanted, helped me focus my attention on events in our world and on how we are all connected. We must care for each other. My contribution is small, but I hope that the thoughts and prayers that went into it were significant. 

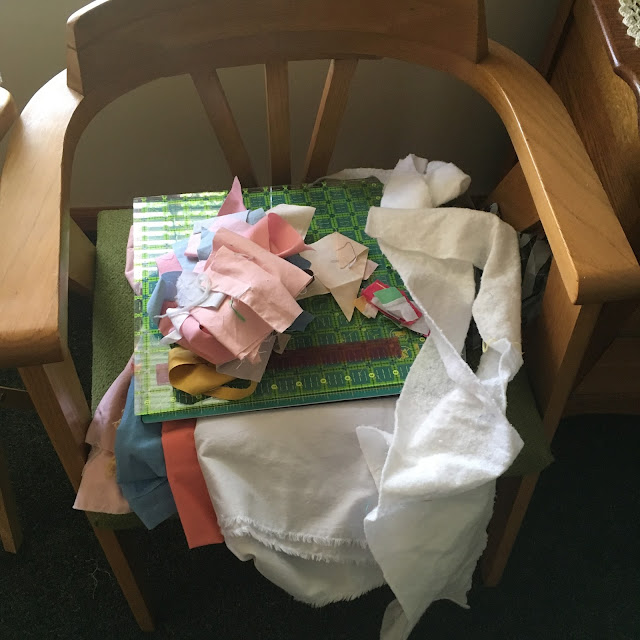
Now it will be time for me to clean up my multi-project mess and get back to other sewing. Here's what the banquet table set up in my living room for my current projects looks like today. No more room to do anything! 


And the chairs. Oh, they are for sitting on? Not for this quilter.


I'll clean this up tomorrow. Meanwhile, I have some happy mail to share with you. 

Mari, at The Academic Quilter recently wrote a blog post (well, lots of them, actually) about her organization of her sewing space. The post that really struck a chord with me was about storing fabric. She showed how pretty her fabrics were wrapped around comic book boards to keep them neat and lined up on a shelf. In response to a comment I made, she sent me some of the boards to help me jumpstart improvement in my own fabric storage. And she included a yard of fabric folded around one of the boards to demonstrate how it fits. Isn't that sweet?! The fabric matches a fat quarter bundle I've been saving for my next project (after I finish the current WIPs, of course).

My fabric collection is kind of different from that of a lot of quilters. I usually buy barely enough yardage to complete a project so most of my fabric is what many other people think of as scraps. I do have storage bins for my tiniest scraps, and that works well, but the rest of my fabric is odd sizes, many around an eighth to a quarter yard. I keep them in six drawers of an old dresser, stored on edge so I can see them. The problem is that after awhile they get pretty messy from my pawing around to get something and jamming them back in and then I start having problems opening and closing the drawers and this happens:
Three of the drawers: red/orange, yellow/multi, and blue
My idea is to pull out the few pieces that are large enough to wrap on a comic book board and store those on a shelf and then cut boards in half to wrap the smaller pieces of fabric and store them on edge in the drawers. I'm excited to give this a try. I will post pictures. There. I've said it, so now I'm accountable for following through. This will take awhile, and that's okay. Mari said so. So this gift from Mari is much more than comic book boards and a yard of fabric--it's the gift of organization. Isn't that neat??!

Okay, time to relax and catch up on correspondence. Whenever I get in the sewing zone I get so behind on responding to comments and looking at what everyone else is working on. 
I'm linking up with Crazy Mom Quilts for Finish it up Friday. I'm also linking up with mmm! quilts for DrEAMi even though technically this is a June finish instead of a May finish. By the end of June it will be past the timeline for the blocks for Manchester--and thus, old news for anyone who reads this and might want to take part. While you are at Sandra's site, be sure to check out the awesome caring quilt she made. And there are more pictures of it in her more recent post. 

Have a lovely weekend. Keep quilting. And keep caring.